在研究学习 Kafka 的各个网络组件之前,我们先从整体上看一下完整的网络通信层架构:
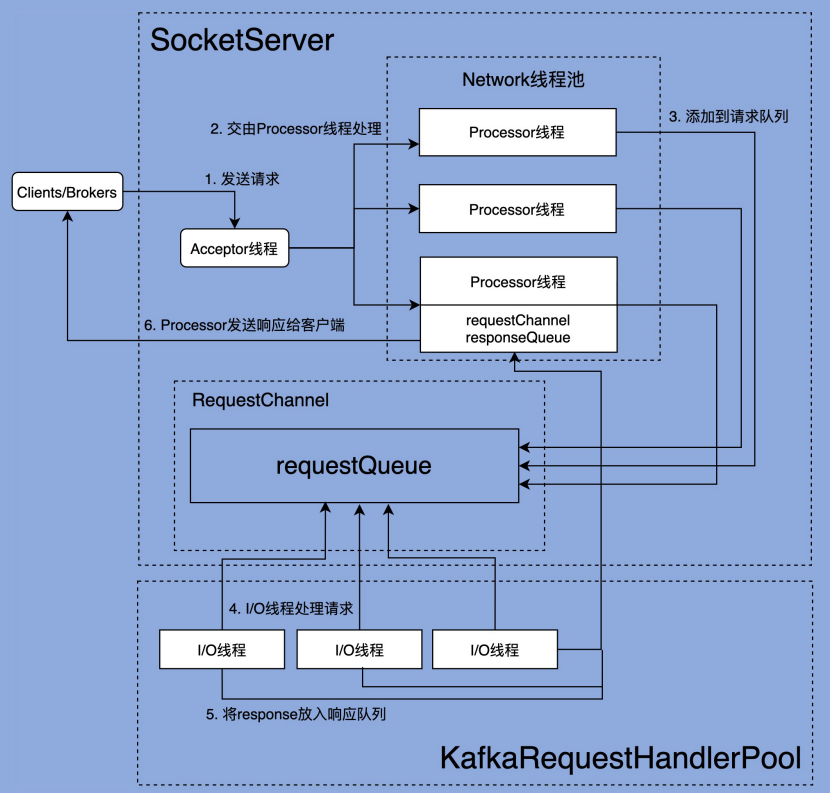
由上图可以看出,Kafka 网络通信组件主要由两大部分构成:SocketServer 和 KafkaRequestHandlerPool。
KafkaRequestHandlerPool 组件就是我们常说的 I/O 线程池,里面定义了若干个 I/O 线程,用于执行真实的请求处理逻辑。
SocketServer 组件是网络通信的核心,主要实现了 Reactor 模式,用于接收外部客户端(Producer、Consumer 或其他 Broker)的请求,并将请求分发给下游 I/O 线程,然后再将下游的 Response 返还给 Clients。
两者的交互点在于 SocketServer 中定义的 RequestChannel,他们通过 RequestChannel 中的 request queue 和 response queue 交换数据。大体流程是这样的:
- Process 线程会将客户端请求封装成 Request,放到 RequestChannel 对象的 request queue 中
- KafkaRequestHandlerPool 中的 I/O 线程会去拉取 Request queue 中的请求,处理完实际业务成后会将 Response 放到 Response queue 中,
- Processor 线程会拉取 Response queue 中的数据,返回给对应的客户端
SocketServer.startup()
在开始阅读组件的源码之前,还有一个东西需要先了解下。
Kafka 将请求类型划分为两大类:Data plane 和 Control plane。其中 Data plane 负责处理数据类请求,Control plane 负责处理控制类请求。目前,Controller 与 Broker 交互的请求类型有 3 种:LeaderAndIsr、StopReplica 和UpdateMetadata。这 3 类请求属于控制类请求,通常应该被赋予高优先级。像我们熟知的 PRODUCE 和 FETCH 请求,就是典型的数据类请求。
如果配置文件中配置了 control.plane.listener.name 参数,kafka 就会启动 Control plane,单独为控制类请求创建一套 Acceptor 和 Processor。否则,就只会创建一套 Acceptor 和 Processor,控制类请求和数据类请求就会统一用这一套来处理。
举个例子,假设一个 borker 的配置如下:
listeners = INTERNAL://192.1.1.8:9092, EXTERNAL://192.1.1.8:9093, CONTROLLER://192.1.1.8:9094
listener.security.protocol.map = INTERNAL:PLAINTEXT, EXTERNAL:SSL, CONTROLLER:SSL
control.plane.listener.name = CONTROLLER
在启动的时候,它会在 192.1.1.8:9094 以 SSL 协议监听控制面请求。
同时,它会在 zookeeper 上发布了自己的 endpoint:
"endpoints" : ["INTERNAL://broker1.example.com:9092","EXTERNAL://broker1.example.com:9093","CONTROLLER://broker1.example.com:9094"]而集群中的 controller 配置如下:
listeners = xxx
control.plane.listener.name = CONTROLLER
listener.security.protocol.map = INTERNAL:PLAINTEXT, EXTERNAL:SSL, CONTROLLER:SSL
Controller 通过自己的 listener.name 确定控制面监听器的名称是 CONTROLLER,然后在 Zookeeper 发现 Broker 的 CONTROLLER://broker1.example.com:9094 监听地址,再通过自己的 protocol map 确定协议是 SSL,就会使用该地址和协议与 Broker 建立连接。
下面是 SocketServer 的定义,可以清楚的看到,为两个 plane 都创建了 Acceptor,Processor 和 RequestChannel,需要注意的是,Control plane 的变量都用 Opt 包裹,意味着他们可能是不存在的(即没有配置 control.plane.listener.name 参数)
/**
 * Handles new connections, requests and responses to and from broker.
 * Kafka supports two types of request planes :
 *  - data-plane :
 *    - Handles requests from clients and other brokers in the cluster.
 *    - The threading model is
 *      1 Acceptor thread per listener, that handles new connections.
 *      It is possible to configure multiple data-planes by specifying multiple "," separated endpoints for "listeners" in KafkaConfig.
 *      Acceptor has N Processor threads that each have their own selector and read requests from sockets
 *      M Handler threads that handle requests and produce responses back to the processor threads for writing.
 *  - control-plane :
 *    - Handles requests from controller. This is optional and can be configured by specifying "control.plane.listener.name".
 *      If not configured, the controller requests are handled by the data-plane.
 *    - The threading model is
 *      1 Acceptor thread that handles new connections
 *      Acceptor has 1 Processor thread that has its own selector and read requests from the socket.
 *      1 Handler thread that handles requests and produce responses back to the processor thread for writing.
 *
 * Kafka 支持两个层面的 request
 *  - 数据面:
 *    - 处理来自客户端和其他 broker 的请求
 *    - 线程模型是:
 *      每一个监听器对应一个 Acceptor 线程,处理新连接。
 *      也可以配置多个监听器,只需要在 KafkaConfig 的 listeners endpoint 中用多个 "," 分隔即可。
 *      每个 Acceptor 线程有 N 个 Processor 线程,每个 Processor 线程都有自己的 selector,
 *      可以从 socket 中读取 request
 *      然后会有 M 个 Handler 线程来处理读到的请求,处理完后会再通过 Processor 返回 response
 *  - 控制面
 *    - 处理来自 controller 的请求。但是如果不在配置中指定 "control.plane.listener.name",
 *      那么两种类型的请求都会交由数据面处理
 *    - 线程模型是:
 *      有一个 Acceptor 线程处理新连接。
 *      Acceptor 线程有一个 Processor 线程的 ,Processor 有自己的 selector,
 *      可以从 socket 中读取 request
 *      有一个 Handler 线程处理 request,然后生成 response 通过 processor 线程返回
 *
 */
class SocketServer(val config: KafkaConfig,
                   val metrics: Metrics,
                   val time: Time,
                   val credentialProvider: CredentialProvider)
  extends Logging with KafkaMetricsGroup with BrokerReconfigurable {
  ......

  // data-plane
  private val dataPlaneProcessors = new ConcurrentHashMap[Int, Processor]()
  private[network] val dataPlaneAcceptors = new ConcurrentHashMap[EndPoint, Acceptor]()
  val dataPlaneRequestChannel = new RequestChannel(maxQueuedRequests, DataPlaneMetricPrefix, time)

  // control-plane
  private var controlPlaneProcessorOpt : Option[Processor] = None
  private[network] var controlPlaneAcceptorOpt : Option[Acceptor] = None
  val controlPlaneRequestChannelOpt: Option[RequestChannel] = config.controlPlaneListenerName.map(_ =>
    new RequestChannel(20, ControlPlaneMetricPrefix, time))
  ......
}
我们来看一下 SocketServer 的 startUp 方法,主要工作就是创建这些 Acceptor 和 Processor
  /**
   * Starts the socket server and creates all the Acceptors and the Processors. The Acceptors
   * start listening at this stage so that the bound port is known when this method completes
   * even when ephemeral ports are used. Acceptors and Processors are started if `startProcessingRequests`
   * is true. If not, acceptors and processors are only started when [[kafka.network.SocketServer#startProcessingRequests()]]
   * is invoked. Delayed starting of acceptors and processors is used to delay processing client
   * connections until server is fully initialized, e.g. to ensure that all credentials have been
   * loaded before authentications are performed. Incoming connections on this server are processed
   * when processors start up and invoke [[org.apache.kafka.common.network.Selector#poll]].
   *
   * 启动 socket server 创建所有的 acceptor 和 processor。acceptor 从此刻开始监听,
   * 即便使用的是操作系统分配的临时端口,当该方法执行完成时,也能够确定具体绑定的端口了。
   *
   * 只有当调用了 startProcessingRequests() 且返回 true 的时候,Acceptors 和 Processors 才会启动。
   * 延迟启动接收器和处理器的目的是在服务器完全初始化之前延迟处理客户端连接,
   * 例如,确保在执行身份验证之前已加载所有凭据。
   * (KafkaServer 启动的时候,会调用 startup 方法,但 startProcessingRequests 参数是 false,
   *   即不会立刻启动 Acceptors 和 Processors)
   *
   * 当处理器启动并调用 [[org.apache.kafka.common.network.Selector#poll]] 时,
   * 服务器上的传入连接会被处理。
   *
   * @param startProcessingRequests Flag indicating whether `Processor`s must be started.
   */
  def startup(startProcessingRequests: Boolean = true): Unit = {
    this.synchronized {

      // 连接数配额。我们能够借此设置单个 ip 和 Broker 的最大连接数
      // 以及单个 Broker 能够允许的最大连接数
      connectionQuotas = new ConnectionQuotas(config, time, metrics)

      // 创建控制面的 Acceptors 和 Processors(如果配置文件没有明确配置,这个方法什么也不做)
      createControlPlaneAcceptorAndProcessor(config.controlPlaneListener)

      // 创建数据面的 Acceptors 和 Processors
      createDataPlaneAcceptorsAndProcessors(config.numNetworkThreads, config.dataPlaneListeners)

      // KafkaServer 启动的时候,先调用 sokcetServer.startup(false),此时不会去执行下面的代码块
      // 等到几乎所有的启动流程都跑完了(包括加载身份验证的相关配置),
      // KafkaServer 才会调用 socketServer.startProcessingRequests(authorizerFutures) 真正去启动他们
      if (startProcessingRequests) {
        this.startProcessingRequests()
      }
    }

    // 后续都是监控指标相关的配置代码
    ......
  }

  // 控制面
  // 注意,这里的 endpointOpt 是由 Option 包裹的。
  // 即 如果配置文件中不指定 control.plane.listener.name,endpointOpt 就是空
  // 这个方法就什么也不做,不会创建 ControlPlane
  private def createControlPlaneAcceptorAndProcessor(endpointOpt: Option[EndPoint]): Unit = {
    endpointOpt.foreach { endpoint =>
        ......
    }
  }

  // 数据面
  private def createDataPlaneAcceptorsAndProcessors(dataProcessorsPerListener: Int,
                                                    endpoints: Seq[EndPoint]): Unit = {
    endpoints.foreach { endpoint =>
      // 为每个 listener 添加 maxConnectionsPerListener 配置(这个参数是可动态更新的)
      // 创建连接数计数器
      connectionQuotas.addListener(config, endpoint.listenerName)

      // 创建 Acceptor
      val dataPlaneAcceptor = createAcceptor(endpoint, DataPlaneMetricPrefix)

      // 创建 Processor,并且添加到 Acceptor 的 Processor 列表中
      addDataPlaneProcessors(dataPlaneAcceptor, endpoint, dataProcessorsPerListener)

      // 将 Acceptor 保存到 SocketServer 中
      dataPlaneAcceptors.put(endpoint, dataPlaneAcceptor)
      info(s"Created data-plane acceptor and processors for endpoint : ${endpoint.listenerName}")
    }
  }
接下来,在学习 SocketServer 的三大组件:Acceptor,Processor,RequestChannel 之前,我们先简单看一下 AbstractServerThread 这个抽象类,它是 Acceptor,Processor 的父类。
AbstractServerThread
在 AbstractServerThread 类中,借助 countDownLatch 实现了一些关于 ServerThread 开始、终止状态管理的方法:
private[kafka] abstract class AbstractServerThread(connectionQuotas: ConnectionQuotas) extends Runnable with Logging {

  private val startupLatch = new CountDownLatch(1)

  // `shutdown()` is invoked before `startupComplete` and `shutdownComplete` if an exception is thrown in the constructor
  // (e.g. if the address is already in use). We want `shutdown` to proceed in such cases, so we first assign an open
  // latch and then replace it in `startupComplete()`.
  //
  // 如果在构造方法中抛出异常,shutdown() 就会先于 startupComplete 和 shutdownComplete 调用(比如说端口被占用的情况)
  // 这时候,如果 shutdownLatch = new CountDownLatch(0),shutdown 方法还是可以正常运行的。
  // 为了 cover 这个场景,这里初始化的时候,会给他设为0。
  // 正常运行的情况下,执行 startupComplete 方法的时候,会赋值为 1
  @volatile private var shutdownLatch = new CountDownLatch(0)

  private val alive = new AtomicBoolean(true)

  def wakeup(): Unit

  /**
   * Initiates a graceful shutdown by signaling to stop
   */
  def initiateShutdown(): Unit = {
    if (alive.getAndSet(false))
      wakeup()
  }

  /**
   * Wait for the thread to completely shutdown
   */
  def awaitShutdown(): Unit = shutdownLatch.await

  /**
   * Returns true if the thread is completely started
   */
  def isStarted(): Boolean = startupLatch.getCount == 0

  /**
   * Wait for the thread to completely start up
   */
  def awaitStartup(): Unit = startupLatch.await

  /**
   * Record that the thread startup is complete
   */
  protected def startupComplete(): Unit = {
    // Replace the open latch with a closed one
    shutdownLatch = new CountDownLatch(1)
    startupLatch.countDown()
  }

  /**
   * Record that the thread shutdown is complete
   */
  protected def shutdownComplete(): Unit = shutdownLatch.countDown()

  /**
   * Is the server still running?
   */
  protected def isRunning: Boolean = alive.get

}
Acceptor 类
然后我们来看一看 Acceptor,它的核心是 NIO selector 对象,用于监听外部的连接请求(SelectionKey.OP_ACCEPT)。其中还有 processor 线程池,Acceptor 发现就绪的连接请求之后,会将任务分发给 processor 线程池中的线程来建立实际的连接。
/**
 * Thread that accepts and configures new connections. There is one of these per endpoint.
 */
private[kafka] class Acceptor(val endPoint: EndPoint,
                              val sendBufferSize: Int,
                              val recvBufferSize: Int,
                              brokerId: Int,
                              connectionQuotas: ConnectionQuotas,
                              metricPrefix: String) extends AbstractServerThread(connectionQuotas) with KafkaMetricsGroup {

  // 创建 NIO Selector 对象
  private val nioSelector = NSelector.open()

  // 打开 ServerSocketChannel,绑定 InetSocketAddress
  val serverChannel = openServerSocket(endPoint.host, endPoint.port)

  // processor 线程池
  private val processors = new ArrayBuffer[Processor]()

  ......
下面是 Acceptor 线程核心的 run 方法,总的来说,就是使用 Java NIO 的 Selector + SocketChannel 的方式循环地轮询网络连接创建事件(SelectionKey.OP_ACCEPT)。一旦接收到外部连接请求,Acceptor 就会找一个连接数未满的 Processor 线程,并将该请求交由它,让它去创建真正的网络连接:
  /**
   * Accept loop that checks for new connection attempts
   *
   * 循环等待新连接
   */
  def run(): Unit = {
    serverChannel.register(nioSelector, SelectionKey.OP_ACCEPT)

    // shutdownLatch = new CountDownLatch(1)
    // startupLatch.countDown()
    startupComplete()

    try {
      var currentProcessorIndex = 0
      while (isRunning) {
        try {
          // 监听就绪的I/O事件
          val ready = nioSelector.select(500)
          if (ready > 0) {
            val keys = nioSelector.selectedKeys()
            val iter = keys.iterator()
            while (iter.hasNext && isRunning) {
              try {
                val key = iter.next
                iter.remove()

                if (key.isAcceptable) {

                  // 调用 ServerSocketChannel.accept 方法创建 Socket 连接
                  accept(key).foreach { socketChannel =>
                    // Assign the channel to the next processor (using round-robin) to which the
                    // channel can be added without blocking. If newConnections queue is full on
                    // all processors, block until the last one is able to accept a connection.
                    //
                    // 循环遍历 processor,直到找到不阻塞,可以直接添加 SocketChannel 的 processor
                    // (processor 内部实际上使用一个 ArrayBlockingQueue[SocketChannel] 保存新连接的)
                    // 如果所有的 processor 都是满的,就阻塞当前线程,直到遍历的最后一个 processor 可以添加连接
                    // (即:retriesLeft == 0)
                    var retriesLeft = synchronized(processors.length)
                    var processor: Processor = null
                    do {
                      retriesLeft -= 1
                      processor = synchronized {
                        // adjust the index (if necessary) and retrieve the processor atomically for
                        // correct behaviour in case the number of processors is reduced dynamically
                        //
                        // 防止 index 越界
                        currentProcessorIndex = currentProcessorIndex % processors.length
                        processors(currentProcessorIndex)
                      }
                      currentProcessorIndex += 1
                    } while (!assignNewConnection(socketChannel, processor, retriesLeft == 0))
                  }
                } else
                  throw new IllegalStateException("Unrecognized key state for acceptor thread.")
              } catch {
                case e: Throwable => error("Error while accepting connection", e)
              }
            }
          }
        }
        catch {
          // We catch all the throwables to prevent the acceptor thread from exiting on exceptions due
          // to a select operation on a specific channel or a bad request. We don't want
          // the broker to stop responding to requests from other clients in these scenarios.
          case e: ControlThrowable => throw e
          case e: Throwable => error("Error occurred", e)
        }
      }
    } finally {
      debug("Closing server socket and selector.")
      CoreUtils.swallow(serverChannel.close(), this, Level.ERROR)
      CoreUtils.swallow(nioSelector.close(), this, Level.ERROR)

      // shutdownLatch.countDown()
      shutdownComplete()
    }
  }
上面这段代码提到的 assignNewConnection(socketChannel, processor, retriesLeft == 0) 方法,其实就是把 socketChannel 放到 Processor 线程中的等待队列中去:
  // retriesLeft == 0,即遍历到最后一个 Processor 的时候 mayBlock == True,此时是允许 block 的。
  // 在此之前,都是直接跳过,去检查下一个 Processor 的 socketChannel 队列
  private def assignNewConnection(socketChannel: SocketChannel, processor: Processor, mayBlock: Boolean): Boolean = {

    // 两件事:
    // 1. 把 socketChannel 放到 Processor 线程中的等待队列中去
    // 2. 调用 Processor 中的 selector 的 wakeUp() 方法,通知 select(timeout) 线程
    //    即  Processor 的 run() 方法
    if (processor.accept(socketChannel, mayBlock, blockedPercentMeter)) {
      debug(s"Accepted connection from ${socketChannel.socket.getRemoteSocketAddress} on" +
        s" ${socketChannel.socket.getLocalSocketAddress} and assigned it to processor ${processor.id}," +
        s" sendBufferSize [actual|requested]: [${socketChannel.socket.getSendBufferSize}|$sendBufferSize]" +
        s" recvBufferSize [actual|requested]: [${socketChannel.socket.getReceiveBufferSize}|$recvBufferSize]")
      true
    } else
      false
  }
Processor 中的等待队列长这样:
  // Processor 中的 socketChannel 队列
  private val newConnections = new ArrayBlockingQueue[SocketChannel](connectionQueueSize)
Processor 中的 accept 方法:
  def accept(socketChannel: SocketChannel,
             mayBlock: Boolean,
             acceptorIdlePercentMeter: com.yammer.metrics.core.Meter): Boolean = {
    val accepted = {
      if (newConnections.offer(socketChannel))
        true
      else if (mayBlock) {
        // 阻塞,直到 put 成功
        val startNs = time.nanoseconds
        newConnections.put(socketChannel)

        // 统计耗时
        acceptorIdlePercentMeter.mark(time.nanoseconds() - startNs)
        true
      } else
        false
    }
    if (accepted)
      // 调用 selector.wakeup() 方法
      wakeup()
    accepted
  }
Processor 类
/**
 * Thread that processes all requests from a single connection. There are N of these running in parallel
 * each of which has its own selector
 *
 * 每个 Processor 实例与一个客户端连接相关联,处理从客户端发送的请求。
 * 请求可以是消息发布、消息消费、元数据请求等等。
 *
 * Kafka 使用多个 Processor 实例并行处理请求,每个实例都有自己的 Selector,
 * 负责网络IO的多路复用。这样可以在多个客户端连接之间更高效地共享资源,kafka 配置中的
 * num.network.threads 参数,决定了每个 broker 上的 Processor 线程数量。
 *
 * 注意: Processor 线程仅仅是网络接收线程,不会执行真正的请求处理逻辑,
 *      当 Request 被后面的 I/O 线程处理完成后,会再依靠 Processor 线程发送 Response 给请求发送方
 */
private[kafka] class Processor(val id: Int,
                               time: Time,
                               maxRequestSize: Int,
                               requestChannel: RequestChannel,
                               connectionQuotas: ConnectionQuotas,
                               connectionsMaxIdleMs: Long,
                               failedAuthenticationDelayMs: Int,
                               listenerName: ListenerName,
                               securityProtocol: SecurityProtocol,
                               config: KafkaConfig,
                               metrics: Metrics,
                               credentialProvider: CredentialProvider,
                               memoryPool: MemoryPool,
                               logContext: LogContext,
                               connectionQueueSize: Int = ConnectionQueueSize) extends AbstractServerThread(connectionQuotas) with KafkaMetricsGroup {
  ......
  // 保存着要创建的新连接的信息
  private val newConnections = new ArrayBlockingQueue[SocketChannel](connectionQueueSize)

  // 临时的 response 队列。有些 Response 的逻辑,
  // 是需要在将 response 发送给请求方之后,再执行的一些内容的,他们都暂存在这个临时队列里
  private val inflightResponses = mutable.Map[String, RequestChannel.Response]()

  // 保存着需要被返还给请求方的所有 Response 对象
  private val responseQueue = new LinkedBlockingDeque[RequestChannel.Response]()

  // KafkaSelector 对象
  private val selector = createSelector(
    ChannelBuilders.serverChannelBuilder(listenerName,
      listenerName == config.interBrokerListenerName,
      securityProtocol,
      config,
      credentialProvider.credentialCache,
      credentialProvider.tokenCache,
      time,
      logContext))
  ......
}
kafka 对 java.nio 的 selector 做了一层封装,因此,下文的 selector 均指代的是 KafkaSelector,如果是 nio 包下的 selector,则用 nioSelector 指代。
Processor 类的核心 run 方法
Processor 中的 run 方法如下:
  override def run(): Unit = {
    startupComplete()
    try {
      while (isRunning) {
        try {
          // setup any new connections that have been queued up
          // 处理 Acceptor 线程中塞过来的新连接
          // 1. 为每个连接生成一个唯一 connectionId,将代表新连接的 SocketChannel 包装成
          //    KafkaChannel 注册到 Selector 中。
          //    核心是调用 java.nio 包下的方法: SocketChannel.register(selector)
          // 2. 将上一步的 KafkaChannel 对象,然后通过 SelectionKey.attach(obj) 方法,
          //    绑定到 SelectionKey 中
          // 3. 将 KafkaChannel 放到 Selector 的 channelMap 中
          //
          // 第一步是调用底层 nio 的方法建立链接
          // 第二步是确保通过 SelectionKey 可以找到 KafkaChannel。
          //      当后续 poll 的时候,底层会调用 nioSelector.select(),得到 SelectionKey,
          //      然后藉此就可以获得 KafkaChannel 了。
          // 第三步是确保通过 Selector 可以找到 KafkaChannel
          configureNewConnections()

          // register any new responses for writing
          // 发送 response 给请求方(如果有的话) ,这里的 response 可能有多种类型:
          // 1. 空白响应:不需要响应给客户端,记录指标数据即可
          // 2. 正常响应:这里其实是把要发送的 Send 对象,保存到 KafkaChannel 中
          // 3. 要求关闭连接
          // 4. 开始限流:“通道静音”是一种流量控制机制,用于在高负载或特定条件下暂时限制某些客户端的请求,
          //    以便更好地管理资源和维护服务稳定性。静音通道的主要目的是限制请求的处理速率,
          //    防止某些连接过度消耗资源或造成系统压力过大。
          //    这里其实是去更新 KafkaChannel 的 muteState 字段
          // 5. 终止限流:将 KafkaChannel 从 Selector 的限流队列中移除
          processNewResponses()

          // 尝试从 selector 中拉取数据(nioSelector.selectedKeys()),
          // 如果 newConnection 队列中有新链接,则调用 nioSelector.selectNow()
          // 如果 newConnection 队列中无新链接,则调用 nioSelector.select(timeout=300ms)
          //
          // 根据拉取的 SelectionKey,
          // 调用 SelectionKey.attachment() 获取到第一步 configureNewConnections()
          // 绑定的 KafkaChannel 对象,从而获得底层的 SocketChannel 对象
          //
          // 然后从 SocketChannel 中读取数据,封装成 NetworkReceive 对象,
          // 放到 Selector 的  LinkedHashMap<String, NetworkReceive> completedReceives 中,
          //
          // 同时,如果有待发送的数据,会放到 List<Send> completedSends 队列中
          //
          // 后续的步骤会处理 completedReceives 和 completedSends 中的内容。
          poll()

          // 处理读取到的内容
          // 遍历 completedReceives,构建 request,放到 RequestChannel 中的 request 队列中,
          // 等待IO线程处理业务逻辑,然后 mute channel,直到处理完请求,
          // 下一轮的循环中,response 给客户端之后才会 unmute
          // 最后清空 completedReceive 队列
          processCompletedReceives()

          // unmute channel,清空 CompletedSends 队列
          processCompletedSends()

          // send failed 的 channel 会被记录,这里清除掉相关的 inflightResponses
          // 并清除 channel 所占用的连接配额(connectionQuotas)
          processDisconnected()

          // 如果 broker 的连接数超过了 max.connections,就关掉 lru 的那一条
          closeExcessConnections()

        } catch {
          // We catch all the throwables here to prevent the processor thread from exiting. We do this because
          // letting a processor exit might cause a bigger impact on the broker. This behavior might need to be
          // reviewed if we see an exception that needs the entire broker to stop. Usually the exceptions thrown would
          // be either associated with a specific socket channel or a bad request. These exceptions are caught and
          // processed by the individual methods above which close the failing channel and continue processing other
          // channels. So this catch block should only ever see ControlThrowables.
          //
          // 拦截所有 throwable 防止 processor 线程结束。
          // 这样做是因为让 processor 线程退出可能会对 broker 造成更大的影响
          // 通常情况下这里的异常都来自于某一个 socketChannel 的异常或者只是一个 bad request,
          // 这些异常会被上面各个方法捕获并处理,方法会关闭失败的通道,并继续处理其他通道。
          // 因此,这个捕获块应该只会处理控制性异常 ControlThrowable
          case e: Throwable => processException("Processor got uncaught exception.", e)
        }
      }
    } finally {
      debug(s"Closing selector - processor $id")
      CoreUtils.swallow(closeAll(), this, Level.ERROR)
      shutdownComplete()
    }
  }
configureNewConnections 接收新连接
  /**
   * Register any new connections that have been queued up. The number of connections processed
   * in each iteration is limited to ensure that traffic and connection close notifications of
   * existing channels are handled promptly.
   *
   * Acceptor 在发现就绪的连接之后,会将它塞到 Processor 的 newConnections 队列中,
   * 这里将 selector 注册到代表新连接的 SocketChannel 中。
   */
  private def configureNewConnections(): Unit = {

    var connectionsProcessed = 0
    while (connectionsProcessed < connectionQueueSize && !newConnections.isEmpty) {

      val channel = newConnections.poll()
      try {
        debug(s"Processor $id listening to new connection from ${channel.socket.getRemoteSocketAddress}")
        selector.register(connectionId(channel.socket), channel)
        connectionsProcessed += 1
      } catch {
        // We explicitly catch all exceptions and close the socket to avoid a socket leak.
        // 避免 socket 泄露,明确的 catch 所有异常,并关闭 socket
        case e: Throwable =>
          val remoteAddress = channel.socket.getRemoteSocketAddress
          // need to close the channel here to avoid a socket leak.
          close(listenerName, channel)
          processException(s"Processor $id closed connection from $remoteAddress", e)
      }
    }
  }
selector.register()中调用了 registerChannel() 方法:
    protected SelectionKey registerChannel(String id, SocketChannel socketChannel, int interestedOps) throws IOException {

        // 将 channel 注册到 selector 中,返回代表这个 channel 的 SelectionKey
        SelectionKey key = socketChannel.register(nioSelector, interestedOps);

        // 生成 KafkaChannel 对象,
        // 然后通过 SelectionKey.attach(obj) 方法,将 KafkaChannel 绑定给 SelectionKey
        // 后续可以通过 SelectionKey.attachment() 取回绑定的 KafkaChannel
        KafkaChannel channel = buildAndAttachKafkaChannel(socketChannel, id, key);

        // 放到 channel map 中
        this.channels.put(id, channel);
        if (idleExpiryManager != null)
            idleExpiryManager.update(channel.id(), time.nanoseconds());
        return key;
    }
processNewResponses 处理响应
  private def processNewResponses(): Unit = {
    var currentResponse: RequestChannel.Response = null

    // 遍历 response queue
    while ({currentResponse = dequeueResponse(); currentResponse != null}) {
      val channelId = currentResponse.request.context.connectionId
      try {
        currentResponse match {
          case response: NoOpResponse =>
            // There is no response to send to the client, we need to read more pipelined requests
            // that are sitting in the server's socket buffer
            // 不需要发送东西给 client。只更新请求指标数据(网络线程耗时)
            updateRequestMetrics(response)
            trace(s"Socket server received empty response to send, registering for read: $response")
            // Try unmuting the channel. If there was no quota violation and the channel has not been throttled,
            // it will be unmuted immediately. If the channel has been throttled, it will be unmuted only if the
            // throttling delay has already passed by now.
            handleChannelMuteEvent(channelId, ChannelMuteEvent.RESPONSE_SENT)

            // 原本这一步是要在 precessCompletedSends 中做的,但是由于不需要返回数据给客户端
            // 所以这里就直接 unmute 了,以便继续处理 channel 中的下一个请求
            tryUnmuteChannel(channelId)

          case response: SendResponse =>
            // 发送请求
            sendResponse(response, response.responseSend)

          case response: CloseConnectionResponse =>
            updateRequestMetrics(response)
            trace("Closing socket connection actively according to the response code.")
            // 立刻从 channelMap 和 closingChannelMap 中移除,并丢弃可能的 pending response
            close(channelId)

          case _: StartThrottlingResponse =>
            handleChannelMuteEvent(channelId, ChannelMuteEvent.THROTTLE_STARTED)

          case _: EndThrottlingResponse =>
            // Try unmuting the channel. The channel will be unmuted only if the response has already been sent out to
            // the client.
            handleChannelMuteEvent(channelId, ChannelMuteEvent.THROTTLE_ENDED)
            tryUnmuteChannel(channelId)

          case _ =>
            throw new IllegalArgumentException(s"Unknown response type: ${currentResponse.getClass}")
        }
      } catch {
        case e: Throwable =>
          processChannelException(channelId, s"Exception while processing response for $channelId", e)
      }
    }
  }
我们看一下核心的 sendResponse 方法:
  protected[network] def sendResponse(response: RequestChannel.Response, responseSend: Send): Unit = {
    val connectionId = response.request.context.connectionId
    trace(s"Socket server received response to send to $connectionId, registering for write and sending data: $response")

    // `channel` can be None if the connection was closed remotely or if selector closed it for being idle for too long
    // 如果 channel 不存在,说明连接可能已经关闭(比如客户端主动断开连接或连接因空闲超时被关闭)
    //
    // 从 Processor 中的 selector 对象的 channelMap 中获取到 KafkaChannel
    // (这个 KafkaChannel 是在 Processor 的 run 循环中,通过 configureNewConnections 方法添加进来的)
    if (channel(connectionId).isEmpty) {
      warn(s"Attempting to send response via channel for which there is no open connection, connection id $connectionId")
      response.request.updateRequestMetrics(0L, response)
    }

    // Invoke send for closingChannel as well so that the send is failed and the channel closed properly and
    // removed from the Selector after discarding any pending staged receives.
    // `openOrClosingChannel` can be None if the selector closed the connection because it was idle for too long
    //
    // 如果连接处于打开状态或者正在关闭(而非完全关闭),将响应发送出去,
    // 并在 inflightResponses 中记录此响应,以便后续处理
    //
    // 对于 closingChannel 的情况,send 可能会失败,Selector 会丢弃所有该连接上还未处理的接收数据
    // (即 “pending staged receives”),然后触发清理逻辑来彻底关闭并清理该通道
    if (openOrClosingChannel(connectionId).isDefined) {
      // 从 responseSend 中取出 connectionId,然后据此找到 KafkaChannel,
      // 然后设置 KafkaChannel.send = responseSend
      selector.send(responseSend)
      inflightResponses += (connectionId -> response)
    }
  }
再进一步,看一下 KafkaSelector 是如何 send 的:
public void send(Send send) {
        String connectionId = send.destination();

        // 如果 channel 不在 channelMap 或者 closingChannelMap 中,则抛出异常
        KafkaChannel channel = openOrClosingChannelOrFail(connectionId);

        if (closingChannels.containsKey(connectionId)) {
            // ensure notification via `disconnected`, leave channel in the state in which closing was triggered
            this.failedSends.add(connectionId);
        } else {
            try {
                // 将 send 绑定到 channel 中
                channel.setSend(send);
            } catch (Exception e) {
                // update the state for consistency, the channel will be discarded after `close`
                channel.state(ChannelState.FAILED_SEND);
                // ensure notification via `disconnected` when `failedSends` are processed in the next poll
                this.failedSends.add(connectionId);
                close(channel, CloseMode.DISCARD_NO_NOTIFY);
                if (!(e instanceof CancelledKeyException)) {
                    log.error("Unexpected exception during send, closing connection {} and rethrowing exception {}",
                            connectionId, e);
                    throw e;
                }
            }
        }
    }
我们发现,这一步其实并没有实际的发送 response 给客户端,而是把 Send 对象 set 到了 KafkaChannel 中。
等到 poll 的时候,才会真正的去执行 write 操作,将数据写到底层的 SocketChannel 中。
poll 接收/发送数据
/**
     * Do whatever I/O can be done on each connection without blocking. This includes completing connections, completing
     * disconnections, initiating new sends, or making progress on in-progress sends or receives.
     *
     * 在不阻塞的情况下,对每个连接执行可以完成的所有 I/O 操作。
     * 这包括完成连接、完成断开连接、启动新的发送操作,或处理正在进行的发送或接收操作。
     *
     * When this call is completed the user can check for completed sends, receives, connections or disconnects using
     * {@link #completedSends()}, {@link #completedReceives()}, {@link #connected()}, {@link #disconnected()}. These
     * lists will be cleared at the beginning of each `poll` call and repopulated by the call if there is
     * any completed I/O.
     *
     * 当此调用完成后,用户可以通过 completedSends()、completedReceives()、#connected() 和 disconnected()
     * 来检查已完成的发送、接收、连接或断开连接。这些列表会在每次 `poll` 调用的开始时被清空,
     * 并在调用期间重新填充(如果有任何已完成的 I/O 操作)。
     *
     * In the "Plaintext" setting, we are using socketChannel to read & write to the network. But for the "SSL" setting,
     * we encrypt the data before we use socketChannel to write data to the network, and decrypt before we return the responses.
     * This requires additional buffers to be maintained as we are reading from network, since the data on the wire is encrypted
     * we won't be able to read exact no.of bytes as kafka protocol requires. We read as many bytes as we can, up to SSLEngine's
     * application buffer size. This means we might be reading additional bytes than the requested size.
     * If there is no further data to read from socketChannel selector won't invoke that channel and we have additional bytes
     * in the buffer. To overcome this issue we added "keysWithBufferedRead" map which tracks channels which have data in the SSL
     * buffers. If there are channels with buffered data that can by processed, we set "timeout" to 0 and process the data even
     * if there is no more data to read from the socket.
     *
     * 在“Plaintext”模式下,我们使用 `socketChannel` 与网络进行读写。
     * 但在“SSL”模式下,我们在使用 `socketChannel` 将数据写入网络之前对数据进行加密,并在返回响应之前对数据进行解密。
     * 由于网络上传输的数据是加密的,我们无法按照 Kafka 协议要求的精确字节数读取,
     * 因此需要维护额外的缓冲区来从网络读取数据。
     *
     * 我们会尽可能多地读取字节,最多读取到 `SSLEngine` 的应用缓冲区大小。
     * 这意味着我们可能会读取比请求的大小更多的字节。
     *
     * 如果从 `socketChannel` 中没有更多数据可读,则 selector 不会再调用该通道,
     * 但缓冲区中可能还有额外的数据。
     *
     * 为了解决这个问题,我们添加了一个名为 "keysWithBufferedRead" 的映射,
     * 用于跟踪在 SSL 缓冲区中有数据的通道。如果存在可以处理缓冲数据的通道,
     * 我们将 `timeout` 设置为 0,即使 `socketChannel` 中没有更多数据可读,我们也会处理这些数据。
     *
     * Atmost one entry is added to "completedReceives" for a channel in each poll. This is necessary to guarantee that
     * requests from a channel are processed on the broker in the order they are sent. Since outstanding requests added
     * by SocketServer to the request queue may be processed by different request handler threads, requests on each
     * channel must be processed one-at-a-time to guarantee ordering.
     *
     * 每次 `poll` 中,每个通道最多只有一个条目被添加到 "completedReceives" 列表中。
     * 这是为了保证来自某个通道的请求在 broker 上按照发送顺序被处理。
     * 由于 `SocketServer` 添加到请求队列的未完成请求可能由不同的请求处理线程处理,
     * 为保证顺序性,每个通道的请求必须一次只能处理一个。
     *
     *
     * @param timeout The amount of time to wait, in milliseconds, which must be non-negative
     * @throws IllegalArgumentException If `timeout` is negative
     * @throws IllegalStateException If a send is given for which we have no existing connection or for which there is
     *         already an in-progress send
     */
    @Override
    public void poll(long timeout) throws IOException {
        if (timeout < 0)
            throw new IllegalArgumentException("timeout should be >= 0");

        // 在 poll() 调用中,如果没有读取到新数据也没有处理任何缓冲数据就可能进入“无效循环”
        // 通过这个标志位,Kafka 能够避免浪费 CPU 资源在无意义的循环中空转跑飞掉
        boolean madeReadProgressLastCall = madeReadProgressLastPoll;

        // 清理缓存和标记位,为本轮 poll 做准备
        // this.madeReadProgressLastPoll = false;
        // this.completedSends.clear();
        // this.completedReceives.clear();
        // this.connected.clear();
        // this.disconnected.clear();
        // this.failedSends.remove(xxxxx);
        // this.disconnected.put(xxxxx, ChannelState.FAILED_SEND);
        // this.failedSends.clear();
        clear();

        // 对于 PlaintextTransportLayer 不存在这种情况
        // 对于 SslTransportLayer,底层传输数据的时候,上一轮 poll 的时候,
        // 可能有数据遗留在 SSLEngine 的应用缓冲区中,本轮 poll 的时候需要去处理这些数据
        boolean dataInBuffers = !keysWithBufferedRead.isEmpty();

        if (!immediatelyConnectedKeys.isEmpty() || (madeReadProgressLastCall && dataInBuffers))
            timeout = 0;

        // 在调用 KafkaChannel 的 read 方法时,会先构建 NetworkReceive 对象,
        // 然后调用 NetworkReceive.readFrom() 方法,这个方法在读取数据的时候,会先申请内存,
        // 此时如果申请失败,则表示内存压力较大,会先静音通道,然后设置 outOfMemory = True
        //
        // 这里检测如果 channel 处于 outOfMemory 状态,但是内存池中有空余了,
        // 则说明内存压力已经消退了
        if (!memoryPool.isOutOfMemory() && outOfMemory) {

            //we have recovered from memory pressure. unmute any channel not explicitly muted for other reasons
            log.trace("Broker no longer low on memory - unmuting incoming sockets");
            for (KafkaChannel channel : channels.values()) {

                // 如果 channel 处于静音状态,但是 channel 没有明确的被设置为静音,
                // 则解除静音状态
                if (channel.isInMutableState() && !explicitlyMutedChannels.contains(channel)) {
                    channel.maybeUnmute();
                }
            }

            // 内存压力消退,解除 outOfMemory 状态
            outOfMemory = false;
        }

        /* check ready keys */
        long startSelect = time.nanoseconds();

        // 调用底层 nioSelector 的 select/selectNow 方法
        int numReadyKeys = select(timeout);

        long endSelect = time.nanoseconds();
        this.sensors.selectTime.record(endSelect - startSelect, time.milliseconds());

        // 有东西可读
        if (numReadyKeys > 0 || !immediatelyConnectedKeys.isEmpty() || dataInBuffers) {
            Set<SelectionKey> readyKeys = this.nioSelector.selectedKeys();

            // Poll from channels that have buffered data (but nothing more from the underlying socket)
            // 上一轮 poll 的时候,由于内存不足或其他原因,有数据积压在 SslEngine 缓冲区的数据。
            // 如果本轮 poll 还是拉不到数据,就放回到 keysWithBufferedRead 中,等下一轮再 poll 处理
            if (dataInBuffers) {
                keysWithBufferedRead.removeAll(readyKeys); //so no channel gets polled twice
                Set<SelectionKey> toPoll = keysWithBufferedRead;
                keysWithBufferedRead = new HashSet<>(); //poll() calls will repopulate if needed
                pollSelectionKeys(toPoll, false, endSelect);
            }

            // Poll from channels where the underlying socket has more data
            // 处理 SelectionKeys 上所有处于 ready 状态的 IO 操作
            pollSelectionKeys(readyKeys, false, endSelect);
            // Clear all selected keys so that they are included in the ready count for the next select
            readyKeys.clear();

            pollSelectionKeys(immediatelyConnectedKeys, true, endSelect);
            immediatelyConnectedKeys.clear();
        } else {
            // 没有东西可读
            madeReadProgressLastPoll = true; //no work is also "progress"
        }

        long endIo = time.nanoseconds();
        this.sensors.ioTime.record(endIo - endSelect, time.milliseconds());

        // Close channels that were delayed and are now ready to be closed
        //
        // 上面执行 pollSelectionKeys 的时候,会调用 channel.prepare()
        // 完成传输层连接和 authenticate 身份验证,如果身份验证失败(authenticator.authenticate()),
        // 会记录失败的 channel 到 delayedClosingChannels 中
        //
        // 这里是去尝试关闭这些 channel
        //
        // 身份验证:对于 PLAINTEXT 和 SSL 其实是没有额外的认证工作的,而对于 SASL_PLAINTEXT 和 SASL_SSL
        //         则需要执行 SASL 验证
        completeDelayedChannelClose(endIo);

        // we use the time at the end of select to ensure that we don't close any connections that
        // have just been processed in pollSelectionKeys
        // 遍历 lru map,关闭空闲时间超过 connections.max.idle.ms 的连接
        maybeCloseOldestConnection(endSelect);
    }
跳过那些现阶段不重要的方法,我们直奔主题,看一看 kafka 是如何 pollSelectionKeys 的:
/**
     * handle any ready I/O on a set of selection keys
     * @param selectionKeys set of keys to handle
     * @param isImmediatelyConnected true if running over a set of keys for just-connected sockets
     * @param currentTimeNanos time at which set of keys was determined
     */
    // package-private for testing
    void pollSelectionKeys(Set<SelectionKey> selectionKeys,
                           boolean isImmediatelyConnected,
                           long currentTimeNanos) {
        // determineHandlingOrder()
        // 如果内存濒临耗尽,则用 Collections.shuffle 将列表打乱,
        // 避免所有连接都阻塞在某一个大的 read() 上
        // 如果内存充足,就什么也不做
        for (SelectionKey key : determineHandlingOrder(selectionKeys)) {
            KafkaChannel channel = channel(key);
            long channelStartTimeNanos = recordTimePerConnection ? time.nanoseconds() : 0;
            boolean sendFailed = false;
            String nodeId = channel.id();

            // register all per-connection metrics at once
            // 注册 metrics,如 request-size-avg、.bytes-received、.latency 等
            sensors.maybeRegisterConnectionMetrics(nodeId);

            // 通过 linkedHashMap 实现了一个 lru 缓存,
            // 统计空闲时间超过 connections.max.idle.ms 的 connectionId
            if (idleExpiryManager != null)
                idleExpiryManager.update(nodeId, currentTimeNanos);

            try {
                /* complete any connections that have finished their handshake (either normally or immediately) */
                if (isImmediatelyConnected || key.isConnectable()) {
                    if (channel.finishConnect()) {
                        this.connected.add(nodeId);
                        this.sensors.connectionCreated.record();

                        SocketChannel socketChannel = (SocketChannel) key.channel();
                        ······
                    } else {
                        continue;
                    }
                }

                /* if channel is not ready finish prepare */
                //
                // 连接已经建立
                // isConnected = socketChannel.isConnected()
                // 但是尚未 ready(握手尚未完成、安全协议尚未校验等)
                // ready = transportLayer.ready() && authenticator.complete()
                // 需要做前置的校验工作
                //
                // (对于 PlaintextTransportLayer,read 永远等于 true,不需要走这段逻辑
                //  对于其他协议,比如 SaslClientAuthenticator,则可能走这段逻辑)
                if (channel.isConnected() && !channel.ready()) {

                    // 上面没握完的手,这里握
                    // 上面没做完的身份验证,这里验
                    channel.prepare();

                    if (channel.ready()) {
                        long readyTimeMs = time.milliseconds();

                        // 成功通过验证的次数;只有当 re-authentication 功能开启的时候,才可能会大于 1
                        boolean isReauthentication = channel.successfulAuthentications() > 1;
                        if (isReauthentication) {
                            sensors.successfulReauthentication.record(1.0, readyTimeMs);
                            if (channel.reauthenticationLatencyMs() == null)
                                log.warn(
                                    "Should never happen: re-authentication latency for a re-authenticated channel was null; continuing...");
                            else
                                sensors.reauthenticationLatency
                                    .record(channel.reauthenticationLatencyMs().doubleValue(), readyTimeMs);
                        } else {
                            sensors.successfulAuthentication.record(1.0, readyTimeMs);
                            if (!channel.connectedClientSupportsReauthentication())
                                sensors.successfulAuthenticationNoReauth.record(1.0, readyTimeMs);
                        }
                        log.debug("Successfully {}authenticated with {}", isReauthentication ?
                            "re-" : "", channel.socketDescription());
                    }
                }

                if (channel.ready() && channel.state() == ChannelState.NOT_CONNECTED)
                    channel.state(ChannelState.READY);
                Optional<NetworkReceive> responseReceivedDuringReauthentication = channel.pollResponseReceivedDuringReauthentication();
                responseReceivedDuringReauthentication.ifPresent(receive -> {
                    long currentTimeMs = time.milliseconds();
                    addToCompletedReceives(channel, receive, currentTimeMs);
                });

                //if channel is ready and has bytes to read from socket or buffer, and has no
                //previous completed receive then read from it
                if (channel.ready() && (key.isReadable() || channel.hasBytesBuffered()) && !hasCompletedReceive(channel)
                        && !explicitlyMutedChannels.contains(channel)) {
                    attemptRead(channel);
                }

                // 对于 PlaintextTransportLayer 不存在这种情况
                // 对于 SslTransportLayer,底层传输数据的时候,buffer 中可能有数据尚未读完
                if (channel.hasBytesBuffered()) {

                    //this channel has bytes enqueued in intermediary buffers that we could not read
                    //(possibly because no memory). it may be the case that the underlying socket will
                    //not come up in the next poll() and so we need to remember this channel for the
                    //next poll call otherwise data may be stuck in said buffers forever. If we attempt
                    //to process buffered data and no progress is made, the channel buffered status is
                    //cleared to avoid the overhead of checking every time.
                    //
                    // 当 Kafka 从网络中读取数据时,数据可能先被存储在通道的中间缓冲区中,而不是直接传递给应用程序。
                    // 这可能是由于内存不足或其他原因,导致无法处理所有读取到的数据。
                    // 如果缓冲区中有数据且未被处理,下次调用 poll() 时,底层套接字可能不会触发任何事件(例如 READ 事件)。
                    // 这会导致数据长时间滞留在缓冲区中,无法被读取。
                    //
                    // 这里记录一下这个 key,下一轮 poll(其实就是 nioSelector.select())的时候继续处理。
                    //
                    keysWithBufferedRead.add(key);
                }

                /* if channel is ready write to any sockets that have space in their buffer and for which we have data */

                long nowNanos = channelStartTimeNanos != 0 ? channelStartTimeNanos : currentTimeNanos;
                try {
                    // 判断:
                    // send != null && channel.ready() && key.isWritable() && 客户端session未过期
                    // 然后底层调用 nio 包下的 GatheringByteChannel.write 方法写数据
                    attemptWrite(key, channel, nowNanos);
                } catch (Exception e) {
                    sendFailed = true;
                    throw e;
                }

                /* cancel any defunct sockets */
                if (!key.isValid())
                    close(channel, CloseMode.GRACEFUL);

            } catch (Exception e) {
                ······
            } finally {
                maybeRecordTimePerConnection(channel, channelStartTimeNanos);
            }
        }
    }
我们看到了两个关键方法 attemptRead 和 attemptWrite
    private void attemptRead(KafkaChannel channel) throws IOException {
        String nodeId = channel.id();

        // 从 buffer 中读数据
        // 读数据的时候,会调用 memoryPool.tryAllocate 申请内存,
        // 如果内存不足,则不会接收数据,并且会静音通道(mute())
        long bytesReceived = channel.read();
        if (bytesReceived != 0) {
            long currentTimeMs = time.milliseconds();
            sensors.recordBytesReceived(nodeId, bytesReceived, currentTimeMs);
            madeReadProgressLastPoll = true;

            // 如果 buffer 中的数据全都读完了,则添加到 CompletedReceives map 中
            NetworkReceive receive = channel.maybeCompleteReceive();
            if (receive != null) {
                addToCompletedReceives(channel, receive, currentTimeMs);
            }
        }
        if (channel.isMuted()) {
            outOfMemory = true; //channel has muted itself due to memory pressure.
        } else {
            madeReadProgressLastPoll = true;
        }
    }
然后是 attemptWrite:
    private void attemptWrite(SelectionKey key, KafkaChannel channel, long nowNanos) throws IOException {
        if (channel.hasSend()
                && channel.ready()
                && key.isWritable()
                && !channel.maybeBeginClientReauthentication(() -> nowNanos)) {
            write(channel);
        }
    }

    void write(KafkaChannel channel) throws IOException {
        String nodeId = channel.id();

        // 调用 nio 包下的 GatheringByteChannel.write 方法写数据
        long bytesSent = channel.write();

        // 如果 bytes/records 都已经发送了,则返回 Send 对象,否则返回 null
        Send send = channel.maybeCompleteSend();

        // We may complete the send with bytesSent < 1 if `TransportLayer.hasPendingWrites` was true and `channel.write()`
        // caused the pending writes to be written to the socket channel buffer
        //
        // 看提交记录,这里是修了个 bug,当数据发送到底层 sslEngine 的 netWriteBuffer 中时,就认为他已经发送成功了
        if (bytesSent > 0 || send != null) {
            long currentTimeMs = time.milliseconds();
            if (bytesSent > 0)
                this.sensors.recordBytesSent(nodeId, bytesSent, currentTimeMs);
            if (send != null) {

                // send 成功之后,将记录添加到 completedSends 列表中
                this.completedSends.add(send);
                this.sensors.recordCompletedSend(nodeId, send.size(), currentTimeMs);
            }
        }
    }
到这一步,我们该收的请求收下了,该发的请求发出去了。然后就要:
- 调用 processCompletedReceives() 方法,将请求分发下去继续处理
- 调用 processCompletedSends() 方法,清理现场,记录指标
processCompletedReceives 分发请求
  private def processCompletedReceives(): Unit = {
    selector.completedReceives.forEach { receive =>
      try {
        openOrClosingChannel(receive.source) match {
          case Some(channel) =>

            val header = parseRequestHeader(receive.payload)

            // 如果是 SASL_HANDSHAKE 请求,并且该连接没有 ReAuthentication,什么都不需要做
            if (header.apiKey == ApiKeys.SASL_HANDSHAKE && channel.maybeBeginServerReauthentication(receive,
              () => time.nanoseconds()))
              trace(s"Begin re-authentication: $channel")

            else {
              val nowNanos = time.nanoseconds()

              // 身份认证过期,直接干掉
              if (channel.serverAuthenticationSessionExpired(nowNanos)) {
                ......
                close(channel.id)
                ......

              } else {
                val connectionId = receive.source

                // 构建请求 context
                val context = new RequestContext(header, connectionId, channel.socketAddress,
                  channel.principal, listenerName, securityProtocol,
                  channel.channelMetadataRegistry.clientInformation)

                // 构建请求
                val req = new RequestChannel.Request(processor = id, context = context,
                ......

                // 核心就是这个方法,其实就是调用 RequestChannel.requestQueue.put(request)
                requestChannel.sendRequest(req)

                // 保证请求的顺序,每次只接受并处理一个请求,处理完成后会 unmute
                selector.mute(connectionId)
                handleChannelMuteEvent(connectionId, ChannelMuteEvent.REQUEST_RECEIVED)
              }
            }
          case None =>
            // This should never happen since completed receives are processed immediately after `poll()`
            throw new IllegalStateException(s"Channel ${receive.source} removed from selector before processing completed receive")
        }
      } catch {
        // note that even though we got an exception, we can assume that receive.source is valid.
        // Issues with constructing a valid receive object were handled earlier
        case e: Throwable =>
          processChannelException(receive.source, s"Exception while processing request from ${receive.source}", e)
      }
    }

    // 清空 LinkedHashMap<String, NetworkReceive> completedReceives
    selector.clearCompletedReceives()
  }
processCompletedSends 清理数据
  private def processCompletedSends(): Unit = {
    selector.completedSends.forEach { send =>
      try {
        .....

        // Invoke send completion callback
        response.onComplete.foreach(onComplete => onComplete(send))

        // Try unmuting the channel. If there was no quota violation and the channel has not been throttled,
        // it will be unmuted immediately. If the channel has been throttled, it will unmuted only if the throttling
        // delay has already passed by now.
        //
        // 发送 response 完毕,解除通道静音
        handleChannelMuteEvent(send.destination, ChannelMuteEvent.RESPONSE_SENT)
        tryUnmuteChannel(send.destination)
      } catch {
        case e: Throwable => processChannelException(send.destination,
          s"Exception while processing completed send to ${send.destination}", e)
      }
    }

    // 清空 List<Send> completedSends
    selector.clearCompletedSends()
  }
RequestChannel
RequestChannel 中的内容不多,它其实就是一个数据中转站,主要做了两件事
- 接收 Processor poll 方法读到的 Request,以备 IO 线程处理
- 将 IO 线程处理完的 Response 发回给对应的 Processor
所以这个类其实就是围绕着它的 requestQueue 和 processors 在工作,它的方法都是对这两个属性的访问:
class RequestChannel(val queueSize: Int,                // 请求队列的长度
                     val metricNamePrefix : String,     // 指标名称前缀,用于区分数据面和控制面
                     time: Time) extends KafkaMetricsGroup {
  ......

  // 请求队列,新的请求会被插入到这个队列中,等待 IO 线程去处理
  private val requestQueue = new ArrayBlockingQueue[BaseRequest](queueSize)

  // Processor 列表,IO 线程处理完请求后,会从这里找到对应的 Processor,
  // 然后将 response 放到 processor 的 response 队列中
  private val processors = new ConcurrentHashMap[Int, Processor]()

  /** Send a request to be handled, potentially blocking until there is room in the queue for the request */
  // 向请求队列中放入一个 request
  def sendRequest(request: RequestChannel.Request): Unit = {
    requestQueue.put(request)
  }

  /** Send a response back to the socket server to be sent over the network */
  // 将 response 返回给请求方
  def sendResponse(response: RequestChannel.Response): Unit = {
    ......
    val processor = processors.get(response.processor)

    // 如果 processor 被关闭了,这里就会是 null,这个 response 就会被丢弃。
    if (processor != null) {
      processor.enqueueResponse(response)
    }
  }

  /** 获取下一个 request,或者阻塞直到超时 */
  def receiveRequest(timeout: Long): RequestChannel.BaseRequest =
    requestQueue.poll(timeout, TimeUnit.MILLISECONDS)

  /** 获取下一个 request,或者一直阻塞 */
  def receiveRequest(): RequestChannel.BaseRequest =
    requestQueue.take()

  ......
}
至此,SocketServer 的主要流程我们就大致清除了。下一节我们看一下业务线程是怎么工作的。
