延时请求(Delayed Operation),是指某些条件未满足,导致暂时无法处理的请求。例如,对于设置了 acks=all 的 Produce Request,Kafka 必须确保 ISR 中的所有副本都要成功响应这次写入(或者最终没有等到所有的 ISR,最后超时的时候),之后才会返回。
为了执行这些延时请求,Kafka 使用了基于多层时间轮的方案。
一、单层时间轮
我们先来看一看单层时间轮(Simple Timing Wheel):
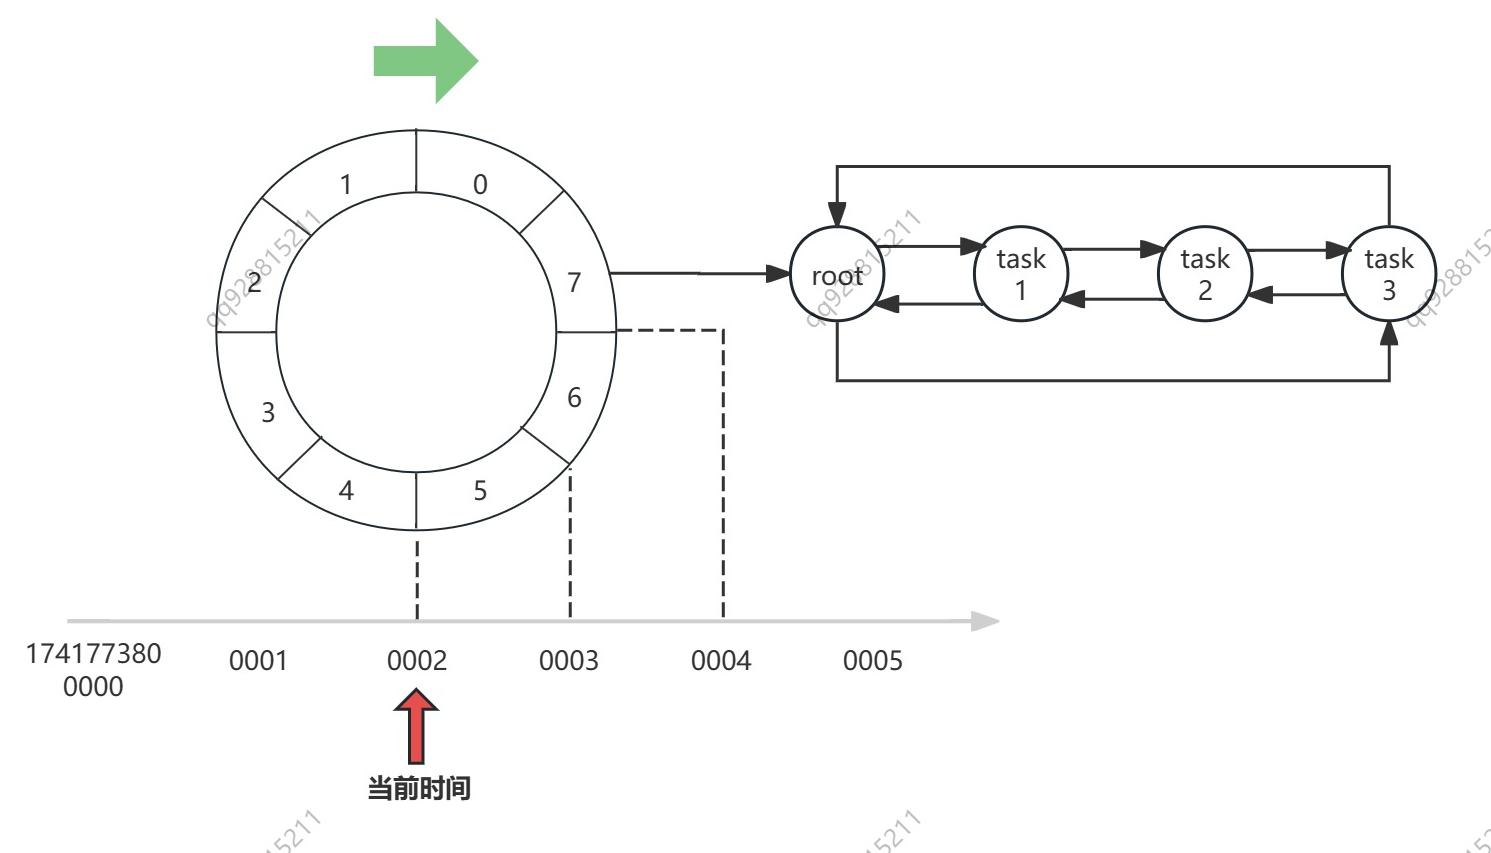
参考上面这张图,就跟钟表类似,我们把圆上一格当做一个最小时间单位(tickMs),假设这里我们取 1 ms,这个圆总共 8 等分(8 个 bucket),那么不考虑复用的情况,整个单层时间轮就可以覆盖 8 ms 的时间段。
我们给圆上的圆弧编个号,上面的数字 0~7,表示 bucket-0 ~ bucket-7,假设现在时间是 1741773800002,我需要在 1741773800004 的时候执行三个延时任务,那么就向 bucket-7 的链表中增加三个任务即可,等待时间到达 1741773800004 的时候,就捞出链表里的延时任务开始执行。
想象一下,时间流逝,时间轮 TimingWheel 向前滚动,时间轴上任何一个时刻,都可以在 TimingWheel 上找到自己对应的那一个 bucket,在 1741773800002 这一时刻过去之后,bucket-5 就会被清空,然后被重用,下一次它将归属于 1741773800010。
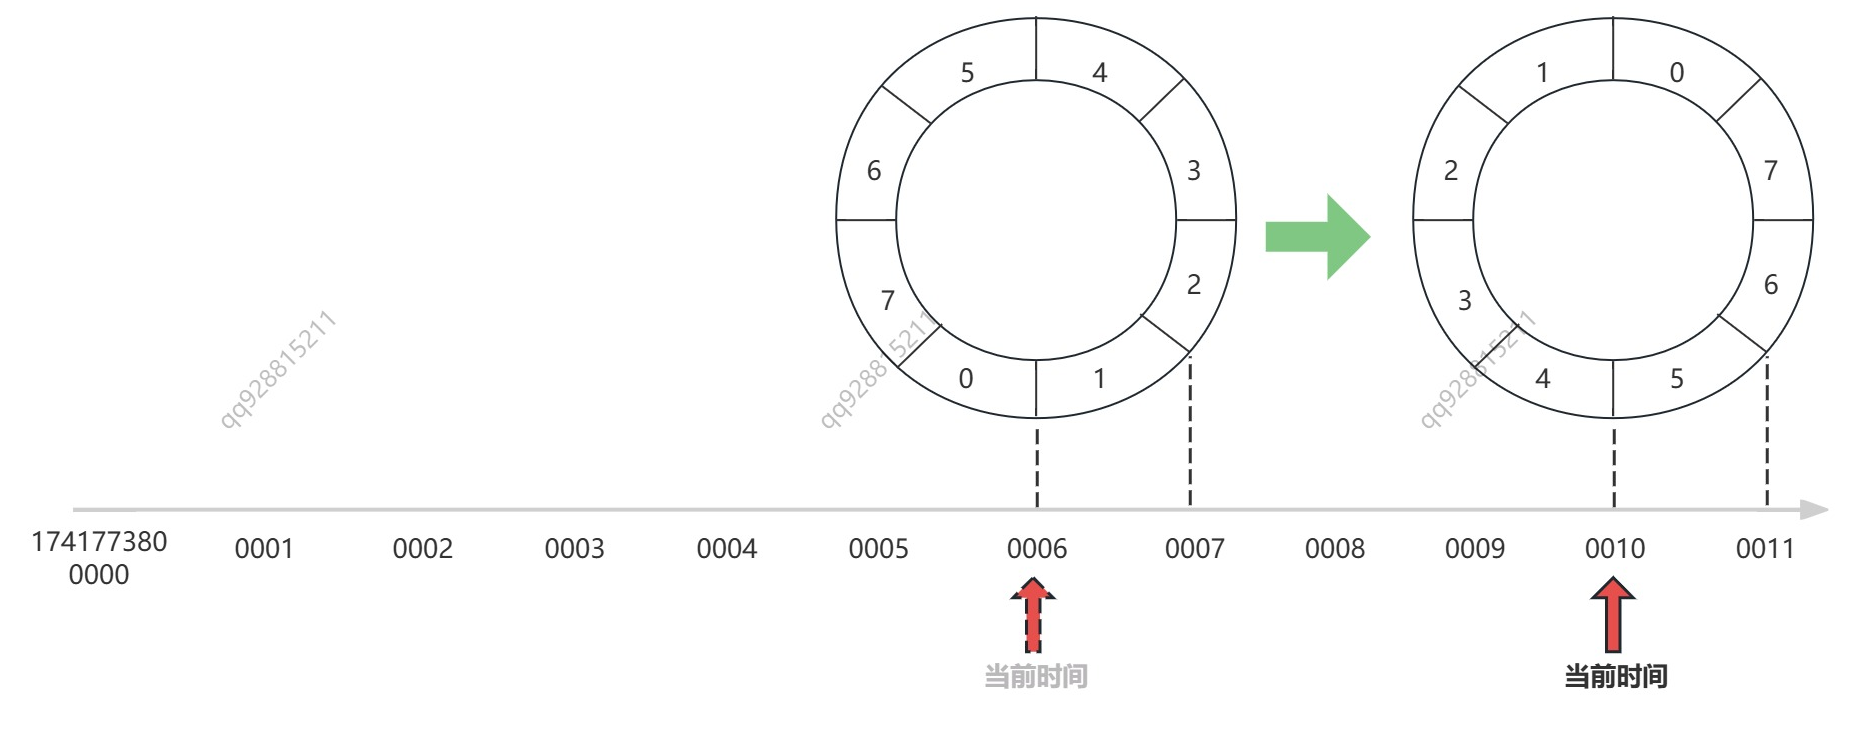
现在,我们先将单层时间轮换一种形式展示,以便后续更好的展示时间轮的推进与任务的流转:
它和上面的圆形时间轮完全一样,只不过是换了个形式展示,这样的话,我们在代码中,就可以方便的用下面的公式,为每一个时间点找到对应的 bucket 了:
bucket_num = (timestamp / 单位时间 tickMs) % bucket_count回到刚刚的问题,
到这里,我们很容易发现,单层时间轮的缺点,就是只能覆盖有限的时间段,比如上面的时间轮只有3格,如果当前时间是 t1,我需要创建一个 t5 时刻的任务该怎么办呢?
单纯地动态的扩大时间轮会大大的增加系统的开销,所以这时候就要引入多层时间轮了。
二、多层时间轮
现在,我们尝试引入多层时间轮(Hierarchical Timing Wheel),创建下一层时间轮的策略是
假设低一层的单位时间是 tickMs,时间轮上总共 x 个 bucket,则新一层的单位时间是 x * tickMs,本层的 bucket 也是 x 个
由此,我们得到了这样的结构:
注意 bucket 上的数字代表 bucket 的编号:
- 02 即 bucket-0-2,表示第 0 层,第 2 个 bucket
- 10 即 bucket-1-0 表示第 1 层,第 0 个 bucket
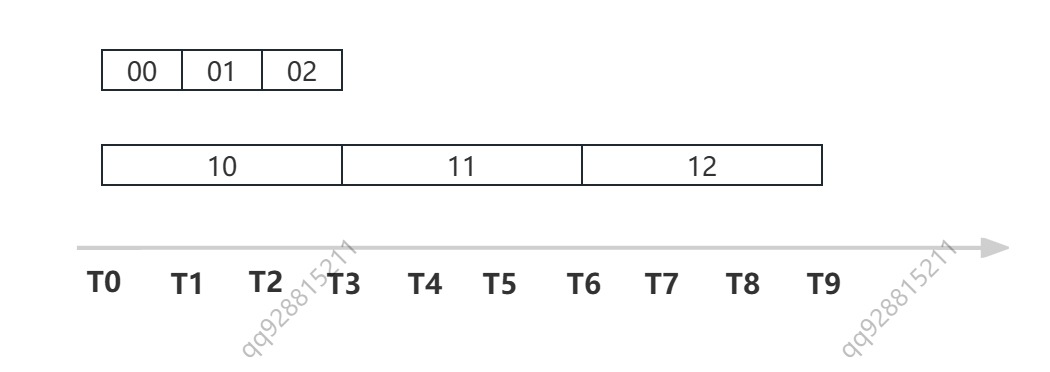
这样,我们需要创建一个 T5 时刻的延时任务的话,就可以把任务插入到 bucket-1-1 中了。
如果我们要创建一个 T21 时刻的延时任务呢?那就再扩展一层时间轮,这个任务会被插入到 bucket-2-2 中。
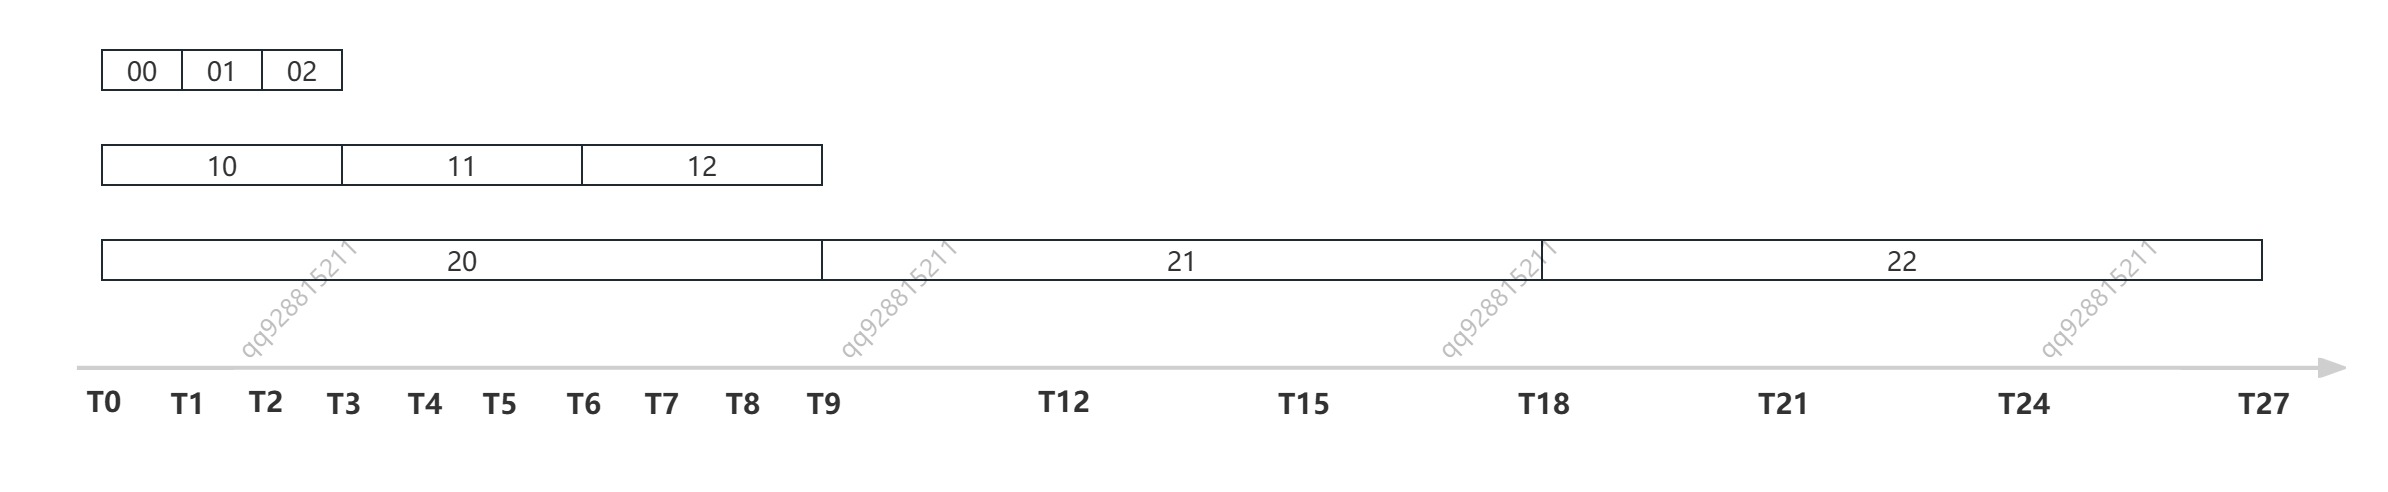
如上图所示,多层时间轮可以按需扩展,每一层的总时间都是低一层的 bucket_size 倍,这样的话,用不了多少层,就能覆盖很大的时间区间,完全可以覆盖 kafka 的使用场景了。
ok,到这里我们了解了多层时间轮的基本结构,下面再来看一看多层时间轮是如何随时间推进的。
1. 多层时间轮的推进
如下图所示:
- 最底层时间轮的时间跨度即为单位时间 tickMs,每经过单位时间,最底层的时间轮就推进一次,即就发生一次复用。
- 第二层的单位时间,是第一层的 bucket_size 倍,即第二层单位时间是
tickMs * bucket_size,所以每经过tickMs * bucket_size复用一次。 - 第三层的单位时间,是第二层的 bucket_size 倍,即第三层单位时间是
tickMs * bucket_size * bucket_size,所以每经过tickMs * bucket_size * bucket_size复用一次
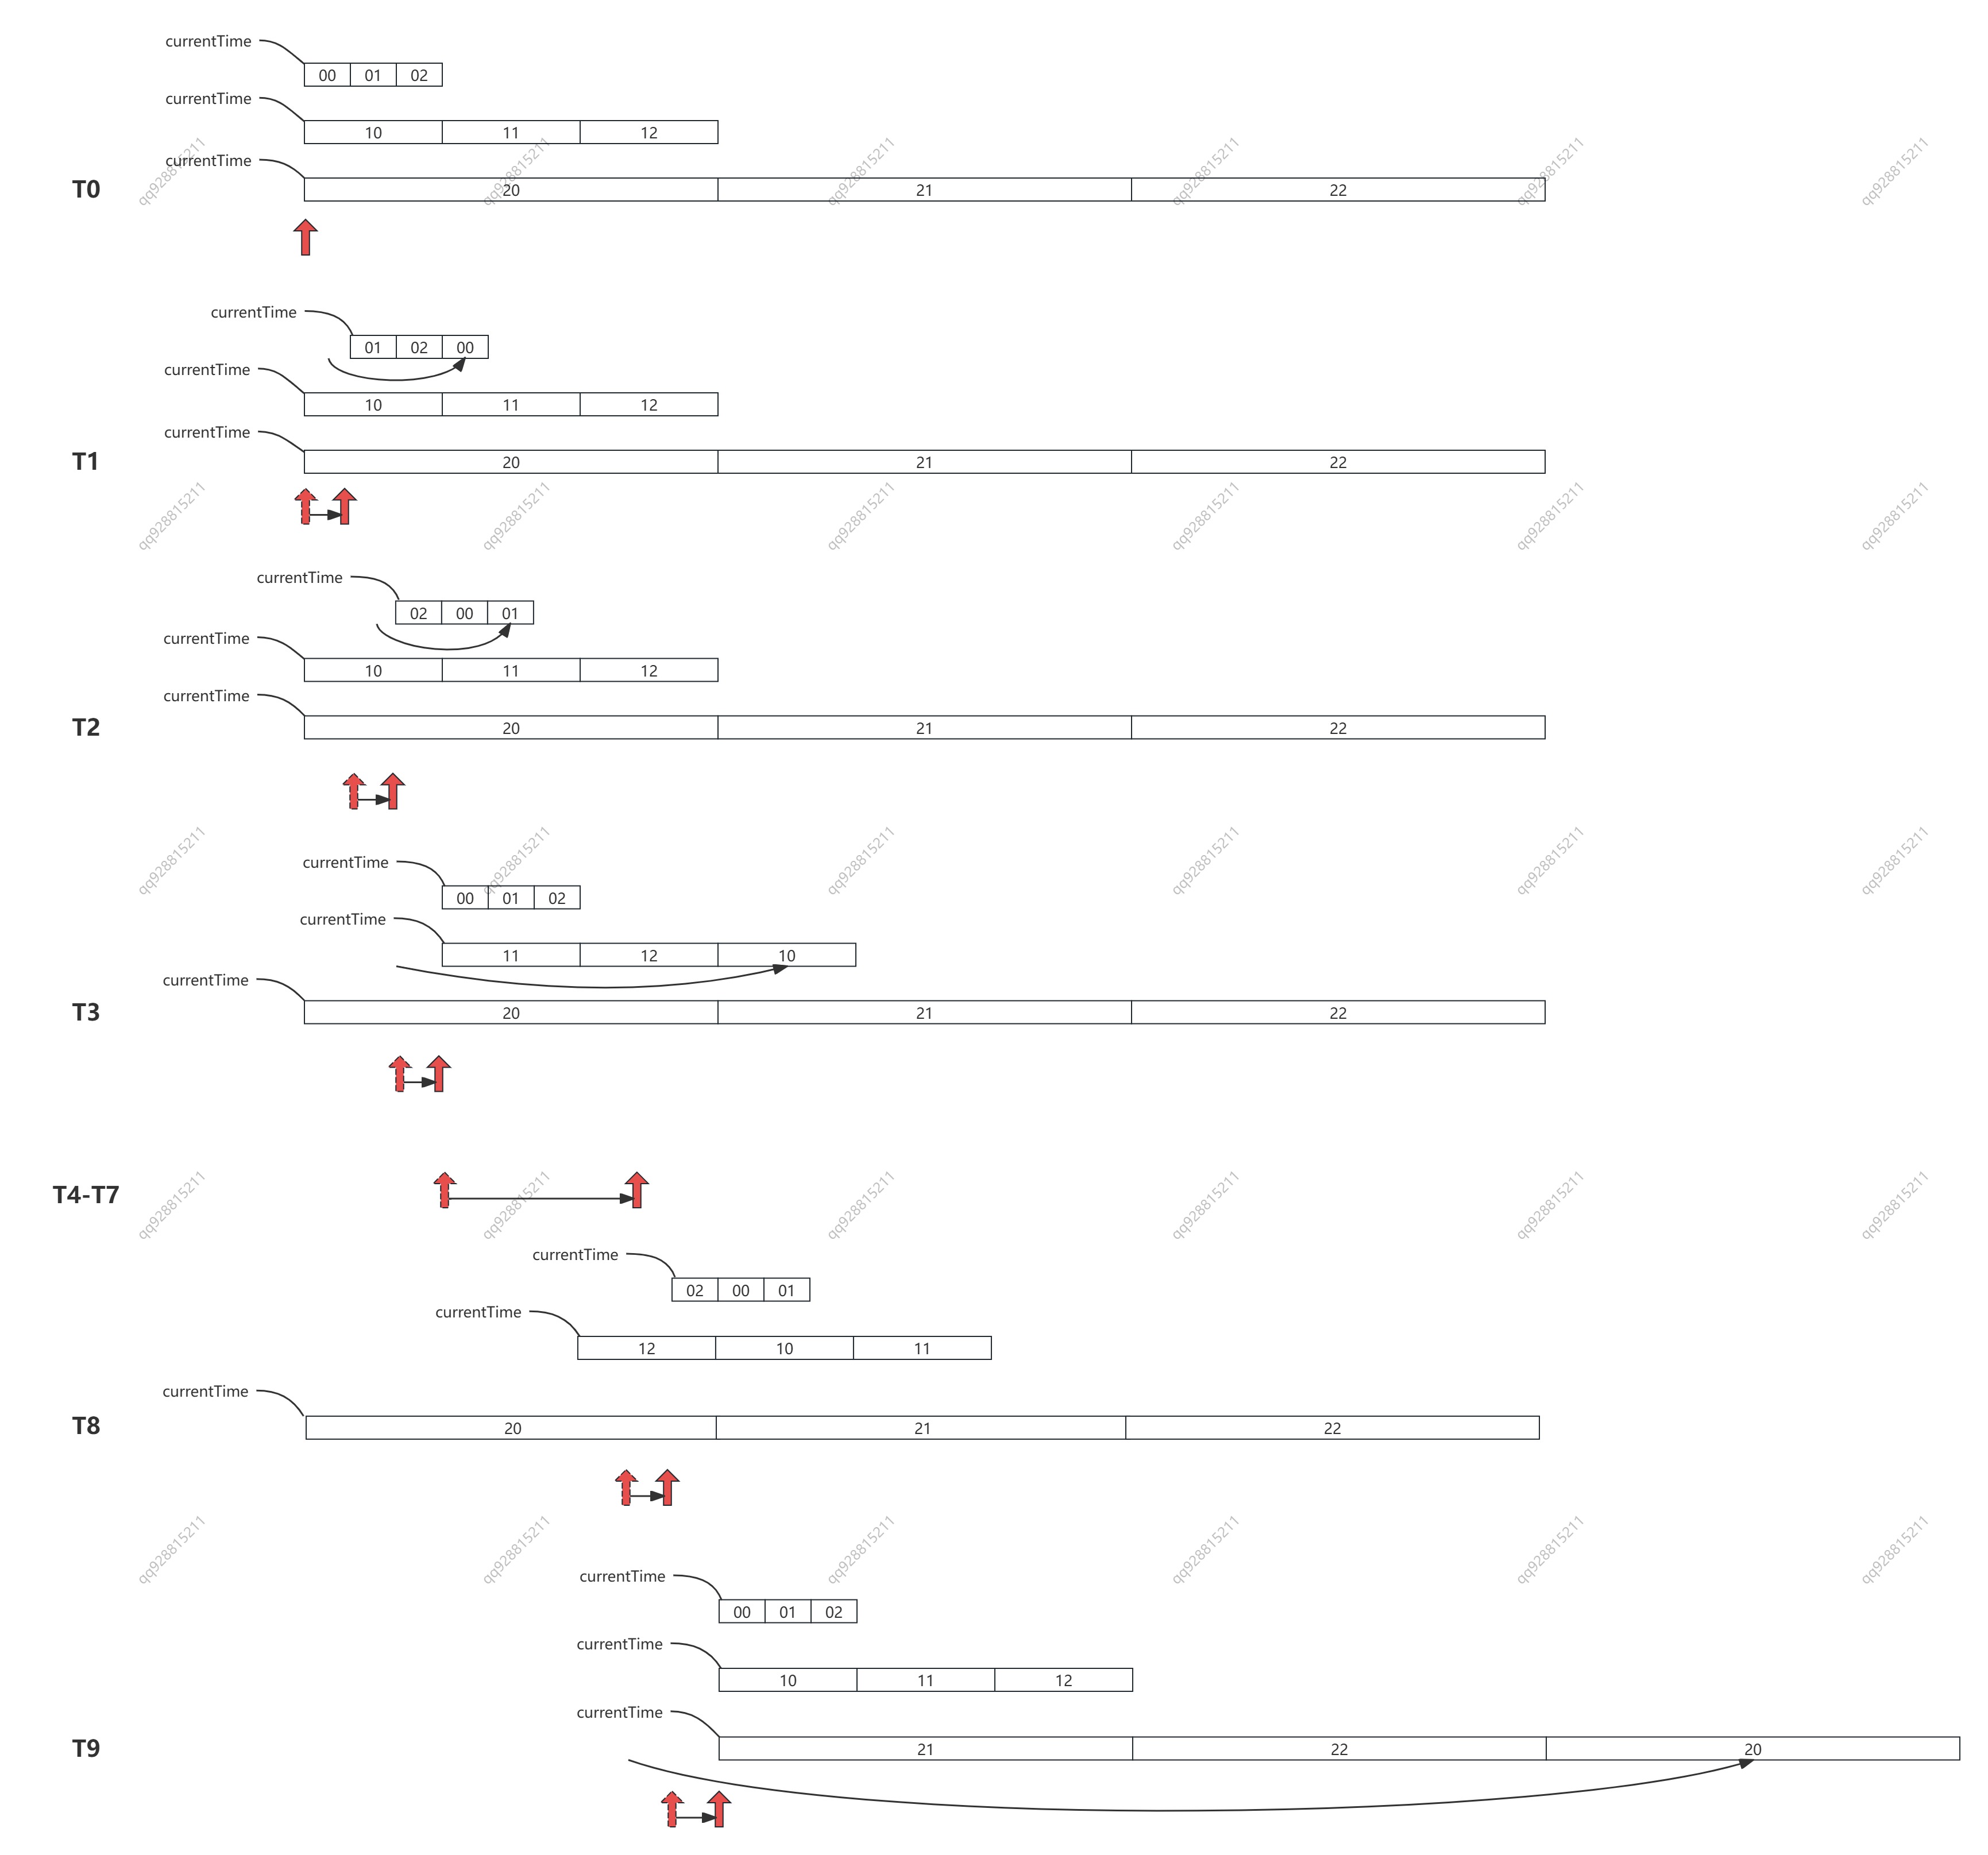
下面我们来拆解这个过程:
- T0-T1 时刻,最底层的 00 号桶发生了复用。
- T1-T2 时刻,01 号桶复用
- T2-T3 时刻,02 号桶复用;此时距离 T0 过去了 bucket_size * tickMS,等于第二层的单位时间长度,第二层的 10 号桶发生了复用。
- T3-T4 时刻,00 号桶复用;
- T4-T5 时刻,01 号桶复用;
- T5-T6 时刻,02 号桶复用;第二层的 11 号桶复用;
- T6-T7 时刻,00 号桶复用;
- T7-T8 时刻,01 号桶复用;
- T8-T9 时刻,02 号桶复用;第二层的 12 号桶复用;此时距离 T0 过去了 bucket_size * tickMS(第二层),等于第三层的单位时间长度,第三层的 20 号桶发生了复用
- ......
如此循环往复,便完成了整个多层时间轮的复用。
2. 多层时间轮的任务流转
在我们往时间轮的 bucket 中塞任务的时候,同时会把 bucket 放进一个 java.concurrent.DelayQueue 中,利用这个 DelayQueue 来探测 bucket 到期与否,如果到期则执行 bucket 中的任务。
注意:DelayQueue 内部是一个小根堆。这里是把 bucket 放入堆中,而不是把任务放入堆中,这样做可以大大减少堆中元素的个数
如下图所示,假设 bucket_size(wheelSize) = 3,tickMs = 1ms,当前时间是 1741654300000,我们需要延时执行 6 个任务,执行时间分别是:
- job1 = 1741654300001
- job2 = 1741654300017
- job3 = 1741654300003
- job4 = 1741654300005
- job5 = 1741654300009
- job6 = 1741654300014
那么,T0 时刻他们将被插入到图片里显示的 bucket 01、11、21 中。此时,bucket-0-1 的超时时间剩余 1ms,bucket-1-1 的超时时间剩余 3ms,bucket-2-1 的超时时间剩余 9ms,那么 DelayQueue 中就会插入三个元素。
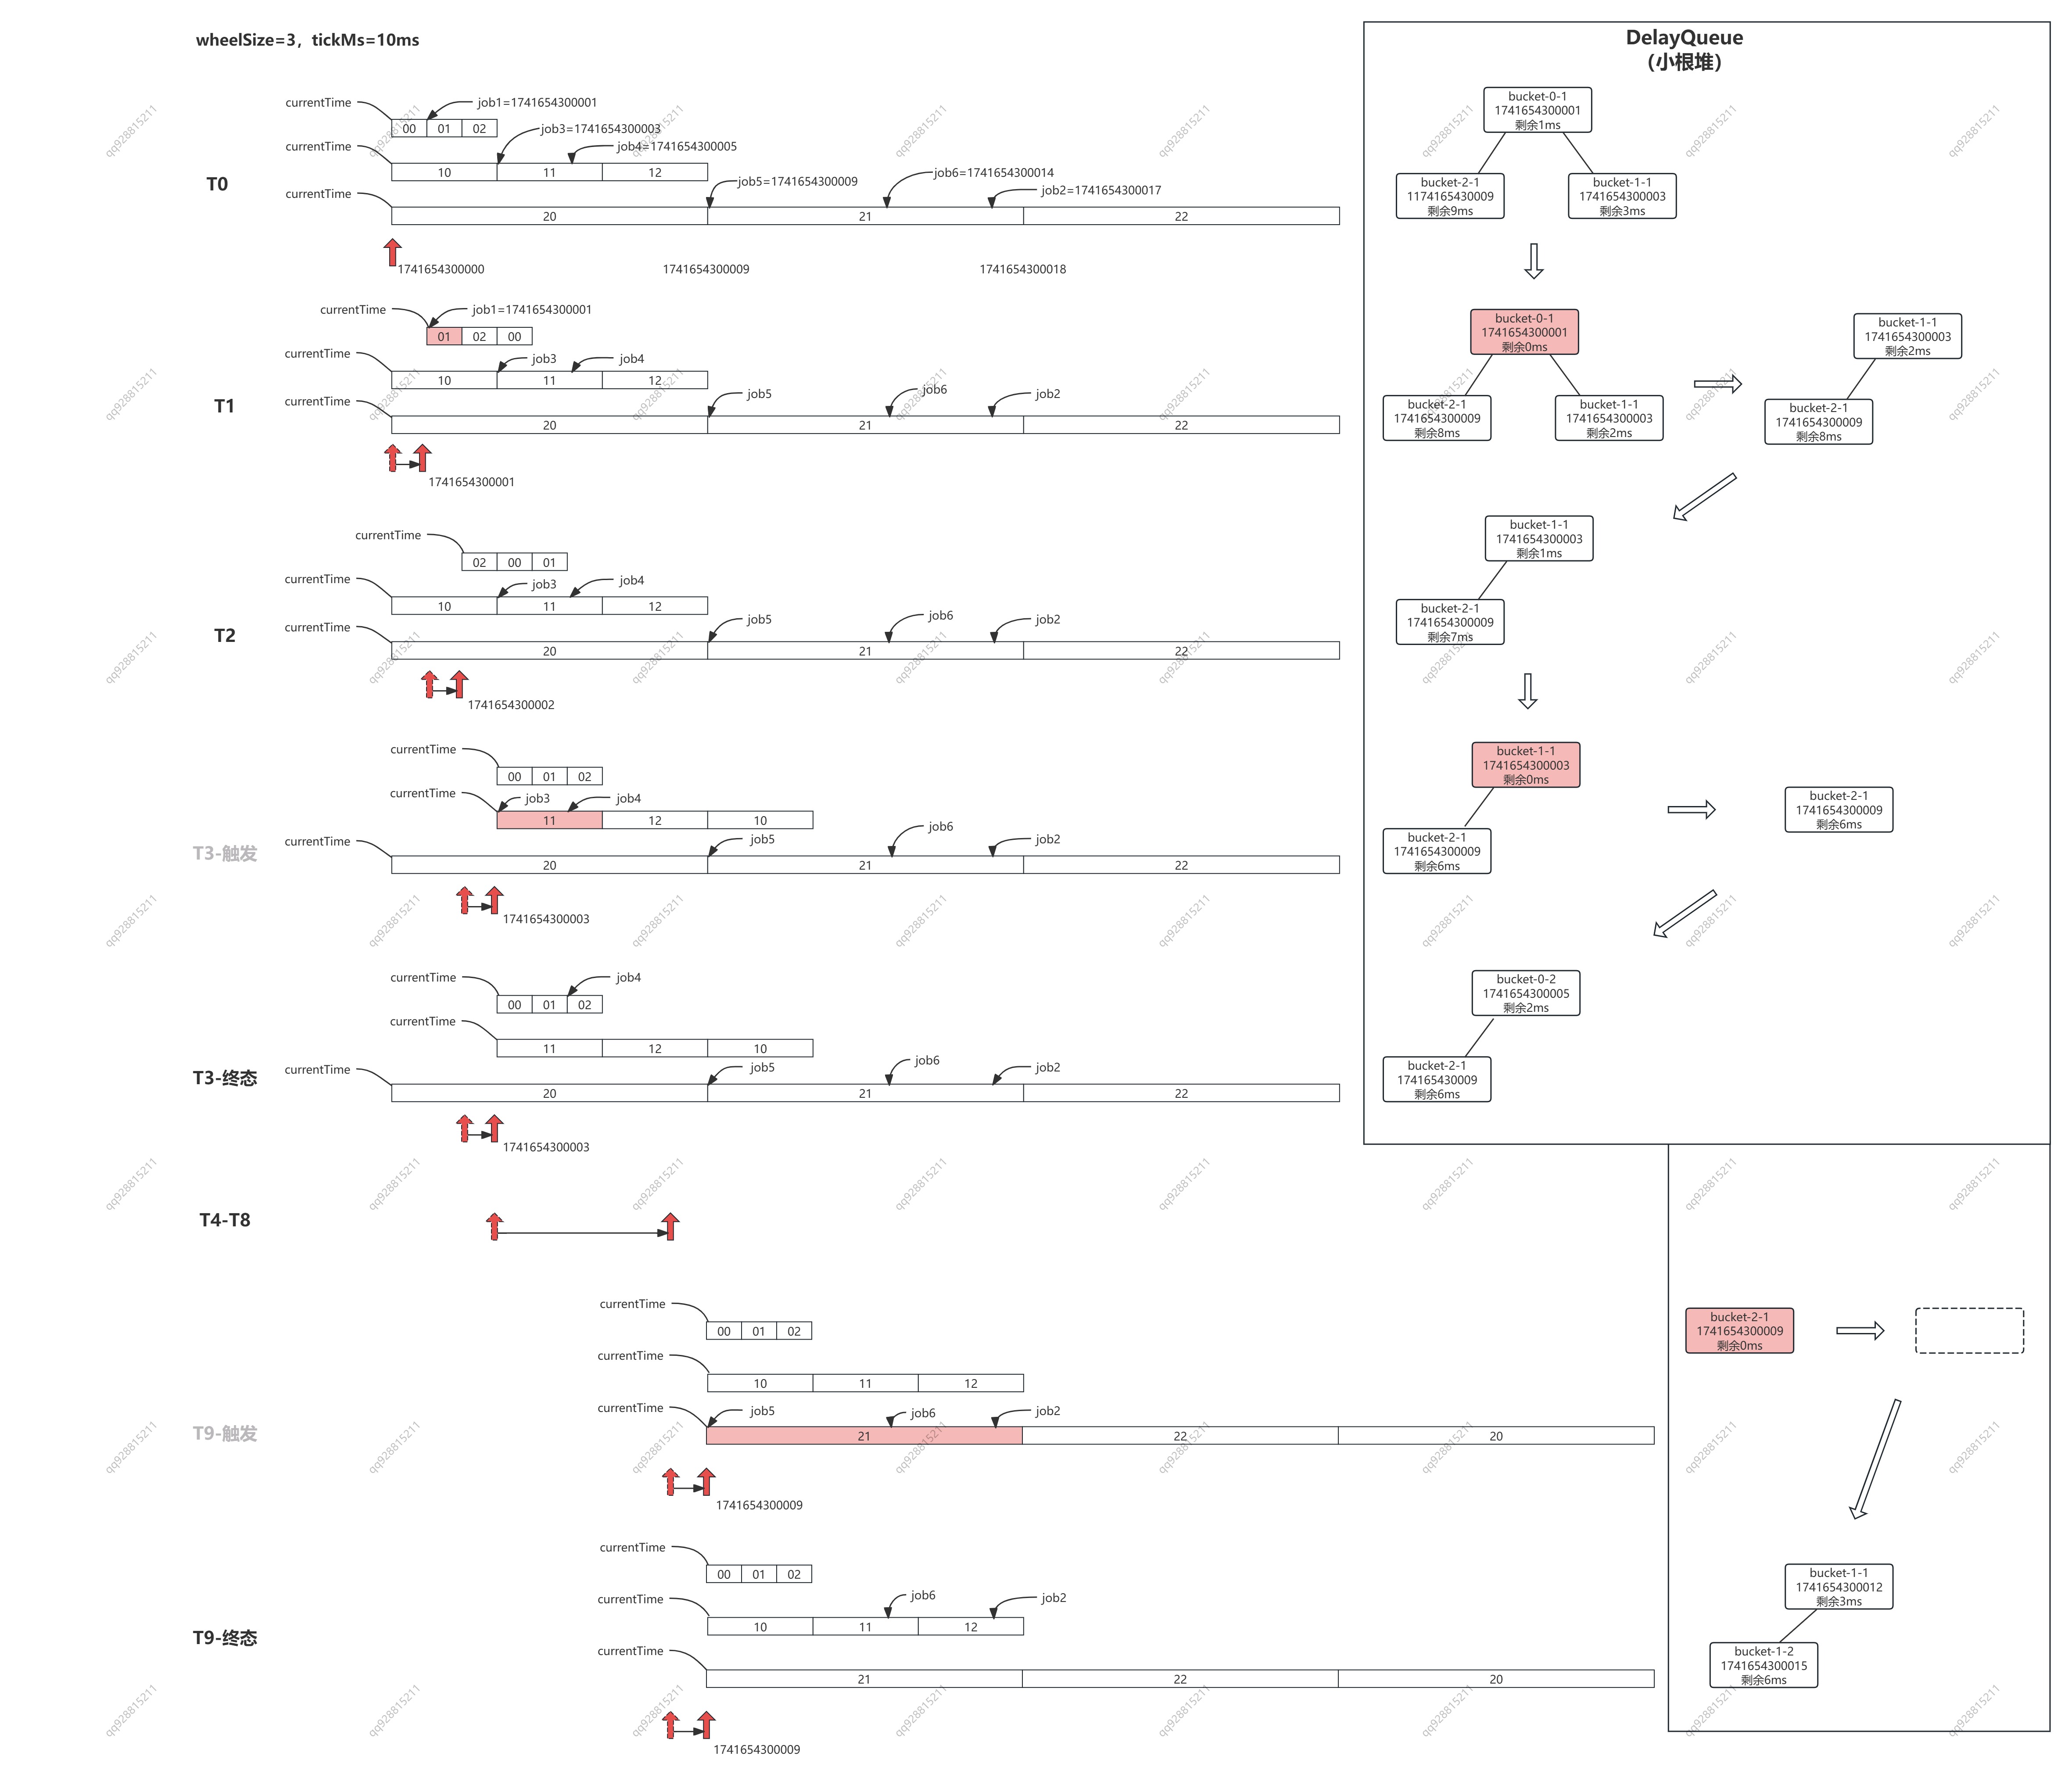
流程拆解:
- T1 = 1741654300001,图片左边 bucket-0-0 轮转,堆中的元素超时时间 -1,图片右边堆中 bucket-0-1 到期,执行其中的任务 job1,堆中只剩两个 bucket
- T2 = 1741654300002,图片左边 bucket-0-1 轮转,堆中的元素超时时间 -1
- T3 = 1741654300003,图片左边 bucket-0-2 bucket-1-0 轮转,堆中的元素超时时间 -1,图片右边堆中 bucket-1-1 到期,其中 job3 的过期时间已到,直接执行,但 job4 的过期时间是 1741654300005,还剩 2ms,因此被插入到第一层时间轮的 bucket-0-2 中。堆中的元素先减少到一个,再增加到两个。
- ......
- T9 = 1741654300009,图片左边 bucket-0-2 bucket-1-2 bucket-2-0 轮转,堆中的元素超时时间 -1,图片右边堆中 bucket-2-1 到期,其中job5 过期时间已到,直接执行,job6 还剩 5ms,被插入到 bucket-1-1 中,job2 还剩 8ms,被插入到 bucket-1-2 中。堆中的元素先减少到 0 个,再增加到 2 个。
......
如此循环往复,便完成了任务的聚合的分级聚合,避免了一股脑将所有的任务全都塞到 DelayQueue 中。
三、源码中的时间轮 TimingWheel
1. TimingWheel 的实现
现在,我们已经了解了时间轮的工作流程,下来我们看一看 Kafka 的源码中是如何实现的:
/**
 *
 * @param tickMs      最小时间单位,对应最小的 bucket 所管理的时间范围;默认是 1 毫秒
 * @param wheelSize   bucket 的数量;默认是 20
 * @param startMs     TimingWheel 所管理的时间范围的起点,会向下取整到 tickMs 的整数倍,并赋值给 currentTime 再用
 * @param taskCounter 整个 TimingWheel 中,任务的总数
 * @param queue       延迟队列。使用的是 java.concurrent.DelayQueue 它的内部是一小根堆,每一个 item 对应一个 bucket。
 *                    Kafka 实际上是用它来实现延迟任务的,TimingWheel 的实际作用是任务的分级聚合,
 *                    通过把 bucket 放进 DelayQeue(而不是具体任务),避免任务过多时系统负载太大的问题
 */
@nonthreadsafe
private[timer] class TimingWheel(tickMs: Long, wheelSize: Int, startMs: Long, taskCounter: AtomicInteger, queue: DelayQueue[TimerTaskList]) {

  // 当前层 TimingWheel 管理的总时长
  private[this] val interval = tickMs * wheelSize

  // 当前层 TimingWheel 的所有 Bucket 对象(每个 bucket 就是一个 TimerTaskList 对象,对应多个延迟任务)
  private[this] val buckets = Array.tabulate[TimerTaskList](wheelSize) { _ => new TimerTaskList(taskCounter) }

  // 将 startMs 向下取整到 tickMs 的整数倍(得到 currentTime 之后 startMs 就没用了)
  private[this] var currentTime = startMs - (startMs % tickMs) // rounding down to multiple of tickMs

  // overflowWheel can potentially be updated and read by two concurrent threads through add().
  // Therefore, it needs to be volatile due to the issue of Double-Checked Locking pattern with JVM
  //
  // 由于可能有多个线程同时 update/read 多层 TimingWheel,所以需要加上 volatile 修饰
  //
  // kafka 按需创建 TimingWheel,如果要执行一个很久之后的任务,
  // 其等待时长超过了本层的 currentTime + interval,就会去创建下一层 TimingWheel。
  @volatile private[this] var overflowWheel: TimingWheel = null

  // 创建更高层 TimingWheel
  private[this] def addOverflowWheel(): Unit = {
    synchronized {
      if (overflowWheel == null) {
        overflowWheel = new TimingWheel(
          tickMs = interval,          // 单位时间 等于上一层 TimingWheel 所覆盖总时长
          wheelSize = wheelSize,      // 与上一层 TimingWheel 的 bucket 数量保持一致
          startMs = currentTime,      // 与上一层 TimingWheel 的起始时间保持一致
          taskCounter = taskCounter,  // 同一个 AtomicInteger;所以它代表多层 TimingWheel 的任务总数
          queue                       // 同一个延迟队列,同时管理多层 TimingWheel,
                                      // 任意一层有 bucket 过期的时候,都会触发 advanceClock 推进时钟
        )
      }
    }
  }

  // 向 TimingWheel 中添加一个定时任务。
  // 注意,这里是从最低一层 TimingWheel 中开始寻找合适的 bucket,
  // 找不到就寻找高一层 TimingWheel,如果最终还是找不到,就说明 TimingWheel 不够大,
  // 这时候就调用上面的 addOverflowWheel 再新增一层 TimingWheel
  def add(timerTaskEntry: TimerTaskEntry): Boolean = {

    // 获取待添加任务的过期时间
    val expiration = timerTaskEntry.expirationMs

    if (timerTaskEntry.cancelled) {
      // 任务被标记为 cancelled,则不添加
      false
    } else if (expiration < currentTime + tickMs) {
      // 任务已经到期了,则不添加 (任务时间等于/早于最新 bucket 的时间,无法再被调度了)
      // 更上一层调用方,会在这情况下直接去执行任务
      false
    } else if (expiration < currentTime + interval) {
      // 任务过期时间处于当前层 TimingWheel,则放入对应的 bucket

      // 找到对应的 bucket
      //
      // 按最朴素的思路来说,我们可能会用 (expiration-currentTime)/tickMs 来计算是哪一个 bucket。
      // 但这是有问题的,考虑下面的场景:
      // wheelSize=20,tickMs=10ms,currentTime=1744444000000
      //
      // 此时,我们插入一个 1744444000161 的任务,按我们的算法,此时应该插入到 buckets[16] 中,
      //
      // 100ms 之后,时钟推进 10 次,currentTime=1744477900100,
      // 我们再插入一个 1744477900161 的任务,按我们的算法,此时就会插入到 buckets[6] 中,
      //
      // 这就和设计的初衷背离了,同一个时间点(段)的任务,被插到了不同 bucket 中,bucket 中的数据就乱了。
      // 所以,kafka采用了【时间轮】的思路来计算 bucket:
      //
      // 想象一下,时间延展,就像坐标轴永远向前,有一个(wheelSize 等分,每份圆弧长度是 tickMs 的)圆形车轮,
      // 一直在上面向前滚动,任何一个时间点,都能在这个车轮上找到对应的 bucket,并且命中注定不会改变
      //
      val virtualId = expiration / tickMs
      val bucket = buckets((virtualId % wheelSize.toLong).toInt)

      // 向双向链表中插入一个 TimerTaskEntry
      bucket.add(timerTaskEntry)

      // 设置 bucket 过期时间
      //
      // 内部逻辑: return expiration.getAndSet(expirationMs) != expirationMs
      //
      // a. 如果返回 false,则说明 bucket 仍然有效,它所覆盖的时间段还没有过去
      // b. 如果返回 true,则说明 bucket 所负责的时间段已经过去了(即 TimingWheel 发生了轮转),
      //    需要重用 bucket,重新将他放入队列中
      if (bucket.setExpiration(virtualId * tickMs)) {

        // 这里很重要。过期任务的触发,是依赖于 DelayQueue 来监督 bucket 的过期时间的,
        // DelayQueue 才是真正延时和排序的地方。
        queue.offer(bucket)
      }
      true
    } else {
      // expiration > currentTime + interval
      // 超过当前层 TimingWheel,放到更高层去
      if (overflowWheel == null) addOverflowWheel()
      overflowWheel.add(timerTaskEntry)
    }
  }

  /**
   * 推进时钟
   *
   * SystemTimer 会一直调用 DelayQueue.poll(timeout),如果某一个 bucket 过期了,就会 poll 到这个 bucket,
   * 然后会尝试调用本方法推进时钟,此时入参 timeMs = bucket.expiration
   *
   * 所谓推进时钟,其实就是推进 TimingWheel 的 currentTime,currentTime 是 TimingWheel 的基准点
   * currentTime 推进了,每一个 bucket 对应的时间区间也就相当于向前推进了
   */
  def advanceClock(timeMs: Long): Unit = {

    // 对最低层的 TimingWheel 来说,一定成立,每次都会推进
    // 对于更高层 TimingWheel 来说,它的 tickMs 很长,并不一定每次都推进
    //
    // 如果按默认值 wheelSize = 20,
    // 第一层推进20次,第二层会推进一次;
    // 第一层推进200次,第二层会推进10次,第三层才会推进1次;
    // ......
    if (timeMs >= currentTime + tickMs) {

      // 确保 currentTime 是 tickMs 的整数倍
      currentTime = timeMs - (timeMs % tickMs)

      // 尝试推进高层 TimingWheel 的时钟
      if (overflowWheel != null) overflowWheel.advanceClock(currentTime)
    }
  }
}
2. Bucket 的实现
下面是 TimingWheel 中 bucket 的实现,它的核心其实是一个双向链表,每当有任务被插入桶中时,就会插入到双向链表的最后。
/**
 * TimerTaskList 就是 TimingWheel 中的 bucket
 * 它持有一个双向循环链表,它的每个节点都是一个 TimerTaskEntry,
 * 每一个 TimerTaskEntry 对应着一个定时任务(TimerTask)
 */
@threadsafe
private[timer] class TimerTaskList(taskCounter: AtomicInteger) extends Delayed {

  // TimerTaskList forms a doubly linked cyclic list using a dummy root entry
  // root.next points to the head
  // root.prev points to the tail

  // 链表有一个空的根节点
  private[this] val root = new TimerTaskEntry(null, -1)
  root.next = root
  root.prev = root

  // 超时时间
  private[this] val expiration = new AtomicLong(-1L)

  // 设置 bucket 的超时时间,返回 true 表示设置成功
  def setExpiration(expirationMs: Long): Boolean = {
    expiration.getAndSet(expirationMs) != expirationMs
  }

  // Get the bucket's expiration time
  def getExpiration: Long = expiration.get

  // 向链表中插入一个 TimerTaskEntry
  def add(timerTaskEntry: TimerTaskEntry): Unit = {
    var done = false
    while (!done) {

      // Remove the timer task entry if it is already in any other list
      // We do this outside of the sync block below to avoid deadlocking.
      // We may retry until timerTaskEntry.list becomes null.
      //
      // 如果 timerTaskEntry 已经在其他 TimerTaskList 中,
      // 需要先解除 timerTaskEntry 和其他 TimerTaskList 的互相引用:
      // 1. list.remove(entry)
      // 2. entry.list = null
      timerTaskEntry.remove()

      synchronized {
        timerTaskEntry.synchronized {
          if (timerTaskEntry.list == null) {

            // 双向链表的插入
            val tail = root.prev
            timerTaskEntry.next = root
            timerTaskEntry.prev = tail
            timerTaskEntry.list = this
            tail.next = timerTaskEntry
            root.prev = timerTaskEntry

            // 任务计数器+1
            taskCounter.incrementAndGet()
            done = true
          }
        }
      }
    }
  }

  // 从链表中移除一个任务
  def remove(timerTaskEntry: TimerTaskEntry): Unit = {
    synchronized {
      timerTaskEntry.synchronized {
        if (timerTaskEntry.list eq this) {
          // 双向链表的移除
          timerTaskEntry.next.prev = timerTaskEntry.prev
          timerTaskEntry.prev.next = timerTaskEntry.next

          // 清空 entry 和 bucket 间的互相引用
          timerTaskEntry.next = null
          timerTaskEntry.prev = null
          timerTaskEntry.list = null

          taskCounter.decrementAndGet()
        }
      }
    }
  }
  ......
}
3. Bucket 中的 TimerTaskEntry
上面说了 bucket 其实是一个双向链表 list[TimerTaskEntry],那么 TimerTaskEntry 是什么结构呢?
private[timer] class TimerTaskEntry(val timerTask: TimerTask, val expirationMs: Long) extends Ordered[TimerTaskEntry] {

  // entry 和 list(bucket) 互相引用
  @volatile
  var list: TimerTaskList = null

  // 双向链表的前向和后向节点
  var next: TimerTaskEntry = null
  var prev: TimerTaskEntry = null

  // if this timerTask is already held by an existing timer task entry,
  // setTimerTaskEntry will remove it.
  //
  // TimerTask 和 TimerTaskEntry 也互相引用
  if (timerTask != null) timerTask.setTimerTaskEntry(this)

  // 任务是否取消: TimerTask 对 TimerTaskEntry 的引用是否存在
  def cancelled: Boolean = {
    timerTask.getTimerTaskEntry != this
  }

  // 移除(取消)任务,实际就是
  // 1. 将当前 entry 从 TimerTaskList 中移除
  // 2. 将 entry 中的 list、next、prev 置空
  def remove(): Unit = {
    var currentList = list
    // If remove is called when another thread is moving the entry from a task entry list to another,
    // this may fail to remove the entry due to the change of value of list. Thus, we retry until the list becomes null.
    // In a rare case, this thread sees null and exits the loop, but the other thread insert the entry to another list later.
    while (currentList != null) {
      currentList.remove(this)
      currentList = list
    }
  }
  ......
}
4. 延时任务 TimerTask
TimerTask 就是整个时间轮最底层粒度的延时任务了,到这里,我们简单画一下时间轮的结构:
// TimingWheel
//     ├── tickMs       当前层最小时间粒度
//     ├── wheelSize    当前层 bucket 的数量
//     ├── interval     tickMs * wheelSize,即当前层 TimingWheel 所覆盖的总时长
//     ├── currentTime  当前层 TimingWheel 的起始时间
//     ├── buckets
//     │      ├── Bucket[0]
//     │      │     ├── TimerTaskEntry[0] ── TimerTask
//     │      │     ├── TimerTaskEntry[1] ── TimerTask
//     │      │     ├── TimerTaskEntry[2] ── TimerTask
//     │      │     ......
//     │      ├── Bucket[1]
//     │      │     ├── TimerTaskEntry[0] ── TimerTask
//     │      │     ├── TimerTaskEntry[1] ── TimerTask
//     │      │     ├── TimerTaskEntry[2] ── TimerTask
//     │      │     ......
//     │      ......
//     │
//     ├── overflowWheel ── TimingWheel
//                              ├── tickMs       当前层最小时间粒度
//                              ├── wheelSize    当前层 bucket 的数量
//                              ├── interval     tickMs * wheelSize,即当前层 TimingWheel 所覆盖的总时长
//                              ├── currentTime  当前层 TimingWheel 的起始时间
//                              ├── buckets
//                              │      ├── Bucket[0]
//                              │      │     ├── TimerTaskEntry[0] ── TimerTask
//                              │      │     ├── TimerTaskEntry[1] ── TimerTask
//                              │      │     ├── TimerTaskEntry[2] ── TimerTask
//                              │      │     ......
//                              │      ├── Bucket[1]
//                              │      │     ├── TimerTaskEntry[0] ── TimerTask
//                              │      │     ├── TimerTaskEntry[1] ── TimerTask
//                              │      │     ├── TimerTaskEntry[2] ── TimerTask
//                              │      │     ......
//                              │      ......
//                              │
//                              ├── overflowWheel 高一层时间轮
//
下面就是 TimerTask 啦,注意它只是一个继承了 runnable 的接口哦,具体的任务会有具体的 run 方法。
trait TimerTask extends Runnable {

  // 计划执行任务的时间
  val delayMs: Long // timestamp in millisecond

  // TimerTask 和链表的表项 TimerTaskEntry 互相引用
  private[this] var timerTaskEntry: TimerTaskEntry = null

  // 取消任务: 即取消和 TimerTaskEntry 的互相引用
  // 1. 调用 timerTaskEntry.remove(),取消 timerTaskEntry 和链表 TimerTaskList 的互相引用
  // 2. 将 timerTaskEntry 置空
  def cancel(): Unit = {
    synchronized {
      if (timerTaskEntry != null) timerTaskEntry.remove()
      timerTaskEntry = null
    }
  }

  // 关联 TimerTaskEntry
  private[timer] def setTimerTaskEntry(entry: TimerTaskEntry): Unit = {
    synchronized {
      // if this timerTask is already held by an existing timer task entry,
      // we will remove such an entry first.
      if (timerTaskEntry != null && timerTaskEntry != entry)
        timerTaskEntry.remove()

      timerTaskEntry = entry
    }
  }

  // 获取 timerTaskEntry 实例
  private[timer] def getTimerTaskEntry: TimerTaskEntry = timerTaskEntry

}
四、TimingWheel 的使用
下面,我们以 创建 topic 作为切入点,来一起学习一下时间轮(TimingWheel) 是如何在 Kafka 中应用的。
  def createTopics(// 请求的超时时间
                   timeout: Int,
                   // 允许模拟创建以校验参数(仅执行参数检查和副本分配计算)
                   validateOnly: Boolean,
                   // 待创建的 topic 信息,key 为 topic 名,value 包含分区数、副本因子、配置等
                   toCreate: Map[String, CreatableTopic],
                   // 如果请求者有 DescribeConfigs 权限,该参数会存储 topic 的配置信息和元数据,以便返回给客户端
                   includeConfigsAndMetadata: Map[String, CreatableTopicResult],
                   // 用于控制 controller 请求 zk 的速率,防止把 zk 打挂了
                   controllerMutationQuota: ControllerMutationQuota,
                   // 请求结束后的回调方法,用户返回 response 给请求方
                   responseCallback: Map[String, ApiError] => Unit): Unit = {

    // 获取存活的 broker 信息,用于分配 partition
    val brokers = metadataCache.getAliveBrokers.map { b => kafka.admin.BrokerMetadata(b.id, b.rack) }

    // 遍历待创建的 topic,进行参数校验和副本分配
    val metadata = toCreate.values.map(topic =>
      try {
        // 参数校验,比如:
        // 1. topic 必须不存在
        // 2. topic 配置项中不能有 null
        // 2. 不能同时指定分区数、复制因子和手动分配的副本列表
        ......

        // 如果未指定分区数,使用默认值
        val resolvedNumPartitions = if (topic.numPartitions == NO_NUM_PARTITIONS)
          defaultNumPartitions else topic.numPartitions

        // 如果未指定副本因子,使用默认值
        val resolvedReplicationFactor = if (topic.replicationFactor == NO_REPLICATION_FACTOR)
          defaultReplicationFactor else topic.replicationFactor

        // 分配副本
        val assignments = if (topic.assignments.isEmpty) {
          // 分配副本,这里我们有机会再详细研究下
          AdminUtils.assignReplicasToBrokers(
            brokers, resolvedNumPartitions, resolvedReplicationFactor)
        } else {
          // 用户自定义副本分配
          val assignments = new mutable.HashMap[Int, Seq[Int]]
          // Note: we don't check that replicaAssignment contains unknown brokers - unlike in add-partitions case,
          // this follows the existing logic in TopicCommand
          topic.assignments.forEach { assignment =>
            assignments(assignment.partitionIndex) = assignment.brokerIds.asScala.map(a => a: Int)
          }
          assignments
        }

        ......

        // 判断是否只是验证请求,而不实际创建 topic
        if (validateOnly) {
          CreatePartitionsMetadata(topic.name, assignments.keySet)
        } else {
          // 限流器记录一次调用
          controllerMutationQuota.record(assignments.size)

          // 创建 /config/topics/[topic_name]
          // 创建 /brokers/topics,并写入数据(eg:{"version":2,"partitions":{"0":[2]},"adding_replicas":{},"removing_replicas":{}})
          adminZkClient.createTopicWithAssignment(topic.name, configs, assignments, validate = false)
          CreatePartitionsMetadata(topic.name, assignments.keySet)
        }
      } catch {
        ......
      }).toBuffer

    // 如果满足下列三点中的一个,则立刻返回
    //    a. 用户要求立刻返回(在请求里设置了 timeout < 0)
    //    b. 用户只是为了验证 topic 的参数
    //    c. 所有的请求都成功了没有error
    if (timeout <= 0 || validateOnly || !metadata.exists(_.error.is(Errors.NONE))) {
      val results = metadata.map { createTopicMetadata =>
        // ignore topics that already have errors
        if (createTopicMetadata.error.isSuccess && !validateOnly) {
          (createTopicMetadata.topic, new ApiError(Errors.REQUEST_TIMED_OUT, null))
        } else {
          (createTopicMetadata.topic, createTopicMetadata.error)
        }
      }.toMap
      responseCallback(results)
    } else {
      // else pass the assignments and errors to the delayed operation and set the keys
      // 用户设置了超时时间,超时之后再返回,创建延时请求
      val delayedCreate = new DelayedCreatePartitions(timeout, metadata, this,
        responseCallback)

      // DelayOp 对应有一个 key,在这种场景下,就是 topic.name
      val delayedCreateKeys = toCreate.values.map(topic => TopicKey(topic.name)).toBuffer

      // 尝试立刻完成请求,如果不成功,则放入 Purgatory 中。
      // Purgatory 可以理解为一个临时暂存区,用于暂存这些 Delay Operation
      topicPurgatory.tryCompleteElseWatch(delayedCreate, delayedCreateKeys)
    }
  }
1. Purgatory
创建 topic 的代码最后,提到了一个 topicPurgatory,那么这是什么东西呢?
class AdminManager(val config: KafkaConfig,
                   val metrics: Metrics,
                   val metadataCache: MetadataCache,
                   val zkClient: KafkaZkClient) extends Logging with KafkaMetricsGroup {

  this.logIdent = "[Admin Manager on Broker " + config.brokerId + "]: "

  private val topicPurgatory = DelayedOperationPurgatory[DelayedOperation]("topic", config.brokerId)

  ......
}
DelayedOperationPurgatory 实际上是一个用来管理带有延迟时间的、带有具体操作内容的延迟请求(delayed operation)的 helper 类。
DelayedOperationPurgatory 类是一个泛型类,它的参数类型是 DelayedOperation 的具体子类。因此,通常情况下,每一类延迟请求都对应于一个 DelayedOperationPurgatory 实例。这些实例一般都保存在上层的管理器中。比如,与消
费者组相关的心跳请求、加入组请求的 Purgatory 实例,就保存在 GroupCoordinator 组件中;我们上文提到的管理 topic 延迟请求的 Purgatory 实例,就保存在 AdminManager 组件中。
object DelayedOperationPurgatory {

  private val Shards = 512 // Shard the watcher list to reduce lock contention

  def apply[T <: DelayedOperation](purgatoryName: String,
                                   brokerId: Int = 0,
                                   purgeInterval: Int = 1000,
                                   reaperEnabled: Boolean = true,
                                   timerEnabled: Boolean = true): DelayedOperationPurgatory[T] = {
    val timer = new SystemTimer(purgatoryName)
    new DelayedOperationPurgatory[T](purgatoryName, timer, brokerId, purgeInterval, reaperEnabled, timerEnabled)
  }

}
我们注意到,每一个具体的 Purgatory 实例中,都有一个 SystemTimer 对象,这个 SystemTimer 其实就持有着 TimingWheel 对象、延迟队列 DelayQueue 对象等,负责管理这个 Purgatory 的添加新任务、推进时钟、执行任务等工作。
2. SystemTimer
@threadsafe
class SystemTimer(executorName: String,
                  tickMs: Long = 1,
                  wheelSize: Int = 20,
                  startMs: Long = Time.SYSTEM.hiResClockMs) extends Timer {

  // 单线程的线程池,负责执行到期的任务
  private[this] val taskExecutor = Executors.newFixedThreadPool(1,
    (runnable: Runnable) => KafkaThread.nonDaemon("executor-" + executorName, runnable))

  // 延迟队列,负责监督 bucket 是否到期
  private[this] val delayQueue = new DelayQueue[TimerTaskList]()

  // 任务计数器,统计 SystemTimer 中的任务总数
  private[this] val taskCounter = new AtomicInteger(0)

  // 时间轮
  private[this] val timingWheel = new TimingWheel(
    tickMs = tickMs,
    wheelSize = wheelSize,
    startMs = startMs,
    taskCounter = taskCounter,
    delayQueue
  )

  ......

  // 添加新延迟任务。(向 TimingWheel 中插入一个新的任务)
  def add(timerTask: TimerTask): Unit = {
    readLock.lock()
    try {
      addTimerTaskEntry(new TimerTaskEntry(timerTask, timerTask.delayMs + Time.SYSTEM.hiResClockMs))
    } finally {
      readLock.unlock()
    }
  }

  // 添加新延迟任务。如果加入失败,任务到期,则执行任务。
  private def addTimerTaskEntry(timerTaskEntry: TimerTaskEntry): Unit = {
    if (!timingWheel.add(timerTaskEntry)) {
      // Already expired or cancelled
      if (!timerTaskEntry.cancelled)
        taskExecutor.submit(timerTaskEntry.timerTask)
    }
  }

  // 重新插入
  // 注意这个方法实际调用的是 addTimerTaskEntry,遇到到期的任务时,不会插入,而是直接执行,它的妙用我们下面会提到
  private[this] val reinsert = (timerTaskEntry: TimerTaskEntry) => addTimerTaskEntry(timerTaskEntry)

  /*
   * Advances the clock if there is an expired bucket. If there isn't any expired bucket when called,
   * waits up to timeoutMs before giving up.
   *
   * 如果有过期的 bucket,则推进时钟
   * (外层的 Purgatory 会启动一个线程,循环调用这个方法,从而达到每时每刻推进时钟的目标)
   */
  def advanceClock(timeoutMs: Long): Boolean = {

    // 这里只有从延迟队列中,poll 到了过期的 bucket 才会去推进时钟,这其实是一个懒推动的过程
    // 假设一直没有任务,则一直不需要推动。直到有任务插入时,这时候会将 bucket 插入到 DelayQueue 中
    // 又等到 bucket 到期时,才会被 poll 到,执行推动时钟的任务
    var bucket = delayQueue.poll(timeoutMs, TimeUnit.MILLISECONDS)
    if (bucket != null) {
      writeLock.lock()
      try {
        while (bucket != null) {
          // 推进时钟(其实就是更新 TimingWheel 的起始时间点)
          timingWheel.advanceClock(bucket.getExpiration)

          // 清理任务并还原 Bucket
          //
          // 1. bucket.elements.foreach{
          //     (这里就是上面提到的 reinsert 方法的逻辑)
          //      1. 从双向链表中移除
          //      2. 从最底层 TimingWheel 开始查找,尝试重新插入
          //         a. 如果原 bucket 属于最底层 TimingWheel,根据逻辑该任务确实已经到期了,这时候会插入失败,然后直接执行
          //         b. 如果原 bucket 属于更高层 TimingWheel,那么其中的任务时间跨度可能较大,是否到期取决于任务自身的过期时间
          //            有可能插入失败,直接执行,也有可能插入到更低层 TimingWheel 中
          //    }
          // 2. 清除 bucket.expiration
          //
          // 由于我们先推进了时钟,更新了 TimingWheel 的起始时间点 currentTime,
          // 所以再次插入任务的时候,有的任务就不符合插入条件了(已到期 expirationMs > currentTime)这时候就会直接执行任务;
          // 还有的任务会被插入到低层的时间轮中,相当与做了重新聚合。
          // 这就是 reinsert 的妙用。
          //
          bucket.flush(reinsert)

          // 防止上一步 bucket 中的任务执行期间,下一个 bucket 也到期了
          // 这里立刻 poll 一次,poll 到了就继续执行任务,poll 不到就跳出循环
          bucket = delayQueue.poll()
        }
      } finally {
        writeLock.unlock()
      }
      true
    } else {
      false
    }
  }
  ......
}
现在,我们再回到 DelayedOperationPurgatory
3. DelayedOperationPurgatory
DelayedOperationPurgatory 的代码略长,我们将它切分成几块来看,首先是定义:
final class DelayedOperationPurgatory[T <: DelayedOperation](purgatoryName: String,
                                                             // SystemTimer 实例
                                                             timeoutTimer: Timer,
                                                             brokerId: Int = 0,
                                                             // 用于控制删除线程移除 Bucket 中的过期延迟请求的频率
                                                             purgeInterval: Int = 1000,
                                                             // 是否启动线程清理 timout 的任务(目前所有的 Purgatory·都启动)
                                                             reaperEnabled: Boolean = true,
                                                             // 是否启用延时任务
                                                             timerEnabled: Boolean = true)
        extends Logging with KafkaMetricsGroup {
  ......

  /**
   * 这里的 WatcherListS 实际上就是一个引用,引用着加入到 TimingWheel 中的任务,
   * 以方便便在任务真正到期之前,还有机会提前结束它。
   *
   * watcher 这块代码结构上比较复杂,与主线无关,我们就不细看它的代码的,只需要了解他的作用即可。
   */
  private val watcherLists = Array.fill[WatcherList](DelayedOperationPurgatory.Shards)(new WatcherList)

  ......

  // 用于记录当前 purgatory 中的 operation 总数
  private[this] val estimatedTotalOperations = new AtomicInteger(0)

  /* background thread expiring operations that have timed out */
  // (reaper 是收割的意思)这个线程会循环检查超时操作,并执行具体的任务
  private val expirationReaper = new ExpiredOperationReaper()

  // 启动超时任务处理线程
  if (reaperEnabled)
    expirationReaper.start()

  /**
   * Check if the operation can be completed, if not watch it based on the given watch keys
   *
   * 检查 operation 是否可以完成,如果不行,则根据 watch key 添加到 watcher 中
   *
   * Note that a delayed operation can be watched on multiple keys. It is possible that
   * an operation is completed after it has been added to the watch list for some, but
   * not all of the keys. In this case, the operation is considered completed and won't
   * be added to the watch list of the remaining keys. The expiration reaper thread will
   * remove this operation from any watcher list in which the operation exists.
   *
   * 需要注意的是,一个 delayed operation 可以同时被多个 watcher watch,并且 watch key 不相同。
   * 所以有可能出现: 一个 operation 先被添加到一部分 watcher 中,然后 completed 了,但还有一部分 watcher 待添加
   * 这种情况下,operation 就不会被添加到剩余的 watcher 中,
   * expiration reaper thread 将会从所有的 watcher 中移除该 operation。
   *
   *
   * 这个方法的大致意图是:判断一个延时请求 DelayOperation 能否在当前线程中立刻完成,
   * a. 如果可以立刻完成,则返回 True
   * b. 如果不能立刻完成,则将它添加到 TimingWheel 中,并 watch 起来,等待执行的时刻。
   *
   * @param operation the delayed operation to be checked
   * @param watchKeys keys for bookkeeping the operation
   * @return true iff the delayed operations can be completed by the caller
   *         注意,只有 DelayOp 是本线程 tryComplete() 的时候完成的,才会返回 True,
   *         其他情况都是 False(比如被别的线程 tryComplete()==true 了)
   */
  def tryCompleteElseWatch(operation: T, watchKeys: Seq[Any]): Boolean = {
    assert(watchKeys.nonEmpty, "The watch key list can't be empty")

    // The cost of tryComplete() is typically proportional to the number of keys. Calling tryComplete() for each key is
    // going to be expensive if there are many keys. Instead, we do the check in the following way through safeTryCompleteOrElse().
    // If the operation is not completed, we just add the operation to all keys. Then we call tryComplete() again. At
    // this time, if the operation is still not completed, we are guaranteed that it won't miss any future triggering
    // event since the operation is already on the watcher list for all keys.
    //
    // tryComplete() 方法的耗时,通常和 keys 的数量成正比。
    // 如果 key 很多,那么逐个调用 tryComplete() 的开销会很大,所以,我们用下面的 safeTryCompleteOrElse() 方法来做检查
    // 如果 DelayOperation 尚未 completed,我们将 DelayOperation 添加到所有 keys 中,然后再次调用 tryComplete() 方法,
    // 此时,即便 operation 还是没有 completed,下一次它也一定会触发的。

    // safeTryCompleteOrElse:
    // 1. 调用 tryComplete(),尝试立刻完成延时请求,如果成功,返回 true,**不需要监听**
    // 2. 如果失败,则执行下面 {} 中的逻辑,**全部 watch 上**
    // 3. 再去调一次 tryComplete(),如果 **成功了就返回 true,否则返回 false**
    if (operation.safeTryCompleteOrElse {

      // 1. 根据 key 从 watchList 中找到 watchers 对象(如果不存在则调用 new Watchers(key) 新建一个)
      // 2. 调用 watchers.watch(op),把 op 添加到 op list 中
      watchKeys.foreach(key => watchForOperation(key, operation))

      // 计数器,用于统计当前 过渡区(purgatory) 中 operation 的数量
      if (watchKeys.nonEmpty) estimatedTotalOperations.incrementAndGet()

    }) return true

    // if it cannot be completed by now and hence is watched, add to the expire queue also
    // 因为已经 watch 上了,如果此时没有成功,就把 op 添加到定时任务中
    if (!operation.isCompleted) {

      // 默认启动
      if (timerEnabled) {

        // timeoutTimer 其实就是 SystemTimer
        // 而 operation 就是 TimerTask
        // 这里其实就是把 TimerTask 插入到 TimingWheel 中
        timeoutTimer.add(operation)
      }

      // 再检查一遍,如果已经完成了,就取消任务
      if (operation.isCompleted) {
        // 取消 timer task
        operation.cancel()
      }
    }

    // 只有 DelayOp 是本线程完成的时候,才会返回 True,其他情况都是 False
    false
  }

  /**
   * Check if some delayed operations can be completed with the given watch key,
   * and if yes complete them.
   *
   * 这个方法,就给外部提供了一个入口,
   * 可以在任务被插入到定时任务之后,到期之前,还有机会提前完成掉
   *
   * @return the number of completed operations during this process
   */
  def checkAndComplete(key: Any): Int = {
    // 根据 key 的 hash 以及 key 自身的值,找到 watcher
    val wl = watcherList(key)
    val watchers = inLock(wl.watchersLock) { wl.watchersByKey.get(key) }

    val numCompleted = if (watchers == null)
      0
    else
      watchers.tryCompleteWatched()
    debug(s"Request key $key unblocked $numCompleted $purgatoryName operations")
    numCompleted
  }

}
然后是超时任务处理线程 ExpiredOperationReaper,它继承自 ShutdownableThread,ShutdownableThread 在 run 方法中循环调用了 doWork(),以达到持续推进时钟的目的:
/**
 * A background reaper to expire delayed operations that have timed out
 */
private class ExpiredOperationReaper extends ShutdownableThread(
    "ExpirationReaper-%d-%s".format(brokerId, purgatoryName),
    false) {

    override def doWork(): Unit = {
      advanceClock(200L)
    }
}

abstract class ShutdownableThread(val name: String, val isInterruptible: Boolean = true)
        extends Thread(name) with Logging {
      ······
  override def run(): Unit = {
    isStarted = true
    info("Starting")
    try {
      while (isRunning)
        doWork()
    } catch {
      case e: FatalExitError =>
        shutdownInitiated.countDown()
        shutdownComplete.countDown()
        info("Stopped")
        Exit.exit(e.statusCode())
      case e: Throwable =>
        if (isRunning)
          error("Error due to", e)
    } finally {
       shutdownComplete.countDown()
    }
    info("Stopped")
  }
4. 推进时钟 advanceClock
advanceClock 也是 DelayedOperationPurgatory 中定义的方法:
  def advanceClock(timeoutMs: Long): Unit = {

    // 这里的 timeoutTimer 就是 SystemTimer
    timeoutTimer.advanceClock(timeoutMs)

    // Trigger a purge if the number of completed but still being watched operations is larger than
    // the purge threshold. That number is computed by the difference btw the estimated total number of
    // operations and the number of pending delayed operations.
    //
    // estimatedTotalOperations: 是当前 Purgatory 中的任务总数
    // numDelayed: 是 SystemTimer 中的任务总数,同时也是 TimingWheel 中的任务总数(他们是同一个 AtomicInteger)
    //
    // 任务在被加入 Purgatory 之后,在被加入 TimingWheel(SystemTimer) 之前,还会做一次尝试,
    // 如果任务可以结束,就不会加入 TimingWheel。此时因此这两个值之间有可能会出现差值
    // 还有一种情况,就是 TimingWheel 中有很多任务完成了,numDelayed 就会逐渐减少,此时同样会出现差值
    //
    // 如果这个差值超过了清理阈值(purgeInterval),则清理一下 watcher
    if (estimatedTotalOperations.get - numDelayed > purgeInterval) {
      // now set estimatedTotalOperations to delayed (the number of pending operations) since we are going to
      // clean up watchers. Note that, if more operations are completed during the clean up, we may end up with
      // a little overestimated total number of operations.
      //
      // 由于即将清理 watcher(监听器)列表,因此先将 estimatedTotalOperations 设置为当前的未完成操作数(numDelayed)
      // 需要注意的是,如果在清理过程中有新的操作完成,最终的 estimatedTotalOperations 可能会略高于实际值
      estimatedTotalOperations.getAndSet(numDelayed)

      // 遍历 watcherLists(监听器列表),对每个 watcher 进行 purgeCompleted() 操作,并统计清理的总数
      debug("Begin purging watch lists")
      val purged = watcherLists.foldLeft(0) {
        case (sum, watcherList) => sum + watcherList.allWatchers.map(_.purgeCompleted()).sum
      }
      debug("Purged %d elements from watch lists.".format(purged))
    }
  }