延时请求(Delayed Operation),是指某些条件未满足,导致暂时无法处理的请求。例如,对于设置了 acks=all 的 Produce Request,Kafka 必须确保 ISR 中的所有副本都要成功响应这次写入(或者最终没有等到所有的 ISR,最后超时的时候),之后才会返回。

为了执行这些延时请求,Kafka 使用了基于多层时间轮的方案。

一、单层时间轮

我们先来看一看单层时间轮(Simple Timing Wheel):

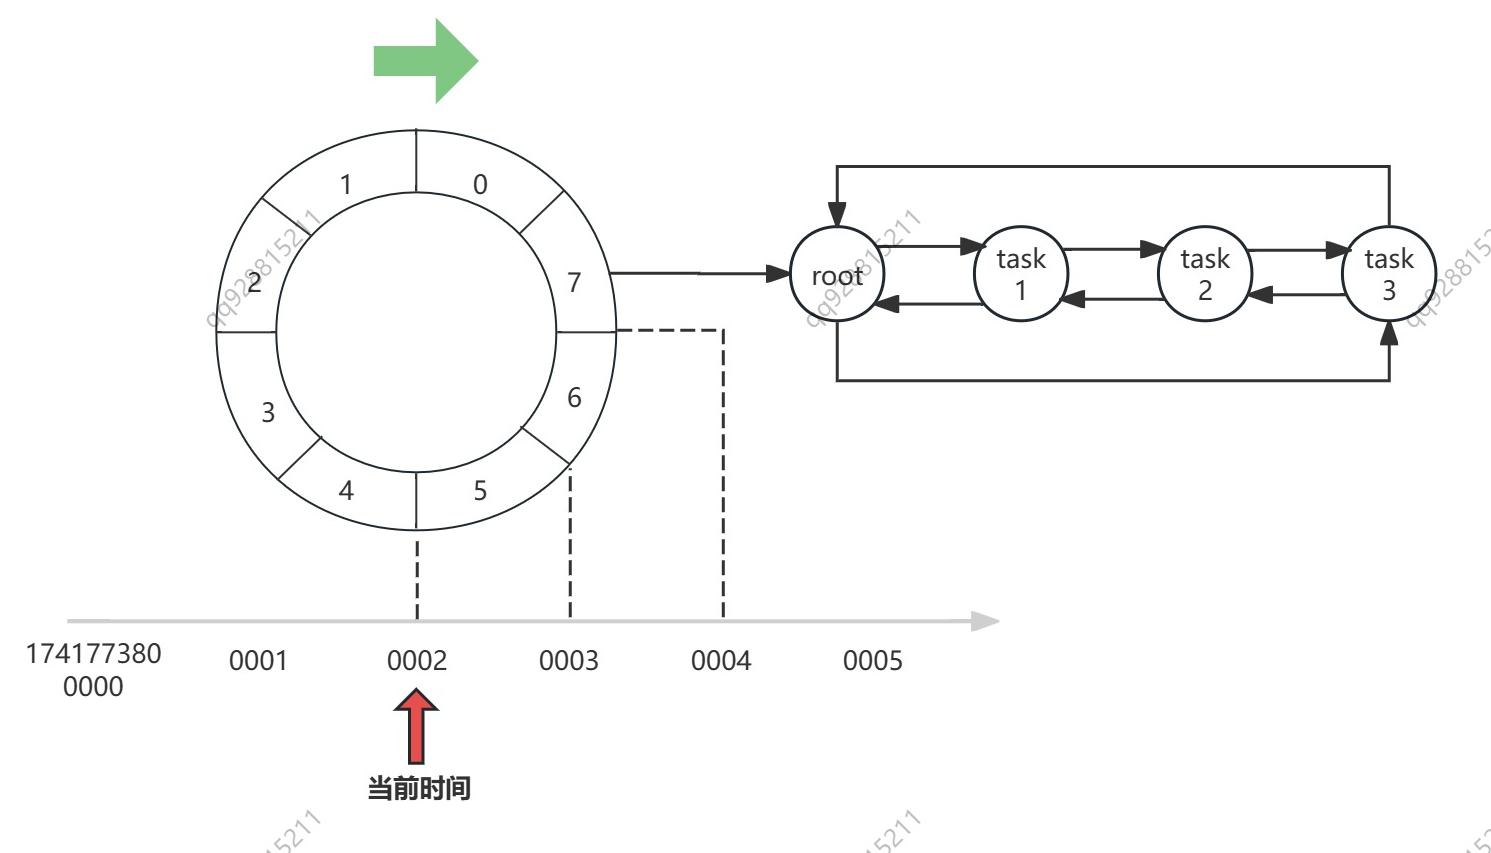
参考上面这张图,就跟钟表类似,我们把圆上一格当做一个最小时间单位(tickMs),假设这里我们取 1 ms,这个圆总共 8 等分(8 个 bucket),那么不考虑复用的情况,整个单层时间轮就可以覆盖 8 ms 的时间段。

我们给圆上的圆弧编个号,上面的数字 0~7,表示 bucket-0 ~ bucket-7,假设现在时间是 1741773800002,我需要在 1741773800004 的时候执行三个延时任务,那么就向 bucket-7 的链表中增加三个任务即可,等待时间到达 1741773800004 的时候,就捞出链表里的延时任务开始执行。

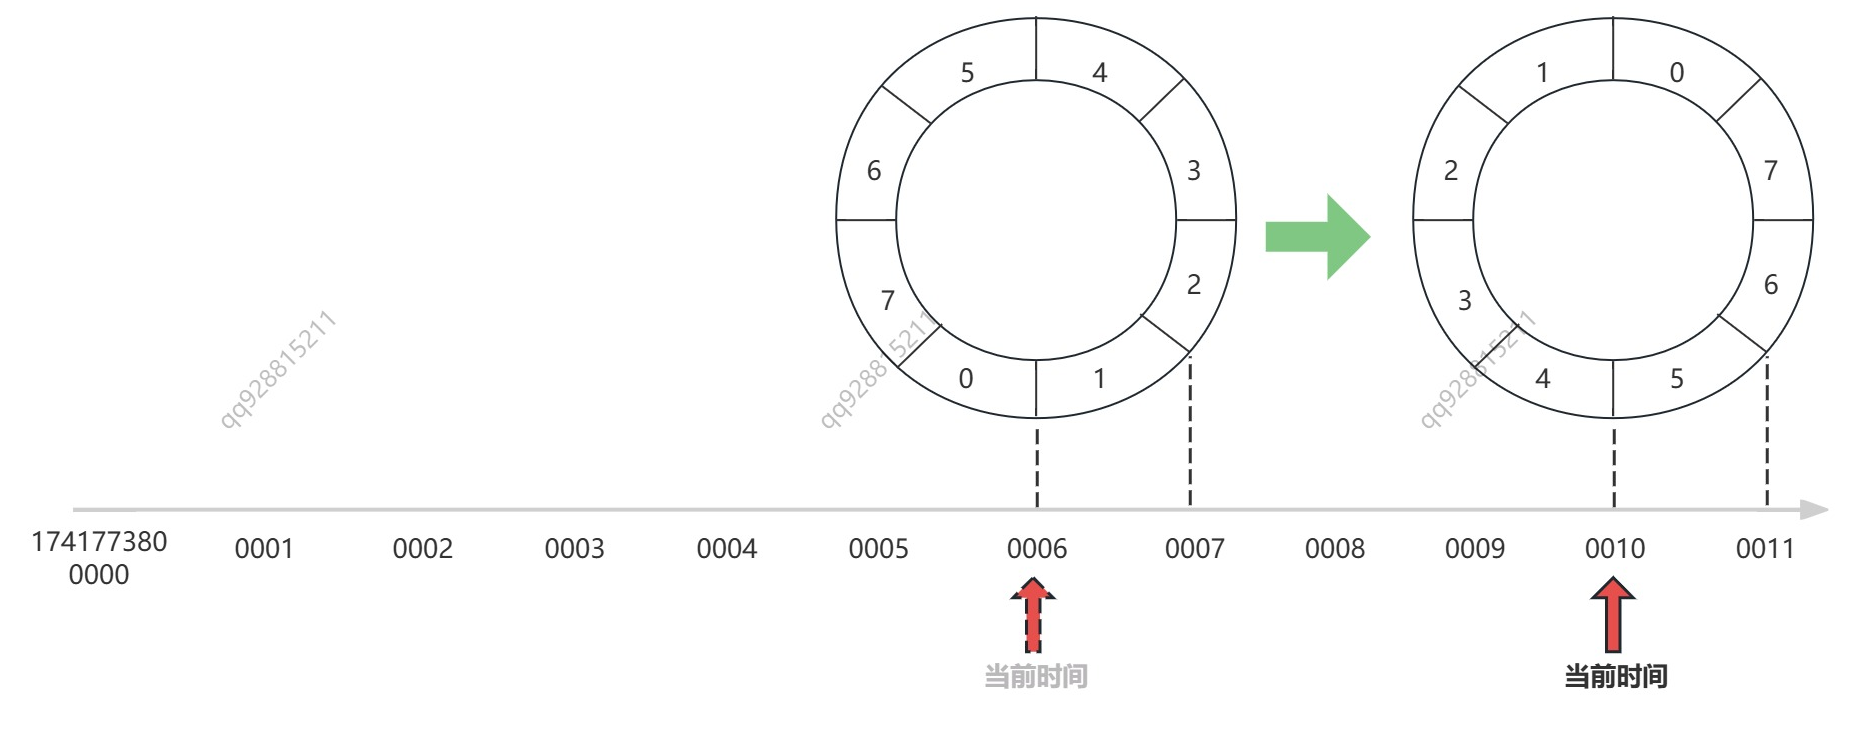
想象一下,时间流逝,时间轮 TimingWheel 向前滚动,时间轴上任何一个时刻,都可以在 TimingWheel 上找到自己对应的那一个 bucket,在 1741773800002 这一时刻过去之后,bucket-5 就会被清空,然后被重用,下一次它将归属于 1741773800010。

现在,我们先将单层时间轮换一种形式展示,以便后续更好的展示时间轮的推进与任务的流转:

它和上面的圆形时间轮完全一样,只不过是换了个形式展示,这样的话,我们在代码中,就可以方便的用下面的公式,为每一个时间点找到对应的 bucket 了:

1
bucket_num = (timestamp / 单位时间 tickMs) % bucket_count

回到刚刚的问题,

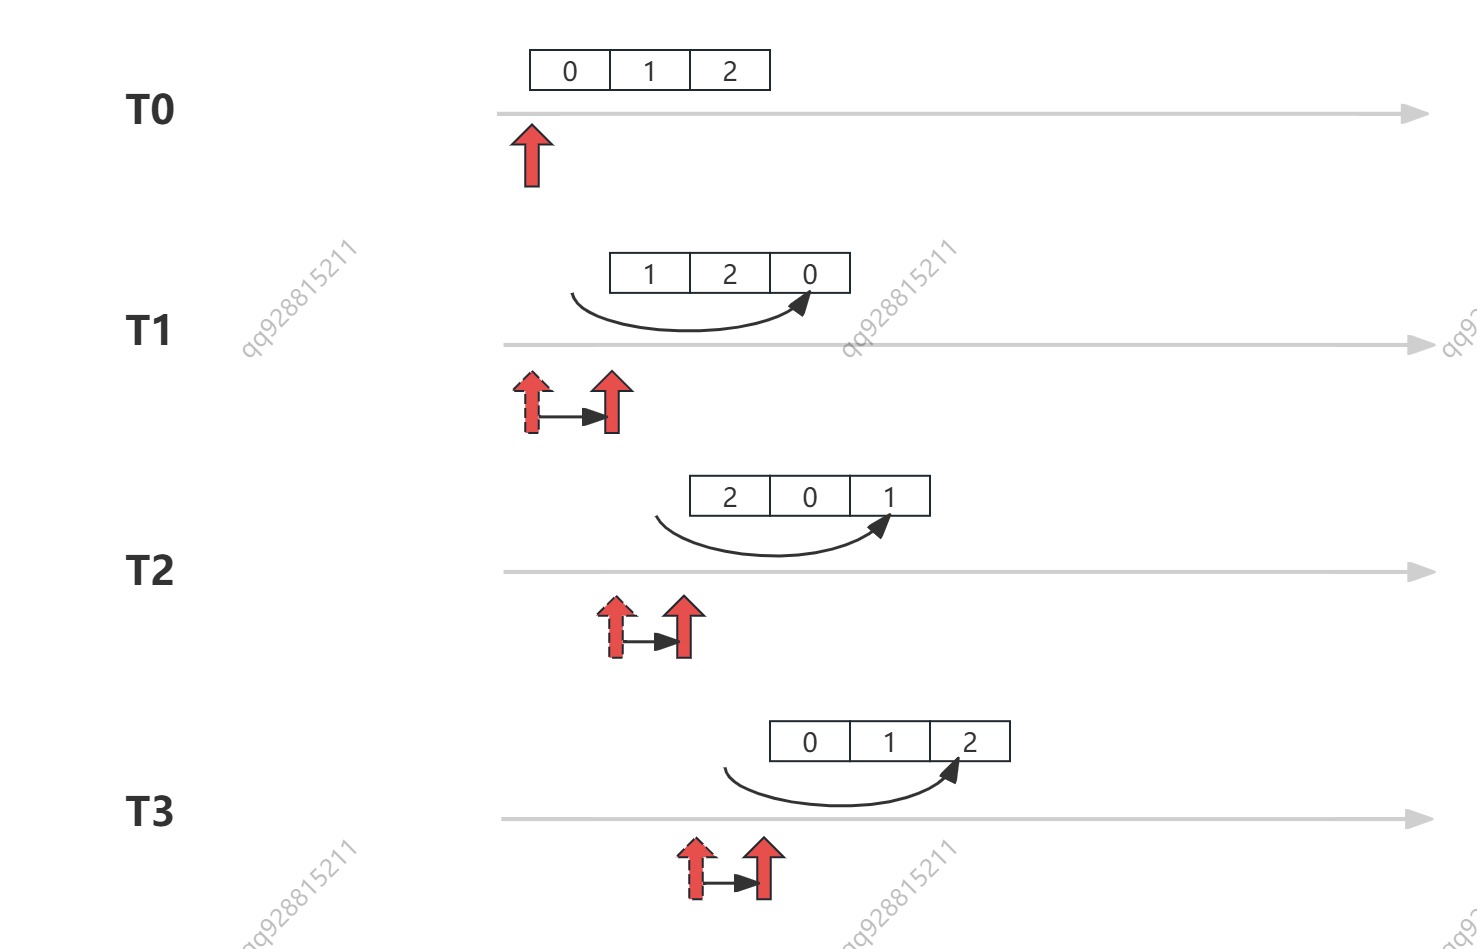
到这里,我们很容易发现,单层时间轮的缺点,就是只能覆盖有限的时间段,比如上面的时间轮只有3格,如果当前时间是 t1,我需要创建一个 t5 时刻的任务该怎么办呢?

单纯地动态的扩大时间轮会大大的增加系统的开销,所以这时候就要引入多层时间轮了。

二、多层时间轮

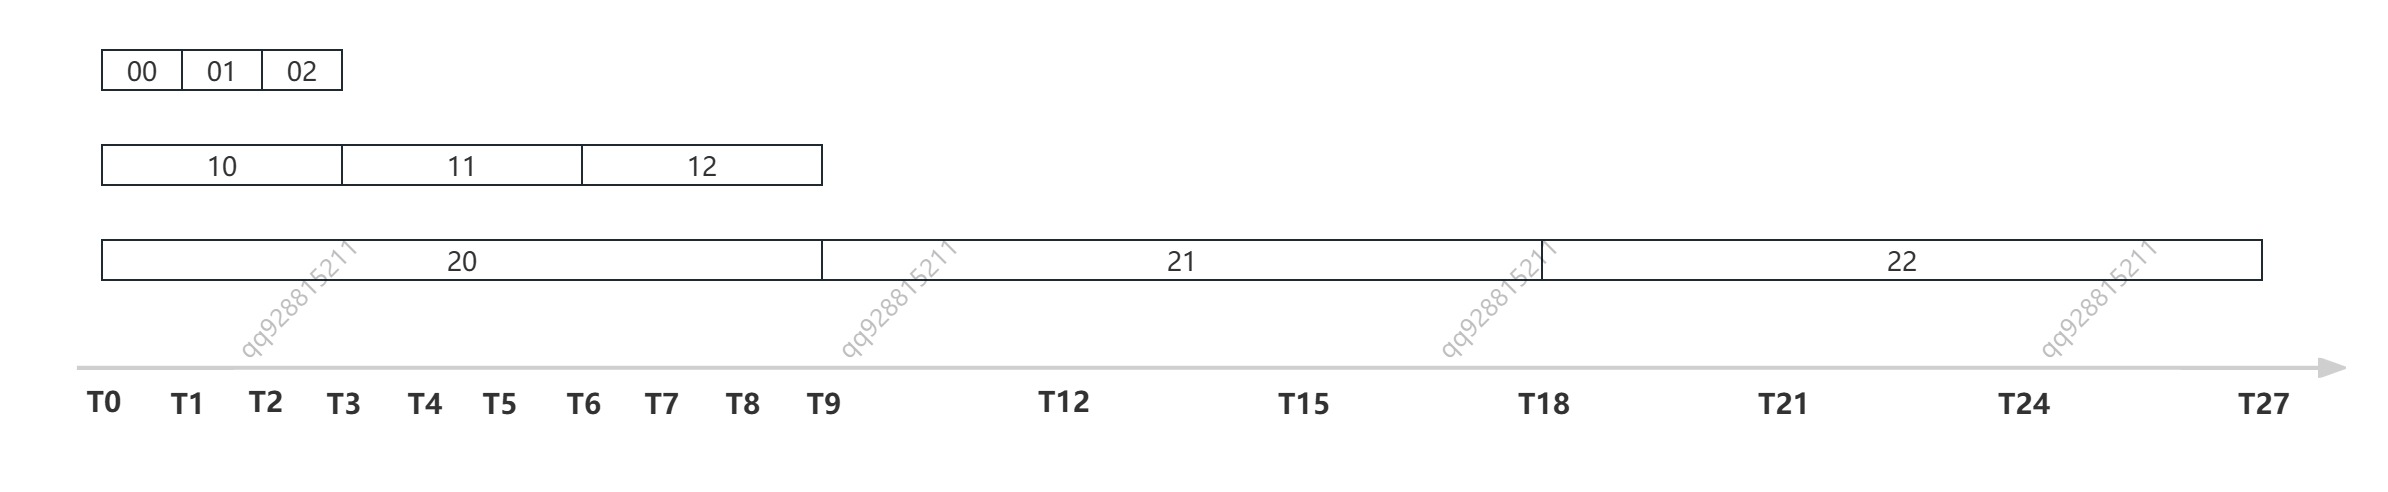
现在,我们尝试引入多层时间轮(Hierarchical Timing Wheel),创建下一层时间轮的策略是

假设低一层的单位时间是 tickMs,时间轮上总共 x 个 bucket,则新一层的单位时间是 x * tickMs,本层的 bucket 也是 x 个

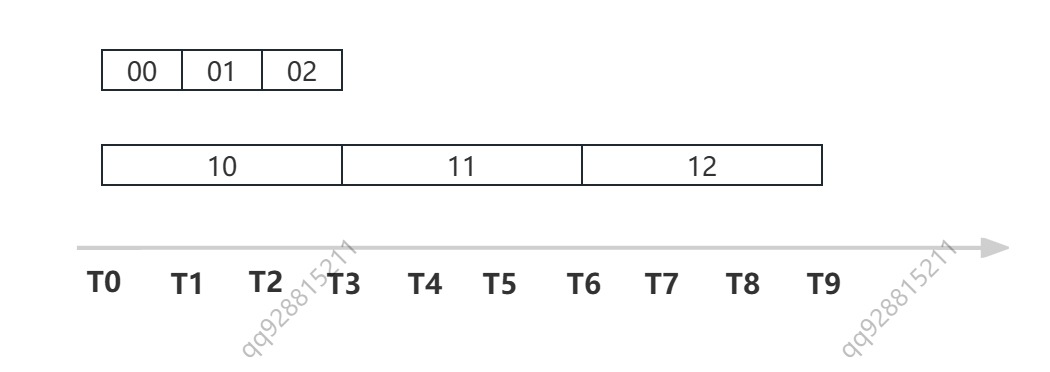
由此,我们得到了这样的结构:

注意 bucket 上的数字代表 bucket 的编号:

  • 02 即 bucket-0-2,表示第 0 层,第 2 个 bucket
  • 10 即 bucket-1-0 表示第 1 层,第 0 个 bucket

这样,我们需要创建一个 T5 时刻的延时任务的话,就可以把任务插入到 bucket-1-1 中了。

如果我们要创建一个 T21 时刻的延时任务呢?那就再扩展一层时间轮,这个任务会被插入到 bucket-2-2 中。

如上图所示,多层时间轮可以按需扩展,每一层的总时间都是低一层的 bucket_size 倍,这样的话,用不了多少层,就能覆盖很大的时间区间,完全可以覆盖 kafka 的使用场景了。

ok,到这里我们了解了多层时间轮基本结构,下面再来看一看多层时间轮是如何随时间推进的。

1. 多层时间轮的推进

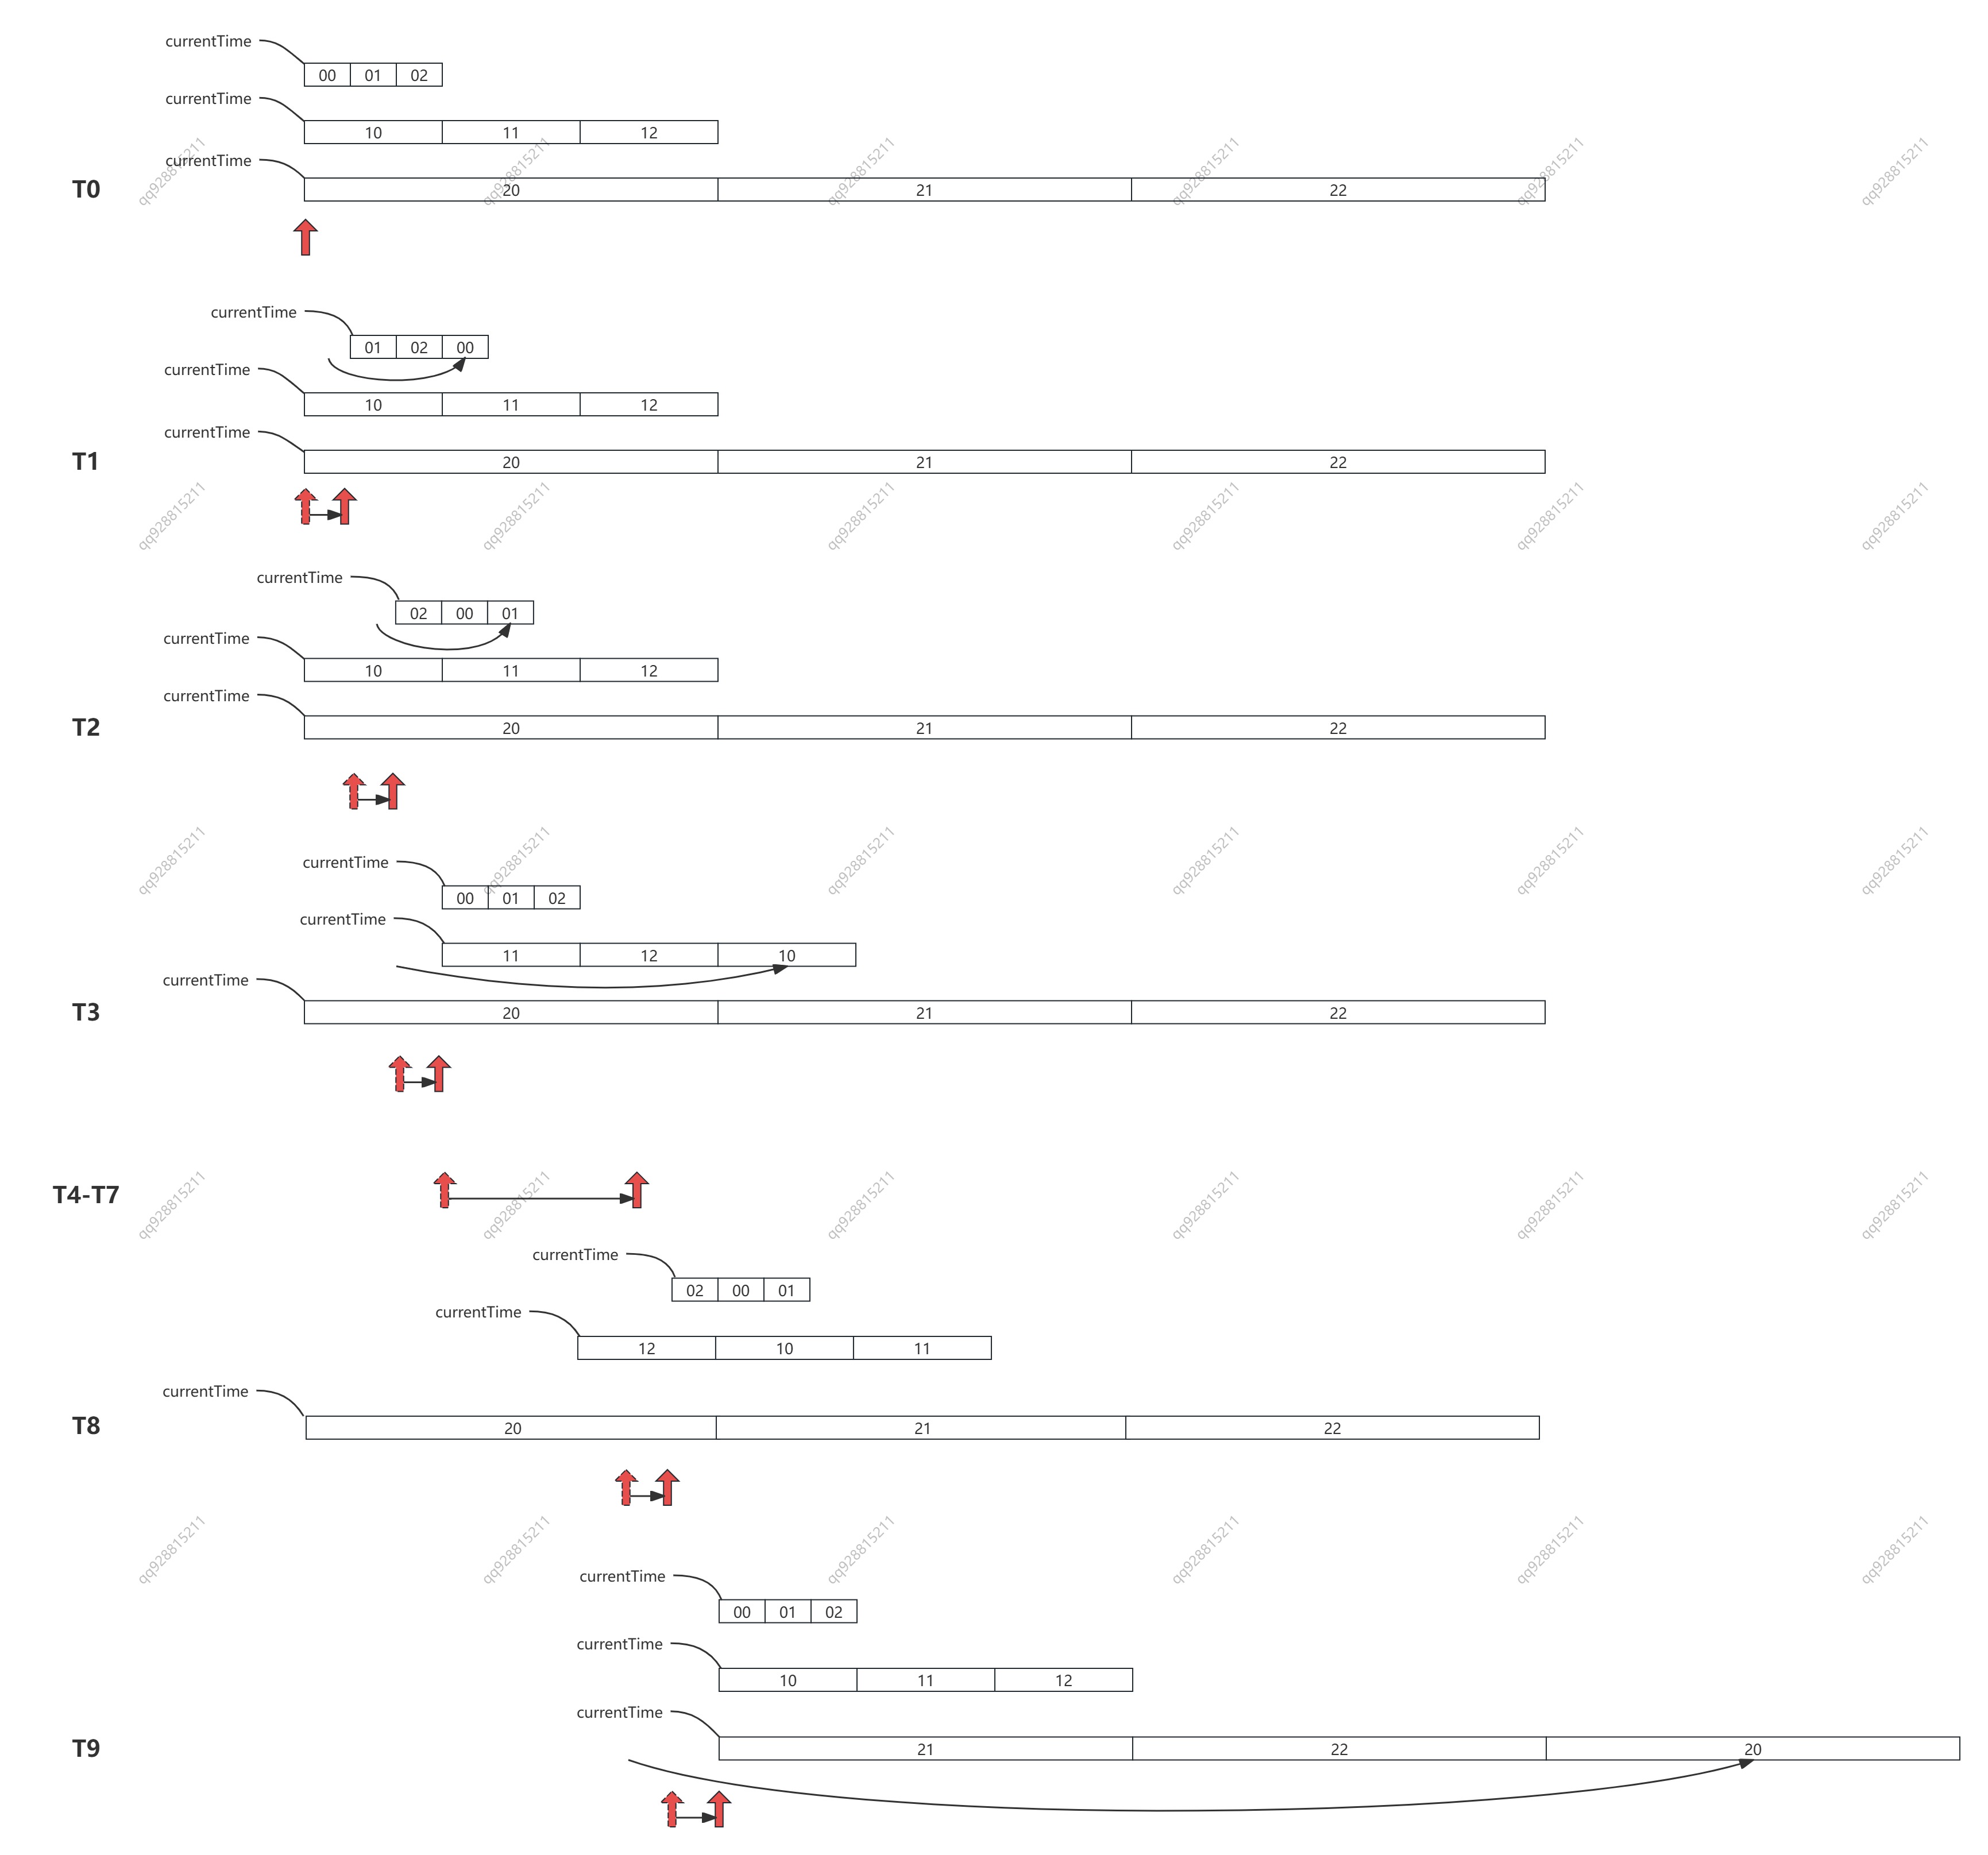
如下图所示:

  1. 最底层时间轮的时间跨度即为单位时间 tickMs,每经过单位时间,最底层的时间轮就推进一次,即就发生一次复用。
  2. 第二层的单位时间,是第一层的 bucket_size 倍,即第二层单位时间是 tickMs * bucket_size,所以每经过 tickMs * bucket_size 复用一次。
  3. 第三层的单位时间,是第二层的 bucket_size 倍,即第三层单位时间是 tickMs * bucket_size * bucket_size,所以每经过 tickMs * bucket_size * bucket_size 复用一次

下面我们来拆解这个过程:

  • T0-T1 时刻,最底层的 00 号桶发生了复用。
  • T1-T2 时刻,01 号桶复用
  • T2-T3 时刻,02 号桶复用;此时距离 T0 过去了 bucket_size * tickMS,等于第二层的单位时间长度,第二层的 10 号桶发生了复用。
  • T3-T4 时刻,00 号桶复用;
  • T4-T5 时刻,01 号桶复用;
  • T5-T6 时刻,02 号桶复用;第二层的 11 号桶复用;
  • T6-T7 时刻,00 号桶复用;
  • T7-T8 时刻,01 号桶复用;
  • T8-T9 时刻,02 号桶复用;第二层的 12 号桶复用;此时距离 T0 过去了 bucket_size * tickMS(第二层),等于第三层的单位时间长度,第三层的 20 号桶发生了复用
  • ……

如此循环往复,便完成了整个多层时间轮的复用。

2. 多层时间轮的任务流转

在我们往时间轮的 bucket 中塞任务的时候,同时会把 bucket 放进一个 java.concurrent.DelayQueue 中,利用这个 DelayQueue 来探测 bucket 到期与否,如果到期则执行 bucket 中的任务。

注意:DelayQueue 内部是一个小根堆。这里是把 bucket 放入堆中,而不是把任务放入堆中,这样做可以大大减少堆中元素的个数

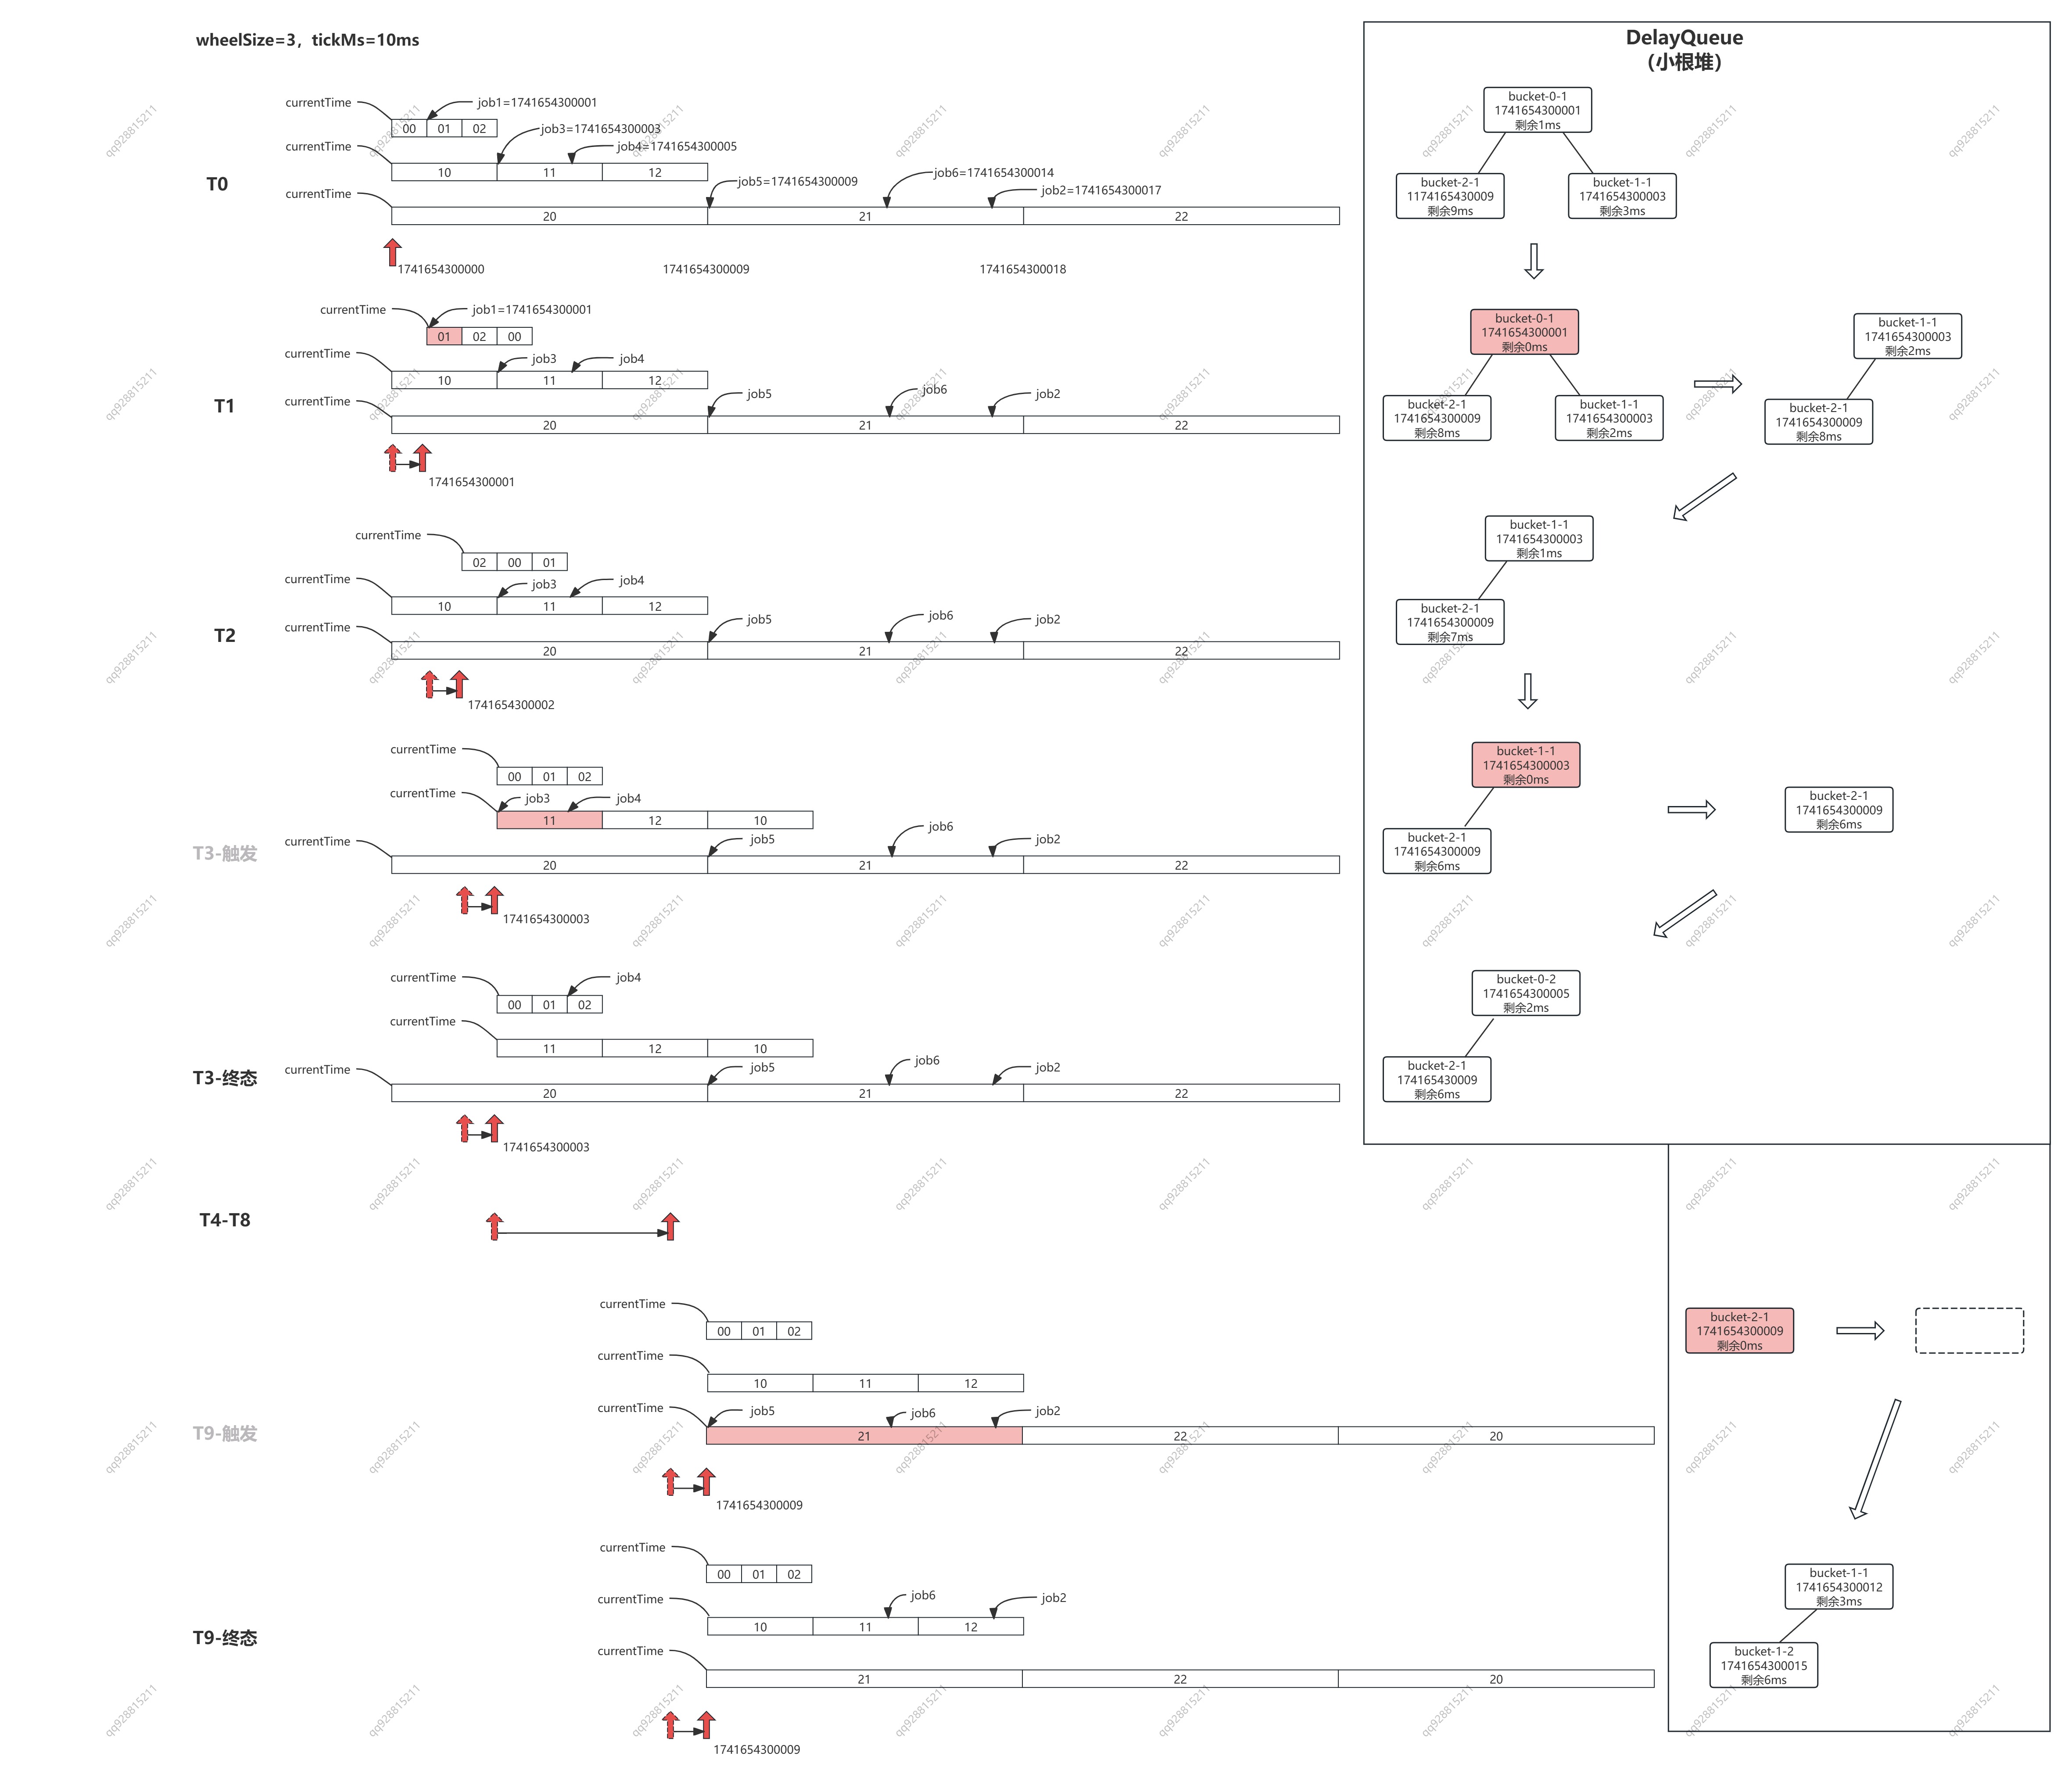
如下图所示,假设 bucket_size(wheelSize) = 3,tickMs = 1ms,当前时间是 1741654300000,我们需要延时执行 6 个任务,执行时间分别是:

  • job1 = 1741654300001
  • job2 = 1741654300017
  • job3 = 1741654300003
  • job4 = 1741654300005
  • job5 = 1741654300009
  • job6 = 1741654300014

那么,T0 时刻他们将被插入到图片里显示的 bucket 01、11、21 中。此时,bucket-0-1 的超时时间剩余 1ms,bucket-1-1 的超时时间剩余 3ms,bucket-2-1 的超时时间剩余 9ms,那么 DelayQueue 中就会插入三个元素。

流程拆解:

  • T1 = 1741654300001,图片左边 bucket-0-0 轮转,堆中的元素超时时间 -1,图片右边堆中 bucket-0-1 到期,执行其中的任务 job1,堆中只剩两个 bucket
  • T2 = 1741654300002,图片左边 bucket-0-1 轮转,堆中的元素超时时间 -1
  • T3 = 1741654300003,图片左边 bucket-0-2 bucket-1-0 轮转,堆中的元素超时时间 -1,图片右边堆中 bucket-1-1 到期,其中 job3 的过期时间已到,直接执行,但 job4 的过期时间是 1741654300005,还剩 2ms,因此被插入到第一层时间轮的 bucket-0-2 中。堆中的元素先减少到一个,再增加到两个。
  • ……
  • T9 = 1741654300009,图片左边 bucket-0-2 bucket-1-2 bucket-2-0 轮转,堆中的元素超时时间 -1,图片右边堆中 bucket-2-1 到期,其中job5 过期时间已到,直接执行,job6 还剩 5ms,被插入到 bucket-1-1 中,job2 还剩 8ms,被插入到 bucket-1-2 中。堆中的元素先减少到 0 个,再增加到 2 个。 ……

如此循环往复,便完成了任务的聚合的分级聚合避免了一股脑将所有的任务全都塞到 DelayQueue 中。

三、源码中的时间轮 TimingWheel

1. TimingWheel 的实现

现在,我们已经了解了时间轮的工作流程,下来我们看一看 Kafka 的源码中是如何实现的:

1
2
3
4
5
6
7
8
9
10
11
12
13
14
15
16
17
18
19
20
21
22
23
24
25
26
27
28
29
30
31
32
33
34
35
36
37
38
39
40
41
42
43
44
45
46
47
48
49
50
51
52
53
54
55
56
57
58
59
60
61
62
63
64
65
66
67
68
69
70
71
72
73
74
75
76
77
78
79
80
81
82
83
84
85
86
87
88
89
90
91
92
93
94
95
96
97
98
99
100
101
102
103
104
105
106
107
108
109
110
111
112
113
114
115
116
117
118
119
120
121
122
123
124
125
126
127
128
129
130
131
132
133
134
135
136
137
138
139
/**
*
* @param tickMs 最小时间单位,对应最小的 bucket 所管理的时间范围;默认是 1 毫秒
* @param wheelSize bucket 的数量;默认是 20
* @param startMs TimingWheel 所管理的时间范围的起点,会向下取整到 tickMs 的整数倍,并赋值给 currentTime 再用
* @param taskCounter 整个 TimingWheel 中,任务的总数
* @param queue 延迟队列。使用的是 java.concurrent.DelayQueue 它的内部是一小根堆,每一个 item 对应一个 bucket。
* Kafka 实际上是用它来实现延迟任务的,TimingWheel 的实际作用是任务的分级聚合,
* 通过把 bucket 放进 DelayQeue(而不是具体任务),避免任务过多时系统负载太大的问题
*/
@nonthreadsafe
private[timer] class TimingWheel(tickMs: Long, wheelSize: Int, startMs: Long, taskCounter: AtomicInteger, queue: DelayQueue[TimerTaskList]) {

// 当前层 TimingWheel 管理的总时长
private[this] val interval = tickMs * wheelSize

// 当前层 TimingWheel 的所有 Bucket 对象(每个 bucket 就是一个 TimerTaskList 对象,对应多个延迟任务)
private[this] val buckets = Array.tabulate[TimerTaskList](wheelSize) { _ => new TimerTaskList(taskCounter) }

// 将 startMs 向下取整到 tickMs 的整数倍(得到 currentTime 之后 startMs 就没用了)
private[this] var currentTime = startMs - (startMs % tickMs) // rounding down to multiple of tickMs

// overflowWheel can potentially be updated and read by two concurrent threads through add().
// Therefore, it needs to be volatile due to the issue of Double-Checked Locking pattern with JVM
//
// 由于可能有多个线程同时 update/read 多层 TimingWheel,所以需要加上 volatile 修饰
//
// kafka 按需创建 TimingWheel,如果要执行一个很久之后的任务,
// 其等待时长超过了本层的 currentTime + interval,就会去创建下一层 TimingWheel。
@volatile private[this] var overflowWheel: TimingWheel = null

// 创建更高层 TimingWheel
private[this] def addOverflowWheel(): Unit = {
synchronized {
if (overflowWheel == null) {
overflowWheel = new TimingWheel(
tickMs = interval, // 单位时间 等于上一层 TimingWheel 所覆盖总时长
wheelSize = wheelSize, // 与上一层 TimingWheel 的 bucket 数量保持一致
startMs = currentTime, // 与上一层 TimingWheel 的起始时间保持一致
taskCounter = taskCounter, // 同一个 AtomicInteger;所以它代表多层 TimingWheel 的任务总数
queue // 同一个延迟队列,同时管理多层 TimingWheel,
// 任意一层有 bucket 过期的时候,都会触发 advanceClock 推进时钟
)
}
}
}

// 向 TimingWheel 中添加一个定时任务。
// 注意,这里是从最低一层 TimingWheel 中开始寻找合适的 bucket,
// 找不到就寻找高一层 TimingWheel,如果最终还是找不到,就说明 TimingWheel 不够大,
// 这时候就调用上面的 addOverflowWheel 再新增一层 TimingWheel
def add(timerTaskEntry: TimerTaskEntry): Boolean = {

// 获取待添加任务的过期时间
val expiration = timerTaskEntry.expirationMs

if (timerTaskEntry.cancelled) {
// 任务被标记为 cancelled,则不添加
false
} else if (expiration < currentTime + tickMs) {
// 任务已经到期了,则不添加 (任务时间等于/早于最新 bucket 的时间,无法再被调度了)
// 更上一层调用方,会在这情况下直接去执行任务
false
} else if (expiration < currentTime + interval) {
// 任务过期时间处于当前层 TimingWheel,则放入对应的 bucket

// 找到对应的 bucket
//
// 按最朴素的思路来说,我们可能会用 (expiration-currentTime)/tickMs 来计算是哪一个 bucket。
// 但这是有问题的,考虑下面的场景:
// wheelSize=20,tickMs=10ms,currentTime=1744444000000
//
// 此时,我们插入一个 1744444000161 的任务,按我们的算法,此时应该插入到 buckets[16] 中,
//
// 100ms 之后,时钟推进 10 次,currentTime=1744477900100,
// 我们再插入一个 1744477900161 的任务,按我们的算法,此时就会插入到 buckets[6] 中,
//
// 这就和设计的初衷背离了,同一个时间点(段)的任务,被插到了不同 bucket 中,bucket 中的数据就乱了。
// 所以,kafka采用了【时间轮】的思路来计算 bucket:
//
// 想象一下,时间延展,就像坐标轴永远向前,有一个(wheelSize 等分,每份圆弧长度是 tickMs 的)圆形车轮,
// 一直在上面向前滚动,任何一个时间点,都能在这个车轮上找到对应的 bucket,并且命中注定不会改变
//
val virtualId = expiration / tickMs
val bucket = buckets((virtualId % wheelSize.toLong).toInt)

// 向双向链表中插入一个 TimerTaskEntry
bucket.add(timerTaskEntry)

// 设置 bucket 过期时间
//
// 内部逻辑: return expiration.getAndSet(expirationMs) != expirationMs
//
// a. 如果返回 false,则说明 bucket 仍然有效,它所覆盖的时间段还没有过去
// b. 如果返回 true,则说明 bucket 所负责的时间段已经过去了(即 TimingWheel 发生了轮转),
// 需要重用 bucket,重新将他放入队列中
if (bucket.setExpiration(virtualId * tickMs)) {

// 这里很重要。过期任务的触发,是依赖于 DelayQueue 来监督 bucket 的过期时间的,
// DelayQueue 才是真正延时和排序的地方。
queue.offer(bucket)
}
true
} else {
// expiration > currentTime + interval
// 超过当前层 TimingWheel,放到更高层去
if (overflowWheel == null) addOverflowWheel()
overflowWheel.add(timerTaskEntry)
}
}

/**
* 推进时钟
*
* SystemTimer 会一直调用 DelayQueue.poll(timeout),如果某一个 bucket 过期了,就会 poll 到这个 bucket,
* 然后会尝试调用本方法推进时钟,此时入参 timeMs = bucket.expiration
*
* 所谓推进时钟,其实就是推进 TimingWheel 的 currentTime,currentTime 是 TimingWheel 的基准点
* currentTime 推进了,每一个 bucket 对应的时间区间也就相当于向前推进了
*/
def advanceClock(timeMs: Long): Unit = {

// 对最低层的 TimingWheel 来说,一定成立,每次都会推进
// 对于更高层 TimingWheel 来说,它的 tickMs 很长,并不一定每次都推进
//
// 如果按默认值 wheelSize = 20,
// 第一层推进20次,第二层会推进一次;
// 第一层推进200次,第二层会推进10次,第三层才会推进1次;
// ......
if (timeMs >= currentTime + tickMs) {

// 确保 currentTime 是 tickMs 的整数倍
currentTime = timeMs - (timeMs % tickMs)

// 尝试推进高层 TimingWheel 的时钟
if (overflowWheel != null) overflowWheel.advanceClock(currentTime)
}
}
}

2. Bucket 的实现

下面是 TimingWheel 中 bucket 的实现,它的核心其实是一个双向链表,每当有任务被插入桶中时,就会插入到双向链表的最后。

1
2
3
4
5
6
7
8
9
10
11
12
13
14
15
16
17
18
19
20
21
22
23
24
25
26
27
28
29
30
31
32
33
34
35
36
37
38
39
40
41
42
43
44
45
46
47
48
49
50
51
52
53
54
55
56
57
58
59
60
61
62
63
64
65
66
67
68
69
70
71
72
73
74
75
76
77
78
79
80
81
82
83
84
85
/**
* TimerTaskList 就是 TimingWheel 中的 bucket
* 它持有一个双向循环链表,它的每个节点都是一个 TimerTaskEntry,
* 每一个 TimerTaskEntry 对应着一个定时任务(TimerTask)
*/
@threadsafe
private[timer] class TimerTaskList(taskCounter: AtomicInteger) extends Delayed {

// TimerTaskList forms a doubly linked cyclic list using a dummy root entry
// root.next points to the head
// root.prev points to the tail

// 链表有一个空的根节点
private[this] val root = new TimerTaskEntry(null, -1)
root.next = root
root.prev = root

// 超时时间
private[this] val expiration = new AtomicLong(-1L)

// 设置 bucket 的超时时间,返回 true 表示设置成功
def setExpiration(expirationMs: Long): Boolean = {
expiration.getAndSet(expirationMs) != expirationMs
}

// Get the bucket's expiration time
def getExpiration: Long = expiration.get

// 向链表中插入一个 TimerTaskEntry
def add(timerTaskEntry: TimerTaskEntry): Unit = {
var done = false
while (!done) {

// Remove the timer task entry if it is already in any other list
// We do this outside of the sync block below to avoid deadlocking.
// We may retry until timerTaskEntry.list becomes null.
//
// 如果 timerTaskEntry 已经在其他 TimerTaskList 中,
// 需要先解除 timerTaskEntry 和其他 TimerTaskList 的互相引用:
// 1. list.remove(entry)
// 2. entry.list = null
timerTaskEntry.remove()

synchronized {
timerTaskEntry.synchronized {
if (timerTaskEntry.list == null) {

// 双向链表的插入
val tail = root.prev
timerTaskEntry.next = root
timerTaskEntry.prev = tail
timerTaskEntry.list = this
tail.next = timerTaskEntry
root.prev = timerTaskEntry

// 任务计数器+1
taskCounter.incrementAndGet()
done = true
}
}
}
}
}

// 从链表中移除一个任务
def remove(timerTaskEntry: TimerTaskEntry): Unit = {
synchronized {
timerTaskEntry.synchronized {
if (timerTaskEntry.list eq this) {
// 双向链表的移除
timerTaskEntry.next.prev = timerTaskEntry.prev
timerTaskEntry.prev.next = timerTaskEntry.next

// 清空 entry 和 bucket 间的互相引用
timerTaskEntry.next = null
timerTaskEntry.prev = null
timerTaskEntry.list = null

taskCounter.decrementAndGet()
}
}
}
}
......
}

3. Bucket 中的 TimerTaskEntry

上面说了 bucket 其实是一个双向链表 list[TimerTaskEntry],那么 TimerTaskEntry 是什么结构呢?

1
2
3
4
5
6
7
8
9
10
11
12
13
14
15
16
17
18
19
20
21
22
23
24
25
26
27
28
29
30
31
32
33
34
35
36
private[timer] class TimerTaskEntry(val timerTask: TimerTask, val expirationMs: Long) extends Ordered[TimerTaskEntry] {

// entry 和 list(bucket) 互相引用
@volatile
var list: TimerTaskList = null

// 双向链表的前向和后向节点
var next: TimerTaskEntry = null
var prev: TimerTaskEntry = null

// if this timerTask is already held by an existing timer task entry,
// setTimerTaskEntry will remove it.
//
// TimerTask 和 TimerTaskEntry 也互相引用
if (timerTask != null) timerTask.setTimerTaskEntry(this)

// 任务是否取消: TimerTask 对 TimerTaskEntry 的引用是否存在
def cancelled: Boolean = {
timerTask.getTimerTaskEntry != this
}

// 移除(取消)任务,实际就是
// 1. 将当前 entry 从 TimerTaskList 中移除
// 2. 将 entry 中的 list、next、prev 置空
def remove(): Unit = {
var currentList = list
// If remove is called when another thread is moving the entry from a task entry list to another,
// this may fail to remove the entry due to the change of value of list. Thus, we retry until the list becomes null.
// In a rare case, this thread sees null and exits the loop, but the other thread insert the entry to another list later.
while (currentList != null) {
currentList.remove(this)
currentList = list
}
}
......
}

4. 延时任务 TimerTask

TimerTask 就是整个时间轮最底层粒度的延时任务了,到这里,我们简单画一下时间轮的结构:

1
2
3
4
5
6
7
8
9
10
11
12
13
14
15
16
17
18
19
20
21
22
23
24
25
26
27
28
29
30
31
32
33
34
35
36
37
38
// TimingWheel
// ├── tickMs 当前层最小时间粒度
// ├── wheelSize 当前层 bucket 的数量
// ├── interval tickMs * wheelSize,即当前层 TimingWheel 所覆盖的总时长
// ├── currentTime 当前层 TimingWheel 的起始时间
// ├── buckets
// │ ├── Bucket[0]
// │ │ ├── TimerTaskEntry[0] ── TimerTask
// │ │ ├── TimerTaskEntry[1] ── TimerTask
// │ │ ├── TimerTaskEntry[2] ── TimerTask
// │ │ ......
// │ ├── Bucket[1]
// │ │ ├── TimerTaskEntry[0] ── TimerTask
// │ │ ├── TimerTaskEntry[1] ── TimerTask
// │ │ ├── TimerTaskEntry[2] ── TimerTask
// │ │ ......
// │ ......
// │
// ├── overflowWheel ── TimingWheel
// ├── tickMs 当前层最小时间粒度
// ├── wheelSize 当前层 bucket 的数量
// ├── interval tickMs * wheelSize,即当前层 TimingWheel 所覆盖的总时长
// ├── currentTime 当前层 TimingWheel 的起始时间
// ├── buckets
// │ ├── Bucket[0]
// │ │ ├── TimerTaskEntry[0] ── TimerTask
// │ │ ├── TimerTaskEntry[1] ── TimerTask
// │ │ ├── TimerTaskEntry[2] ── TimerTask
// │ │ ......
// │ ├── Bucket[1]
// │ │ ├── TimerTaskEntry[0] ── TimerTask
// │ │ ├── TimerTaskEntry[1] ── TimerTask
// │ │ ├── TimerTaskEntry[2] ── TimerTask
// │ │ ......
// │ ......
// │
// ├── overflowWheel 高一层时间轮
//

下面就是 TimerTask 啦,注意它只是一个继承了 runnable 的接口哦,具体的任务会有具体的 run 方法。

1
2
3
4
5
6
7
8
9
10
11
12
13
14
15
16
17
18
19
20
21
22
23
24
25
26
27
28
29
30
31
32
33
34
trait TimerTask extends Runnable {

// 计划执行任务的时间
val delayMs: Long // timestamp in millisecond

// TimerTask 和链表的表项 TimerTaskEntry 互相引用
private[this] var timerTaskEntry: TimerTaskEntry = null

// 取消任务: 即取消和 TimerTaskEntry 的互相引用
// 1. 调用 timerTaskEntry.remove(),取消 timerTaskEntry 和链表 TimerTaskList 的互相引用
// 2. 将 timerTaskEntry 置空
def cancel(): Unit = {
synchronized {
if (timerTaskEntry != null) timerTaskEntry.remove()
timerTaskEntry = null
}
}

// 关联 TimerTaskEntry
private[timer] def setTimerTaskEntry(entry: TimerTaskEntry): Unit = {
synchronized {
// if this timerTask is already held by an existing timer task entry,
// we will remove such an entry first.
if (timerTaskEntry != null && timerTaskEntry != entry)
timerTaskEntry.remove()

timerTaskEntry = entry
}
}

// 获取 timerTaskEntry 实例
private[timer] def getTimerTaskEntry: TimerTaskEntry = timerTaskEntry

}

四、TimingWheel 的使用

下面,我们以 创建 topic 作为切入点,来一起学习一下时间轮(TimingWheel) 是如何在 Kafka 中应用的。

1
2
3
4
5
6
7
8
9
10
11
12
13
14
15
16
17
18
19
20
21
22
23
24
25
26
27
28
29
30
31
32
33
34
35
36
37
38
39
40
41
42
43
44
45
46
47
48
49
50
51
52
53
54
55
56
57
58
59
60
61
62
63
64
65
66
67
68
69
70
71
72
73
74
75
76
77
78
79
80
81
82
83
84
85
86
87
88
89
90
91
92
93
94
95
def createTopics(// 请求的超时时间
timeout: Int,
// 允许模拟创建以校验参数(仅执行参数检查和副本分配计算)
validateOnly: Boolean,
// 待创建的 topic 信息,key 为 topic 名,value 包含分区数、副本因子、配置等
toCreate: Map[String, CreatableTopic],
// 如果请求者有 DescribeConfigs 权限,该参数会存储 topic 的配置信息和元数据,以便返回给客户端
includeConfigsAndMetadata: Map[String, CreatableTopicResult],
// 用于控制 controller 请求 zk 的速率,防止把 zk 打挂了
controllerMutationQuota: ControllerMutationQuota,
// 请求结束后的回调方法,用户返回 response 给请求方
responseCallback: Map[String, ApiError] => Unit): Unit = {

// 获取存活的 broker 信息,用于分配 partition
val brokers = metadataCache.getAliveBrokers.map { b => kafka.admin.BrokerMetadata(b.id, b.rack) }

// 遍历待创建的 topic,进行参数校验和副本分配
val metadata = toCreate.values.map(topic =>
try {
// 参数校验,比如:
// 1. topic 必须不存在
// 2. topic 配置项中不能有 null
// 2. 不能同时指定分区数、复制因子和手动分配的副本列表
......

// 如果未指定分区数,使用默认值
val resolvedNumPartitions = if (topic.numPartitions == NO_NUM_PARTITIONS)
defaultNumPartitions else topic.numPartitions

// 如果未指定副本因子,使用默认值
val resolvedReplicationFactor = if (topic.replicationFactor == NO_REPLICATION_FACTOR)
defaultReplicationFactor else topic.replicationFactor

// 分配副本
val assignments = if (topic.assignments.isEmpty) {
// 分配副本,这里我们有机会再详细研究下
AdminUtils.assignReplicasToBrokers(
brokers, resolvedNumPartitions, resolvedReplicationFactor)
} else {
// 用户自定义副本分配
val assignments = new mutable.HashMap[Int, Seq[Int]]
// Note: we don't check that replicaAssignment contains unknown brokers - unlike in add-partitions case,
// this follows the existing logic in TopicCommand
topic.assignments.forEach { assignment =>
assignments(assignment.partitionIndex) = assignment.brokerIds.asScala.map(a => a: Int)
}
assignments
}

......

// 判断是否只是验证请求,而不实际创建 topic
if (validateOnly) {
CreatePartitionsMetadata(topic.name, assignments.keySet)
} else {
// 限流器记录一次调用
controllerMutationQuota.record(assignments.size)

// 创建 /config/topics/[topic_name]
// 创建 /brokers/topics,并写入数据(eg:{"version":2,"partitions":{"0":[2]},"adding_replicas":{},"removing_replicas":{}})
adminZkClient.createTopicWithAssignment(topic.name, configs, assignments, validate = false)
CreatePartitionsMetadata(topic.name, assignments.keySet)
}
} catch {
......
}).toBuffer

// 如果满足下列三点中的一个,则立刻返回
// a. 用户要求立刻返回(在请求里设置了 timeout < 0)
// b. 用户只是为了验证 topic 的参数
// c. 所有的请求都成功了没有error
if (timeout <= 0 || validateOnly || !metadata.exists(_.error.is(Errors.NONE))) {
val results = metadata.map { createTopicMetadata =>
// ignore topics that already have errors
if (createTopicMetadata.error.isSuccess && !validateOnly) {
(createTopicMetadata.topic, new ApiError(Errors.REQUEST_TIMED_OUT, null))
} else {
(createTopicMetadata.topic, createTopicMetadata.error)
}
}.toMap
responseCallback(results)
} else {
// else pass the assignments and errors to the delayed operation and set the keys
// 用户设置了超时时间,超时之后再返回,创建延时请求
val delayedCreate = new DelayedCreatePartitions(timeout, metadata, this,
responseCallback)

// DelayOp 对应有一个 key,在这种场景下,就是 topic.name
val delayedCreateKeys = toCreate.values.map(topic => TopicKey(topic.name)).toBuffer

// 尝试立刻完成请求,如果不成功,则放入 Purgatory 中。
// Purgatory 可以理解为一个临时暂存区,用于暂存这些 Delay Operation
topicPurgatory.tryCompleteElseWatch(delayedCreate, delayedCreateKeys)
}
}

1. Purgatory

创建 topic 的代码最后,提到了一个 topicPurgatory,那么这是什么东西呢?

1
2
3
4
5
6
7
8
9
10
11
class AdminManager(val config: KafkaConfig,
val metrics: Metrics,
val metadataCache: MetadataCache,
val zkClient: KafkaZkClient) extends Logging with KafkaMetricsGroup {

this.logIdent = "[Admin Manager on Broker " + config.brokerId + "]: "

private val topicPurgatory = DelayedOperationPurgatory[DelayedOperation]("topic", config.brokerId)

......
}

DelayedOperationPurgatory 实际上是一个用来管理**带有延迟时间的、带有具体操作内容的延迟请求(delayed operation)**的 helper 类。

DelayedOperationPurgatory 类是一个泛型类,它的参数类型是 DelayedOperation 的具体子类。因此,通常情况下,每一类延迟请求都对应于一个 DelayedOperationPurgatory 实例。这些实例一般都保存在上层的管理器中。比如,与消 费者组相关的心跳请求、加入组请求的 Purgatory 实例,就保存在 GroupCoordinator 组件中;我们上文提到的管理 topic 延迟请求的 Purgatory 实例,就保存在 AdminManager 组件中。

1
2
3
4
5
6
7
8
9
10
11
12
13
14
object DelayedOperationPurgatory {

private val Shards = 512 // Shard the watcher list to reduce lock contention

def apply[T <: DelayedOperation](purgatoryName: String,
brokerId: Int = 0,
purgeInterval: Int = 1000,
reaperEnabled: Boolean = true,
timerEnabled: Boolean = true): DelayedOperationPurgatory[T] = {
val timer = new SystemTimer(purgatoryName)
new DelayedOperationPurgatory[T](purgatoryName, timer, brokerId, purgeInterval, reaperEnabled, timerEnabled)
}

}

我们注意到,每一个具体的 Purgatory 实例中,都有一个 SystemTimer 对象,这个 SystemTimer 其实就持有着 TimingWheel 对象、延迟队列 DelayQueue 对象等,负责管理这个 Purgatory 的添加新任务推进时钟执行任务等工作。

2. SystemTimer

1
2
3
4
5
6
7
8
9
10
11
12
13
14
15
16
17
18
19
20
21
22
23
24
25
26
27
28
29
30
31
32
33
34
35
36
37
38
39
40
41
42
43
44
45
46
47
48
49
50
51
52
53
54
55
56
57
58
59
60
61
62
63
64
65
66
67
68
69
70
71
72
73
74
75
76
77
78
79
80
81
82
83
84
85
86
87
88
89
90
91
92
93
94
95
96
97
98
99
100
101
102
103
@threadsafe
class SystemTimer(executorName: String,
tickMs: Long = 1,
wheelSize: Int = 20,
startMs: Long = Time.SYSTEM.hiResClockMs) extends Timer {

// 单线程的线程池,负责执行到期的任务
private[this] val taskExecutor = Executors.newFixedThreadPool(1,
(runnable: Runnable) => KafkaThread.nonDaemon("executor-" + executorName, runnable))

// 延迟队列,负责监督 bucket 是否到期
private[this] val delayQueue = new DelayQueue[TimerTaskList]()

// 任务计数器,统计 SystemTimer 中的任务总数
private[this] val taskCounter = new AtomicInteger(0)

// 时间轮
private[this] val timingWheel = new TimingWheel(
tickMs = tickMs,
wheelSize = wheelSize,
startMs = startMs,
taskCounter = taskCounter,
delayQueue
)

......

// 添加新延迟任务。(向 TimingWheel 中插入一个新的任务)
def add(timerTask: TimerTask): Unit = {
readLock.lock()
try {
addTimerTaskEntry(new TimerTaskEntry(timerTask, timerTask.delayMs + Time.SYSTEM.hiResClockMs))
} finally {
readLock.unlock()
}
}

// 添加新延迟任务。如果加入失败,任务到期,则执行任务。
private def addTimerTaskEntry(timerTaskEntry: TimerTaskEntry): Unit = {
if (!timingWheel.add(timerTaskEntry)) {
// Already expired or cancelled
if (!timerTaskEntry.cancelled)
taskExecutor.submit(timerTaskEntry.timerTask)
}
}

// 重新插入
// 注意这个方法实际调用的是 addTimerTaskEntry,遇到到期的任务时,不会插入,而是直接执行,它的妙用我们下面会提到
private[this] val reinsert = (timerTaskEntry: TimerTaskEntry) => addTimerTaskEntry(timerTaskEntry)

/*
* Advances the clock if there is an expired bucket. If there isn't any expired bucket when called,
* waits up to timeoutMs before giving up.
*
* 如果有过期的 bucket,则推进时钟
* (外层的 Purgatory 会启动一个线程,循环调用这个方法,从而达到每时每刻推进时钟的目标)
*/
def advanceClock(timeoutMs: Long): Boolean = {

// 这里只有从延迟队列中,poll 到了过期的 bucket 才会去推进时钟,这其实是一个懒推动的过程
// 假设一直没有任务,则一直不需要推动。直到有任务插入时,这时候会将 bucket 插入到 DelayQueue 中
// 又等到 bucket 到期时,才会被 poll 到,执行推动时钟的任务
var bucket = delayQueue.poll(timeoutMs, TimeUnit.MILLISECONDS)
if (bucket != null) {
writeLock.lock()
try {
while (bucket != null) {
// 推进时钟(其实就是更新 TimingWheel 的起始时间点)
timingWheel.advanceClock(bucket.getExpiration)

// 清理任务并还原 Bucket
//
// 1. bucket.elements.foreach{
// (这里就是上面提到的 reinsert 方法的逻辑)
// 1. 从双向链表中移除
// 2. 从最底层 TimingWheel 开始查找,尝试重新插入
// a. 如果原 bucket 属于最底层 TimingWheel,根据逻辑该任务确实已经到期了,这时候会插入失败,然后直接执行
// b. 如果原 bucket 属于更高层 TimingWheel,那么其中的任务时间跨度可能较大,是否到期取决于任务自身的过期时间
// 有可能插入失败,直接执行,也有可能插入到更低层 TimingWheel 中
// }
// 2. 清除 bucket.expiration
//
// 由于我们先推进了时钟,更新了 TimingWheel 的起始时间点 currentTime,
// 所以再次插入任务的时候,有的任务就不符合插入条件了(已到期 expirationMs > currentTime)这时候就会直接执行任务;
// 还有的任务会被插入到低层的时间轮中,相当与做了重新聚合。
// 这就是 reinsert 的妙用。
//
bucket.flush(reinsert)

// 防止上一步 bucket 中的任务执行期间,下一个 bucket 也到期了
// 这里立刻 poll 一次,poll 到了就继续执行任务,poll 不到就跳出循环
bucket = delayQueue.poll()
}
} finally {
writeLock.unlock()
}
true
} else {
false
}
}
......
}

现在,我们再回到 DelayedOperationPurgatory

3. DelayedOperationPurgatory

DelayedOperationPurgatory 的代码略长,我们将它切分成几块来看,首先是定义:

1
2
3
4
5
6
7
8
9
10
11
12
13
14
15
16
17
18
19
20
21
22
23
24
25
26
27
28
29
30
31
32
33
34
35
36
37
38
39
40
41
42
43
44
45
46
47
48
49
50
51
52
53
54
55
56
57
58
59
60
61
62
63
64
65
66
67
68
69
70
71
72
73
74
75
76
77
78
79
80
81
82
83
84
85
86
87
88
89
90
91
92
93
94
95
96
97
98
99
100
101
102
103
104
105
106
107
108
109
110
111
112
113
114
115
116
117
118
119
120
121
122
123
124
125
126
127
128
129
130
131
132
133
134
135
136
137
final class DelayedOperationPurgatory[T <: DelayedOperation](purgatoryName: String,
// SystemTimer 实例
timeoutTimer: Timer,
brokerId: Int = 0,
// 用于控制删除线程移除 Bucket 中的过期延迟请求的频率
purgeInterval: Int = 1000,
// 是否启动线程清理 timout 的任务(目前所有的 Purgatory·都启动)
reaperEnabled: Boolean = true,
// 是否启用延时任务
timerEnabled: Boolean = true)
extends Logging with KafkaMetricsGroup {
......

/**
* 这里的 WatcherListS 实际上就是一个引用,引用着加入到 TimingWheel 中的任务,
* 以方便便在任务真正到期之前,还有机会提前结束它。
*
* watcher 这块代码结构上比较复杂,与主线无关,我们就不细看它的代码的,只需要了解他的作用即可。
*/
private val watcherLists = Array.fill[WatcherList](DelayedOperationPurgatory.Shards)(new WatcherList)

......

// 用于记录当前 purgatory 中的 operation 总数
private[this] val estimatedTotalOperations = new AtomicInteger(0)

/* background thread expiring operations that have timed out */
// (reaper 是收割的意思)这个线程会循环检查超时操作,并执行具体的任务
private val expirationReaper = new ExpiredOperationReaper()

// 启动超时任务处理线程
if (reaperEnabled)
expirationReaper.start()

/**
* Check if the operation can be completed, if not watch it based on the given watch keys
*
* 检查 operation 是否可以完成,如果不行,则根据 watch key 添加到 watcher 中
*
* Note that a delayed operation can be watched on multiple keys. It is possible that
* an operation is completed after it has been added to the watch list for some, but
* not all of the keys. In this case, the operation is considered completed and won't
* be added to the watch list of the remaining keys. The expiration reaper thread will
* remove this operation from any watcher list in which the operation exists.
*
* 需要注意的是,一个 delayed operation 可以同时被多个 watcher watch,并且 watch key 不相同。
* 所以有可能出现: 一个 operation 先被添加到一部分 watcher 中,然后 completed 了,但还有一部分 watcher 待添加
* 这种情况下,operation 就不会被添加到剩余的 watcher 中,
* expiration reaper thread 将会从所有的 watcher 中移除该 operation。
*
*
* 这个方法的大致意图是:判断一个延时请求 DelayOperation 能否在当前线程中立刻完成,
* a. 如果可以立刻完成,则返回 True
* b. 如果不能立刻完成,则将它添加到 TimingWheel 中,并 watch 起来,等待执行的时刻。
*
* @param operation the delayed operation to be checked
* @param watchKeys keys for bookkeeping the operation
* @return true iff the delayed operations can be completed by the caller
* 注意,只有 DelayOp 是本线程 tryComplete() 的时候完成的,才会返回 True,
* 其他情况都是 False(比如被别的线程 tryComplete()==true 了)
*/
def tryCompleteElseWatch(operation: T, watchKeys: Seq[Any]): Boolean = {
assert(watchKeys.nonEmpty, "The watch key list can't be empty")

// The cost of tryComplete() is typically proportional to the number of keys. Calling tryComplete() for each key is
// going to be expensive if there are many keys. Instead, we do the check in the following way through safeTryCompleteOrElse().
// If the operation is not completed, we just add the operation to all keys. Then we call tryComplete() again. At
// this time, if the operation is still not completed, we are guaranteed that it won't miss any future triggering
// event since the operation is already on the watcher list for all keys.
//
// tryComplete() 方法的耗时,通常和 keys 的数量成正比。
// 如果 key 很多,那么逐个调用 tryComplete() 的开销会很大,所以,我们用下面的 safeTryCompleteOrElse() 方法来做检查
// 如果 DelayOperation 尚未 completed,我们将 DelayOperation 添加到所有 keys 中,然后再次调用 tryComplete() 方法,
// 此时,即便 operation 还是没有 completed,下一次它也一定会触发的。

// safeTryCompleteOrElse:
// 1. 调用 tryComplete(),尝试立刻完成延时请求,如果成功,返回 true,**不需要监听**
// 2. 如果失败,则执行下面 {} 中的逻辑,**全部 watch 上**
// 3. 再去调一次 tryComplete(),如果 **成功了就返回 true,否则返回 false**
if (operation.safeTryCompleteOrElse {

// 1. 根据 key 从 watchList 中找到 watchers 对象(如果不存在则调用 new Watchers(key) 新建一个)
// 2. 调用 watchers.watch(op),把 op 添加到 op list 中
watchKeys.foreach(key => watchForOperation(key, operation))

// 计数器,用于统计当前 过渡区(purgatory) 中 operation 的数量
if (watchKeys.nonEmpty) estimatedTotalOperations.incrementAndGet()

}) return true

// if it cannot be completed by now and hence is watched, add to the expire queue also
// 因为已经 watch 上了,如果此时没有成功,就把 op 添加到定时任务中
if (!operation.isCompleted) {

// 默认启动
if (timerEnabled) {

// timeoutTimer 其实就是 SystemTimer
// 而 operation 就是 TimerTask
// 这里其实就是把 TimerTask 插入到 TimingWheel 中
timeoutTimer.add(operation)
}

// 再检查一遍,如果已经完成了,就取消任务
if (operation.isCompleted) {
// 取消 timer task
operation.cancel()
}
}

// 只有 DelayOp 是本线程完成的时候,才会返回 True,其他情况都是 False
false
}

/**
* Check if some delayed operations can be completed with the given watch key,
* and if yes complete them.
*
* 这个方法,就给外部提供了一个入口,
* 可以在任务被插入到定时任务之后,到期之前,还有机会提前完成掉
*
* @return the number of completed operations during this process
*/
def checkAndComplete(key: Any): Int = {
// 根据 key 的 hash 以及 key 自身的值,找到 watcher
val wl = watcherList(key)
val watchers = inLock(wl.watchersLock) { wl.watchersByKey.get(key) }

val numCompleted = if (watchers == null)
0
else
watchers.tryCompleteWatched()
debug(s"Request key $key unblocked $numCompleted $purgatoryName operations")
numCompleted
}

}

然后是超时任务处理线程 ExpiredOperationReaper,它继承自 ShutdownableThread,ShutdownableThread 在 run 方法中循环调用了 doWork(),以达到持续推进时钟的目的:

1
2
3
4
5
6
7
8
9
10
11
12
13
14
15
16
17
18
19
20
21
22
23
24
25
26
27
28
29
30
31
32
33
34
35
/**
* A background reaper to expire delayed operations that have timed out
*/
private class ExpiredOperationReaper extends ShutdownableThread(
"ExpirationReaper-%d-%s".format(brokerId, purgatoryName),
false) {

override def doWork(): Unit = {
advanceClock(200L)
}
}

abstract class ShutdownableThread(val name: String, val isInterruptible: Boolean = true)
extends Thread(name) with Logging {
······
override def run(): Unit = {
isStarted = true
info("Starting")
try {
while (isRunning)
doWork()
} catch {
case e: FatalExitError =>
shutdownInitiated.countDown()
shutdownComplete.countDown()
info("Stopped")
Exit.exit(e.statusCode())
case e: Throwable =>
if (isRunning)
error("Error due to", e)
} finally {
shutdownComplete.countDown()
}
info("Stopped")
}

4. 推进时钟 advanceClock

advanceClock 也是 DelayedOperationPurgatory 中定义的方法:

1
2
3
4
5
6
7
8
9
10
11
12
13
14
15
16
17
18
19
20
21
22
23
24
25
26
27
28
29
30
31
32
33
34
def advanceClock(timeoutMs: Long): Unit = {

// 这里的 timeoutTimer 就是 SystemTimer
timeoutTimer.advanceClock(timeoutMs)

// Trigger a purge if the number of completed but still being watched operations is larger than
// the purge threshold. That number is computed by the difference btw the estimated total number of
// operations and the number of pending delayed operations.
//
// estimatedTotalOperations: 是当前 Purgatory 中的任务总数
// numDelayed: 是 SystemTimer 中的任务总数,同时也是 TimingWheel 中的任务总数(他们是同一个 AtomicInteger)
//
// 任务在被加入 Purgatory 之后,在被加入 TimingWheel(SystemTimer) 之前,还会做一次尝试,
// 如果任务可以结束,就不会加入 TimingWheel。此时因此这两个值之间有可能会出现差值
// 还有一种情况,就是 TimingWheel 中有很多任务完成了,numDelayed 就会逐渐减少,此时同样会出现差值
//
// 如果这个差值超过了清理阈值(purgeInterval),则清理一下 watcher
if (estimatedTotalOperations.get - numDelayed > purgeInterval) {
// now set estimatedTotalOperations to delayed (the number of pending operations) since we are going to
// clean up watchers. Note that, if more operations are completed during the clean up, we may end up with
// a little overestimated total number of operations.
//
// 由于即将清理 watcher(监听器)列表,因此先将 estimatedTotalOperations 设置为当前的未完成操作数(numDelayed)
// 需要注意的是,如果在清理过程中有新的操作完成,最终的 estimatedTotalOperations 可能会略高于实际值
estimatedTotalOperations.getAndSet(numDelayed)

// 遍历 watcherLists(监听器列表),对每个 watcher 进行 purgeCompleted() 操作,并统计清理的总数
debug("Begin purging watch lists")
val purged = watcherLists.foldLeft(0) {
case (sum, watcherList) => sum + watcherList.allWatchers.map(_.purgeCompleted()).sum
}
debug("Purged %d elements from watch lists.".format(purged))
}
}